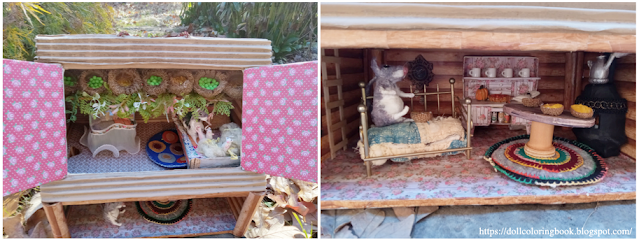
The following is a photo record of my progress through the crafting of a country mouse shoebox house. It is both simple and a delight for a child or doting parent to build.
Both this country house and a town house that I will later post about as well, are based upon the old folk tale "The town mouse and the country mouse" and the Steiff mouse house toys sold during the 1950s.
I tried to use craft materials found in and around my home to decorate the little houses; I will include instructions for these soon.
 |
| Take a peek inside our country mouse shoebox house. |
- a large standard size shoebox
- extra cardboard
- white school glue
- masking tape
- faux 'log' papers for walls
- faux 'wooden plank' papers for floors
- cardboard with heavy rippled texture (optional)
- Mod Podge
- Heavy cording for handle
- coffee stirring sticks (ladders)
- plastic plants from the Dollar Store
- burr oak shells for mouse food storage
- hot glue gun and hot glue
- Styrofoam beads for peas and seeds
- acrylic paints: greens and browns
 |
| The country mouse house has two floors: the sleeping quarters are located in a loft that can be easily accessed through two double "barn loft doors.'' The lower half of the country, log-cabin styled home is a sitting room and kitchen with a pot belly stove to keep the mice warm during winter months. |
Step-by-Step Instructions:
- Cut a ceiling/floor for the top opening of the shoebox and attach this with tape and white school glue. Let it dry completely, overnight if necessary.
- Cut the edges apart from the lid of your shoebox and cut an identical copy from extra cardboard the same size to mask together the ''A'' shaped roof.
- Once you tape this in place on top of the open faced shoebox, you will be able to accurately trace around the roof-line with a pencil on top of additional cardboard to seal-off the sides of the shoebox mouse house. Do this for both ends of the house.
- Then cut away one of the longer sides of the shoebox to create a large hole for children to play both inside and out of the little house.
- Cut two identically sized shapes for the barn doors from the same side of the roof as the opening on the lower floor. (see photos below)
- Leave the far left and right sides attached to the roof so that the doors need only be bent outwards to access the inside loft.
- Decorate the barn loft doors with coffee stirrers in "X'' shaped pattern design, just like real barn doors.
- Cut away a small hole at one end of the loft floor for mice to access the upper room via a coffee stirrer ladder.
- Cut an even smaller hole at the opposite end of the attic space for the stove pipe to fit through.
- Fit a long narrow rafter inside the pitched roof where the burr oak shells may be hot glued on top of. You could use halved walnut shells if you haven't got any burr oak shells instead.
- Fill the shells with Styrofoam beads and white school glue. After these have dried, paint them green, moss colors and brown. These are the seeds and peas the country mouse stores during the winter for survival.
- Decoupage all of the walls and floors inside the little cardboard home using decorative papers of your own liking. I papered the lower half of the house using the same log print on the walls and yet another faux wood print for the floors.
- Now you can fill the country mouse's house with all kinds of sweet old-fashioned furnishings; I'll post my versions later in the week...
 |
| Left, see the closure details for the upper loft barn doors. This allows for secure storage of furniture and mouse dolls when the playset is no in use. Center, the upper loft has unique faux wooden floors designed with a ''shabby chic'' printed surface. Right, you can see the penny wool rug, the chic vanity and Popsicle bed with faux multi colored wood print. I'd describe this style to be somewhere between granny chic and antiquated homespun; just what I would expect from a country mouse. |
 |
| There is a rafter spanning the pitched roof in this country mouse house and on it I hot glued as many oak burrs as possible to store all of the peas, seed, etc... that the mice could store. (View from above) In between these I hot glued plastic moss and plants purchased at my local Dollar Store. Right is a photo taken with the house turned on its side. |
Country and Town Mouse Products:
- Town and Country wooden house for children five and under . . . made of sturdy wood for rougher play and go here to see additional furniture and mouse figures
- Purchase town and country mice at Amazon for those of you who have little time to make your own mice . . .
- Here is a pin of the original "Country Mouse'' by Steiff FAO Schwartz (1950) uploaded by Nicole Souders
- Ellen Rardin shares a picture of the same Steiff Country Mouse House decorated for Christmas (1964)


No comments:
Post a Comment
Thanks for your thoughts. All comments are moderated. Spam is not published. Have a good day!