Showing posts with label Fashion Boutique. Show all posts

Monday, December 4, 2023

Fashionable Handbags for Dolls!

These plaid, coin purses will compliment any doll Chanel suit or 
70s inspired shift dress... The leather straps and nickel plated
clasps make them look like miniature versions of real handbags!


Groovy, Op designs for all sorts of dolls will blend in nicely
with leisure suits, hip mini skirts and Go-go boots.
       Originally, these small novelty purses were intended to protect lipsticks or hold coins inside of ladies handbags. However, I think they are better suited to fashionable 18" doll outfits. Accessories like these will also look adorable inside of our doll's boutique!
       Why not fill your doll's purse with the kinds of things any well-prepared fashionista would carry?
Leopard print handbags with sequin backgrounds come in pale pink, grey, turquoise and hot pink.

Glitter bags with circle patterns in purple, orange, hot pink 
and Kelly green.

Traditional modern bags with square and circular pink, black and purple prints.

Left, coin purses in hot pink, red, orange and white polka dots. 
Right, purple and silver zebra stripes decorate this doll purse.

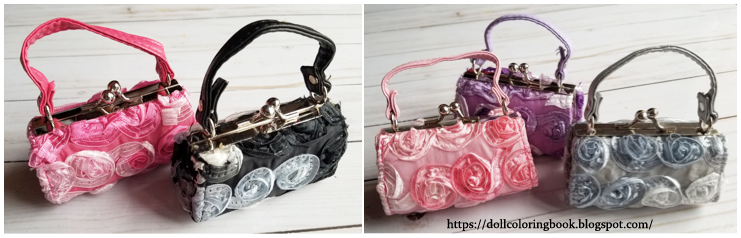
Pastel and grey, black and white ribbon rosettes decorated these second-hand doll bags.

Thursday, September 14, 2023

How to make doll sized lipsticks

Finished 18" doll sized lipsticks for a doll's purse, of course!
       This project requires a steady hand and patience for detail. Again, it also involves the careful use of hot glue and should only be attempted with parental supervision. An older teen could accomplish it far easier than a child so this craft is recommended for older students. 
       The caps of the lipsticks do not necessarily need to be sealed with hot glue; this craft is just as cute without this small detail and therefore would make it safe for a younger child to manipulate if left off to begin with...

 Supply List:
  • hot glue gun and hot glue
  • skewers
  • utility scissors or small hacksaw 
  • acrylic paints: black, pinks and reds
  • metal tape
  • transparent straw or two
  • white school glue
  • black paper
Step-by-Step Instructions:
  1. Cut the skewers down to the size of lipsticks that would fit neatly into an 18" doll's purse or makeup kit. Ours are approximately 3/4" long.
  2. The lipstick is divided into three parts: the top is the makeup for staining the lips, the middle is the tube and the bottom is the part of the tube that is twisted to lift the makeup up and down, in and out as it is used. These sections are made by gluing layers of paper on top of each other with white school glue. This is a detailed by easy process that requires a bit of patience.
  3. After the levels of paper have dried, paint the makeup tube dispenser black or any color you would like. 
  4. Then paint the lipstick makeup a shade of pink, mauve, or red.
  5. Cut a transparent straw to fit over the tube and stop at the part of the stick where the tube and twisting mechanism meet. 
  6. I cut a tiny piece of metal tape to hold the lid onto the tube. This can be easily remove during play and reattached when done. 
  7. To seal the transparent straw at the top, squeeze out a small amount of hot glue onto a slick surface and push the top into the glue. 
  8. Wait a few seconds and then remove the top from the glue. Pull the unwanted portions off of the outside of the straw and leave the inside to seal the tube.
Mini wooden lipsticks in progress... Left, unpainted. Right, beginning to paint.

Make More Doll Cosmetics:

Monday, August 7, 2023

Sew Bohemian Bags for Your Dolls

This groovy, Bohemian bag is a through-back design from the 1960's and 70's.
In its's time it was  considered reminiscent of Victorian crazy quilts.
Which just goes to show that fashion, like history, repeats itself. 
 

       I made this simple purse for our 18" dolls  by drawing half of the large letter "U" on a folded piece of paper. This became my pattern. 
  1. Cut two felt pieces alike, using a similar pattern, for your doll to trace around on top of felt. Choose whatever colors you would like, of course. 
  2. You will also need to cut several lengths of felt approximately 1/2 in width to sew between your felt pieces all the way around the "U" shape, excluding the top opening of the purse.
  3. Around the upper edge of the opening of the purse, sew on a lace trim. 
  4. Attach a purse strap using the same measurements as you used to sew the side panel into the purse itself. 
  5. Now decorate the felt doll purse with lace, embroidery, crochet flowers, beads etc... 
  6. Make a loop from yarn or fabric to attach to the inside, center of one edge of the doll's purse. 
  7. Then attach a decorative button or bead to the opposite side, in the middle, so that the loop may be slipped over the button to close the purse.

Friday, May 27, 2022

How to Sew Hair Bows for Your Dolls

An Our Generation doll wears a patriotic hair bow.
 
       You will need to collect: an assortment of wide ribbons, needle and thread (preferably matching thread), and 2" Bobbie pins for this craft.


 Step-by-Step Instructions:

  1. Cut the ribbon to a length you prefer. This length, plus the width of the ribbon will determine the size of your doll's hair bows in the end.
  2. Loop the cut ribbon for a center-back bow.
  3. Run a gather thread across the center of the bow.
  4. Cover the center with a loop of the ribbon.
  5. See the illustration above to view what the back side of the bow should look like prior to attaching it to a 2" short, mini Bobbie pin
  6. Sew a "loop" around the inside of one half of the Bobbie pin, while attaching it to your doll's hair bow. Knot the end firmly after attaching the bow in a spot where these stitches can not be seen.
  7. Slide the hair bow into your doll's hair!

Saturday, September 18, 2021

DIY Wide Velour Fabric Headbands

       Cut a piece of velour 12"x 4 1/2" and then sew a seam with right sides facing at the narrow ends of the rectangle. Turn the right sides out so that your headband may now be folded in half lengthwise. With the right sides facing out, sew the front halves along the open edges together using a blanket stitch. I then sewed a blanket stitch down the folded half so that my headband would have the same decorative trim on both sides, but obviously, you only need to sew the open edges together. If you wish, you may turn the open seam in on itself and whip stitch along this edge to give your headband an entirely different style.

Left, the finished velour headband on our Kit doll. Center, I also gathered the seams with
a needle and thread for this version of the headband; this step is purely decorative.
 Right, attached felt, lavender rose.

       You can decorate your headbands with soft, fleecy or felt roses too. Cut nine, nickel sized circles from your choice of felt or fleece. Then cut these in half. Sew together the half circle shapes along the bottom straight edges only; overlapping the petal shapes slightly. Then gently pull the threads to make the circle shaped petals of your felt rose gather slightly. Back stitch the thread at one end. Now use a hot glue gun to roll the straight edges into a tight bundle and tack these petals together on the bottom of the felt rose. Let dry. Gently pull the petals at the top apart to form the fully flowered rose. Attach the blossom to your velour headbands at the gathered seam.

Left, Cut nine, nickel sized circles from your choice of felt or fleece. Center, Then cut these
 in half. Right, Sew together the half circle shapes along the bottom straight edges only;
 overlapping the petal shapes slightly.

Left, Then gently pull the threads to make the circle shaped petals of your felt rose
gather slightly. Center, Gently pull the petals at the top apart to form the fully flowered
rose. Right, Cut tear-drop shaped leaves for the rose using dark green felt.

More Headband Crafts for 18" Dolls:

Tuesday, August 24, 2021

How to sew Scrunchies for dolls...

        The Scrunchie was patented in 1987 by Rommy Revson. She created the first prototype of the Scrunchie because she wanted a gentler version of the metal hair ties used in the 1980s. Revson named the decorative hair accessory the Scunci after her pet toy poodle. The name Scrunchie was a natural evolution, because the fabric scrunched up. After patenting the Scrunchie, Revson spent most of her time in legal disputes, both with manufacturers and her own lawyers. Scrunchies were particularly popular in the 1980s and 1990s, including larger, more elaborate versions.Scrunchies regained popularity in the mid 2010s. Wikipedia

Make two Scrunchies alike so that your doll can tie two ponytails in her hair. Dolls may also wear their
Scrunchies on their wrists until they are ready to tie their hair up. Scrunchies were very
popular in the 1980s and 90s.

        The following supplies are approximations; it really doesn't matter too much if your fabric scraps are a little larger or smaller for this craft.  Everyday Scrunchies that your dolls wear to school or around the home are used to keep her locks neatly in place. The hair wraps should be long enough for you to double up the Scrunchie at least once around your doll's hair.

Supply List:

  • 8" x 2 1/2" lengths of scrap fabric
  • needle and thread to match
  • elastic approx. 1/4" at least four to five inches long
  • safety pin
Step-by-Step Instructions:
  1. Cut a 8" x 2 1/2" length of fabric to make one 18" doll sized Scrunchie. 
  2. Fold it in half, right sides together, length wise and iron it flat.
  3. Sew a straight stitch lengthwise, leaving an approximate 1/4" seam from the raw edge, from end to end.
  4. To turn this narrow tube of fabric inside out, use a safety pin. Thread the tip of the safety pin into one end, one side of the tube only. Close the latch.
  5. Now thread the safety pin inside the long tube, until it comes through the opposite end of the Scrunchie. Your tube of fabric should now be turned right sides out. 
  6. Iron the Scrunchie tube flat. 
  7. Next, you will need to thread the elastic through the fabric 'tunnel'. Use a safety pin to work the elastic through the tube in much the same way as done before. Stick the point of the pin firmly into one end of the elastic and close the latch.
  8. 'Thread the elastic through the fabric tube opening, holding on to the beginning end while working the safety pin out the opposite end. 
  9. Tie the two elastic ends together firmly or you may wish the sew your elastic ends together if you are using something wider than a hair tie.
  10. Thread your needle and stitch the two fabric ends together neatly in order to create a finished doll Scrunchie.
Left, the safety pin threaded through the elastic and the elastic threaded through the Scrunchie.
Center, finished Scrunchies made from left-over scraps of fabric. Right, a Scrunchie worn over a
simple pony tail in our doll's hair.

Thursday, December 24, 2020

Two Rudolf Socks, Two Warm Hats!

Left, is one of our Magic Attic dolls wearing a sock hat with two pom poms.
Right is a Wellie Wisher doll sporting a sock hat with ear flaps and a braided tie.

       We've used one Christmas themed sock to make two hat designs for our Magic Attic doll and a Wellie Wisher. The version in the left photo was made by cutting the lower half of a sock, including the heal, four inches in length and then finishing the edges around the opening with a fancy embroidery stitch. The winter hat version in shown on the right was made from a four inch cut across the top of a Christmas sock. In this version I included Rudolf and his large red nose and I also cut ear muff flaps for the hat from the second sock's knit red heal. Attach the ear flaps on both the right and left sides of the knit sock hat with embroidery stitching. Then braid yarn in Christmas colors for the tie. Sew this yarn tie inside the cap with strong thread. Wrap, clip and attach a contrasting pom pom made from yarn to the top of each hat. Read how to make your own pom poms below.

Our doll's are ready for the cold weather this Christmas! 

       You can make a homemade pom pom for your doll's hat like ours. The supplies you will need include: scissors, yarn and cardboard. 

  1. Cut a piece of cardboard to wrap the yarn around. Mine was 2"x4" in the photo below.
  2. Position a short clipping of yarn across the length of the cardboard.This short yarn clipping will be used to tie the yarn pom pom together later.  
  3. Wrap the yarn around the cardboard's length many times trapping the yarn clipping beneath the wraps at the same time. The more you wrap the yarn around the cardboard, the thicker your pom pom will turn out.
  4. Now slip the lops off of the cardboard carefully.
  5. Tie the two ends of the yarn clipping beneath together in a tight knot.
  6. Cut the loops open.
  7. Trim and fluff the pom pom.
  8. Attach it to the top of your doll's cap with strong thread and a needle.
Left, Position a short clipping of yarn across the length of the cardboard.
The cardboard should be a light weight variety so that the yarn will slip off of it
when you are ready to make the pom pom. Center, Wrap the yarn around the
cardboard's length many times trapping the yarn clipping beneath the wraps at the
same time. Right, If your yarn is in several pieces, just knot them together as you
wrap them around the cardboard.
 
Left, Wrap the yarn around the cardboard at least 100 times in order to get a very
 puffy pom pom. Center, Now slip the yarn off of the cardboard carefully.
Right, I'm holding on to the short length of yarn so that I can tie all of
 the loops together at once.

Left, the loops are tied firmly together. Center, you can see the scissors cutting
the loops apart. Right, I have trimmed and fluffed out the yarn to
make a finished pom pom.

Craft More Warm Winter Hats for Dolls:

Sunday, September 29, 2019

Craft a Patriotic Duct Tape Tote for A Doll

Left, our Magic Attic doll Alison, carries a patriotic, duct tape tote bag to the 4th of July Picnic. 
Right, two versions of a duct tape tote bag for dolls. One has a long handle and the other 
two short handles. I have used both patriotic and unicorn duct tape to wrap recycled 
rice boxes for the craft.

       Our dolls could use a little tote bag to carry all kinds of things to a picnic site, the beach, or to spend the night at their grandmother's house. This tote craft is made from a discarded rice box and some patriotic, flag duct tape. The tape is easy to find in a hobby shop or your local hardware store.
       I recycled a clean, small, narrow box and covered it completely with masking tape to begin with. Then I cut and layer the duct tape to the outer parts of the entire box carefully.


       Then I took a longer piece of duct tape and cut this to the length that I thought most comfortable for our dolls to carry the tote over a shoulder. I then folded it length wise three times and used both tape and hot glue to secure it firmly in place at both ends of my tote's sides.


       The last step in crafting this patriotic, doll tote was to brush the interior with Mod Podge and layer some red paper on top of this to finish the inside surface neatly. I let it all dry overnight and now our dolls have a bag to carry towels, sunglasses, suntan oil etc... in to the park or beach!

Friday, March 8, 2019

Make Doll Easter Bonnets from Paper Dishes!

       You don't need to spend much money to make a Easter bonnet for a doll. Look around the house and in the cupboards for a few ordinary supplies and soon you will be crafting all kinds of bonnets for Spring for every doll in your collection! We had so much fun choosing color and pattern combinations for our dolls. Below our 14" doll models a pale blue and white hat for our first hat craft version.

"Dell" our Heart For Hearts doll, models this Easter bonnet made
 from paper dishes.
  Supply List:
  • paper cups and plates
  • white ribbon
  • white cupcake liners
  • decorative scrapbook paper
  • white school glue
  • hot glue and hot glue gun
  • masking tape
  • extra cardboard 
  • pinking shears (optional)
  • ribbon for the tie
Step-by-Step Directions:
  1. Select a paper cup by fitting it to the doll that you wish to make a hat for.
  2. Then cut the paper cup down to that size minus the rim. 
  3. Take the larger edge of the cup and place it in the center of your small paper plate. Trace around the circumference with a pen or pencil and cut the circle out. This will be the opening for the larger lip of the cup to fit through. 
  4. Next take the smaller side of the cup and trace this opening onto a piece of cardboard and trace around it. 
  5. Now cut this cardboard circle out and glue the edge of it to fit the smaller end of your cup on top. Let it dry and trim off the edges with a pair of scissors. 
  6. Fit the larger opening through the paper plate's hole with the brim of the hat facing down.  Use glue and masking tape to hold the pieces of your paper hat together. 
  7. When the initial hat form is dry, shred small pieces of white typing paper and glue these down to the edges where the two paper dishes meet to give them strength. Start with the inside of the hat form and work your way around to the outside of the paper hat.
  8. Use a pair of pinking shears to trim off the edges of the hat's brim after all of the glue had dried.
  9. Then cut the rippled edges of five or six white cupcake liners to paste to the inside of the rim of the doll's hat, this cover the areas of paper mache neatly and will gave the hat a finished look. 
  10. Cut a long strip of decorative scrapbook paper to be a hat band. I cut a very wide hat band in order to cover the printed areas of the paper cup.
  11. Trim the top of hat with paper cupcake liners or scrapbook paper using white glue to finish off the last layer of paper mache.
  12. Now make small bows, flowers, or shapes to hot glue in place if you wish to add these. I made a small bow with ruffled edges cut from the cupcake liners. But, you may choose to decorate the band of your paper hat differently.
  13. Hot glue a ribbon to either side of the hat interior to tie the hat around the chin of your doll. Each ribbon should be no shorter than eight inches if you are making the hat for either a 14" or an 18" doll.
(1.) Left, small paper plates and medium sized paper cups for our 14" doll's head.
(2.) Center, you can see the first circle is traced with a red marker onto the paper plates center.
I will cut this our in order to fit the altered cup inside. Right, now my paper cup hat has both a brim
 and I have also glued an additional cardboard piece to the top of the hat to close up the
second smaller hole.
(6.) Left, cut this cardboard circle out and glue the edge of it to fit the smaller end of your cup on top.
Let it dry and trim off the edges with a pair of scissors. (6.) Center. see the interior of the
 hat being glued and taped firmly in place. Right, the finished result after gluing a
plaid band with a bow in place.
Our doll Dell wears the finished Easter bonnet made from a paper plate, a paper cup and a bit of creativity.
 I think the blue plaid band flatters her eyes!
Make more paper hats for your dolls:

Friday, November 23, 2018

Craft Couture Bags for Barbie

These Fashionistas carry white leather, couture bags made from recycled materials.
       I picked up a few worn leather handbags for a dollar each at resale, intending to use them again in a craft or two. The couture bags shown here were made from a recycled white leather purse that was too damaged to do much with.

Your discarded and broken costume jewelry can be reused to trim couture
purses for a fashion doll.
Supply List:
  • recycled leather bag or purse
  • hot glue and hot glue gun
  • tacky crafter's glue
  • discarded chains
  • gold bead for clasp
  • extra leather trim 
  • cotton fabric scraps for bag bottom and interior
  • embroidery floss
  • cotton balls
  • thin cardboard
Step-by-Step Instructions:
  1. Cut the recycled leather, faux or real into a length measuring approximately 2"x3".
  2. Hot glue the side edges together to make a cylinder shape. You can use a bit of cardboard tubing to help hold the shape of your bags until the glue has dried. 
  3. Trim off the excess glue with a tiny pair of scissors once it has dried.
  4. Measure and cut cardboard circles to fit the bottom end of each bag. 
  5. Using tack glue, attach the cardboard circle to a piece of coordinating scrap fabric, leaving 1/4 inch of excess material to turn over the edges and paste in place. Making a neat finished edge for the bottom of your bag once you've glued it into place.
  6. Stuff the miniature bag with a cotton ball after removing any cardboard you have put into the purse to hold it into place while the hot glue sets up.
  7. At this point I finished the top edges of my leather with an embroidery stitch. 
  8. Then I folded a small rectangle over twice and thread this through a small jump ring attached to a chain for the purse and glued it inside one end of the purse opening. Repeat the same step for the opposite side of the purse as well. 
  9. I then glued the bag shut with hot glue. However, if the leather had been in better shape I would have chosen to line the bag so Barbie could actually put thins inside it.
  10. Next I cut a strip of leather to hot glue on top of my back seam and then to wrap over the top of the purse "opening" and down just a bit for the fake clasp of the bag. 
  11. Then I glued a tiny brass bead to this brown strap to mimic a clasp on the doll's bag.
Far left, Hot glue the side edges together to make a cylinder shape. You can use a bit of cardboard tubing to help hold the shape of your bags until the glue has dried. Left center, Using tack glue, attach the cardboard circle to a piece of coordinating scrap fabric, leaving 1/4 inch of excess material to turn over the edges and paste in place. Right center, Making a neat finished edge for the bottom of your bag once you've glued it into place. Far right, Then I folded a small rectangle over twice and thread this through a small jump ring attached to a chain for the purse and glued it inside one end of the purse opening.
More Ways to Make Couture Bags For Barbie Dolls:

Wednesday, September 26, 2018

Make Rainbow Hair Extensions for Fashion Dolls

This little fashion doll is ready to go to a party. She
 wears a green and yellow, rainbow colored hair ex-
tension that took only minutes to snip, tie and clip
into place.
       Rainbow colored wigs are much easier to purchase during October and February because  these are the months that Christians celebrate All Hallows Eve and Mardi Gras in costume.
       The wig you see pictured below was purchased for $1.00 in it's original package and has never been worn previously. 
       You will also need to buy some very tiny hair clips to attach your doll's hair extensions. These may be found in dollar stores and grocery stores in hair care supply.

Supply List:
  • colorful rainbow wig
  • thread to match hair colors
  • tacky craft glue
  • sharp scissors
  • mini hair clamps
Step-by-Step Instructions:
  1. Cut a length of wig approximately 3 to 4 inches.
  2. Squeeze craft glue onto the tips of the fibers.
  3. Wrap the thread matching the natural hair color of your doll around the tips to hold the strands together.
  4. Let the glue harden and trim off the excess tips so that these look similar to those pictured below.
  5. Tuck the extension into place in your doll's hair using a colorful mini hair clip.
Left, a synthetic colored costume wig. Center, the rainbow hair extensions.
Right, colorful mini hair clips, small enough for a doll.