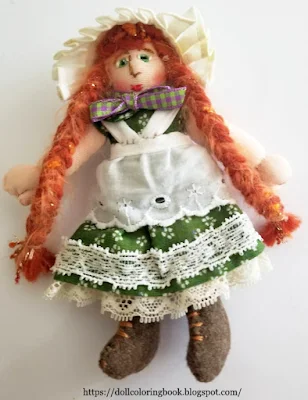
"Often the wind howled outside with a cold and lonesome sound. But in the attic Laura and Mary played house with the squashes and the pumpkins, and everything was snug and cosy.
Mary was bigger than Laura, and she had a rag doll named Nettie. Laura had only a corncob wrapped in a handkerchief, but it was a good doll. It was named Susan. It wasn't Susan's fault that she was only a corncob. Sometimes Mary let Laura hold Nettie, but she did it only when Susan couldn't see." Little House in the Big Woods
 |
| Mary's doll, Nettie, was a rag doll. |
Supply List for Nettie:
- yarn for doll hair
- muslin or any other solid, flesh colored fabric for the doll's body
- fabric scraps for clothes, this is a tiny doll and you won't need much
- buttons or beads for eyes (optional)
- leather or suede for shoes
- embroidery floss for facial features
- a mini doll printable pattern (below)
Step-by-Step Instructions: for a mini rag doll body:
- Use your home printer to print out the mini rag doll pattern here.
- Cut out the body patterns and trace around these on top of cardboard.
- Then place the cardboard patterns on top of muslin and trace around the head/torso piece twice with a soft lead pencil. Cut out the pieces leaving 1/4" seam.
- Sew a straight stitch around the torso and head but leave the bottom section open for stuffing.
- Stuff the torso with cotton and whip stitch the opening shut.
- Repeat these steps for two arms and two legs.
- Attach the arms and legs to the doll torso with needle and thread.
- Stitch long strands of yarn to the doll's head and braid this on either side.
- Stitch the ends of the braids closed with thread.
- Applique a smock-like dress to the tiny doll so that it can not be removed and misplaced.
- Cut a two small squares and stitch together two sides only in order to make a bonnet for your mini pioneer doll.
- Sew an apron and trim her dress with lace scrapes.
- Ad facial features using embroidery floss and or buttons.
- newsprint
- masking tape
- beige lace trim
- tacky glue
Step-by-Step Instructions: for a corn cob baby doll:
- Crush newsprint into a small 2 1/2" roll; looking somewhat like a corn cob.
- Use masking tape to cover this shape.
- Smear on tacky glue as you twist a beige or off-white lace tightly about the paper cob. This will look something like a cob with the corn pulled off.
- Let the glue harden.
- Cut a small kerchief to wrap the corn cob baby with.
Pioneer's normally dried and kept corn cobs for several different uses on their farms. Cobs could be stripped down and used to stuff a mattress with or chopped up further to toss out into chicken pens as bedding. Corn cobs also make excellent fire-starters too.


No comments:
Post a Comment
Thanks for your thoughts. All comments are moderated. Spam is not published. Have a good day!