Showing posts with label Neighborhood Pool. Show all posts

Thursday, July 11, 2024

Make Fun, Easy Beach Balls!

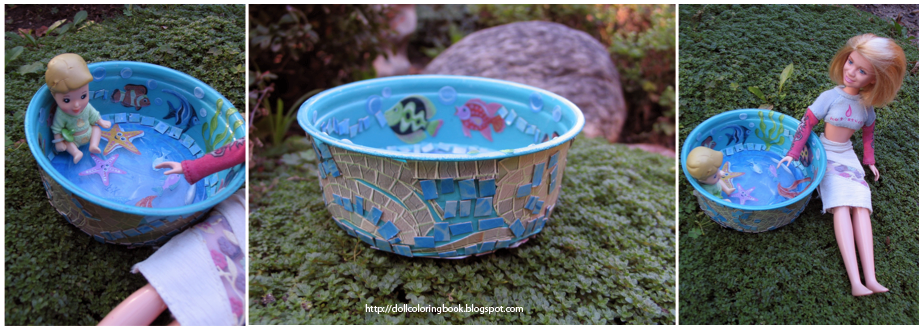
Our Mesha doll waiting to swim.
       I made two decorative versions of this beach or pool craft. One ball is red with white polka-dots and the other with large color blocking in: yellow, green, pink and lavender colors. The polka-dots where cut from typing paper and glued to the surface after the ball was layered in red tissue. The color blocking on the second beach ball was made by marking the masking tape surface in advance with a pencil and then filling in the four areas with different colors of tissue.
        To make a beach ball for a doll in any size or in any color you will need the following supplies: masking tape, colorful tissue paper, a Stryrofoam ball, white school glue and Mod Podge. You can purchase water resistant Mod Podge if you believe that this pretend beach ball will come in contact with water during playtime. I used ordinary Mod Podge because our 18'' doll pool is a dry playset.
       Cover the surface of the Styrofoam ball entirely with a layer or two of masking tape. Do so gently but with some small pressure of your fingertips. If you press too firmly, you could end up denting the surface unnecessarily. Judiciously squeeze small amounts of white school glue directly on top of the layered masking tape and press colorful tissue paper on top of the glue. Cover the entire surface one section at a time, allowing areas to dry entirely before covering other parts of the foam ball. 
       Drying times between each application are not lengthy, but you do need to be patient and methodical during the process. After the ball is covered with tissue and glue, brush on several layers of Mod Podge to seal it's outer surface completely before play. The Mod Podge will harden and take on a vinyl appearance after it dries.
 
Left, Styrafoam balls. Right, decorated to look like beach balls.

Friday, May 27, 2022

How to sew doll swimsuits using socks...

This Wellie Wisher doll, Kendall, wears a
cute purple and pink striped swimsuit made
from a sock. There are straps for the suit 
that tie around the neck to hold it in place.

       Young girls can design cut and fashion small socks into swim wear. Pictured here is one of our Wellie Wishers and a Best Friends Club Doll, Addison, modeling different variations of this simple sewing craft.
       The swimsuits when made of socks need to have their raw edges sewn down tightly or these will unravel. Sewers may also use a glue made especially to prevent this called No Fray, Dritz Fray or Sit n Sew as an alternative.
       I chose pastel striped socks for our dolls to wear but socks come in so many different, colorful designs these days, it's difficult to choose which print to try for this simple craft.
       I cut the sock straight across where the leg and heal come together. Then I slip this tube onto the doll's body to measure where the leg openings should be and the top of the bathing suit should end.
       Next I sew a small seam between the legs and finish all of the openings with seams both at the bottom and top of the sock tube.
       Finally, I sew on ribbon or straps to hold the swimsuits on the dolls body.

More Ideas for Crafting Doll Swimwear:

Day At The Pool for Dolls:

Our Addison doll wears a bathing suit made from a green and white striped sock. It is trimmed 
at the top with calico print, cotton ribbon and has a snap in the back to tighten and close the 
swimming suit snug against her body.

Friday, September 14, 2018

Collage a Baby Swimming Pool for Your Dolls

First, apply the stickers to the inside walls of
the transparent container.
       It's fun to make this simple craft with containers you can recycle from your own kitchen. Cover it with fishy stickers and just a bit of paint and your ready to have a splashing good time with your dolls.

Supply List:
  • a recycled food dish (plastic)
  • fish stickers
  • blue paint
  • Mod Podge
  • decorative paper (mine had printed tiles)
Step-by-Step Instructions:
  1. Clean the discarded, transparent food container with warm soap and water. Let it dry.
  2. Adhere stickers on the inside of the container.
  3. Apply Mod Podge to the inside of the container over the stickers. Let the glue dry between several applications.
  4. Paint the outside of the container with blue paint and let this dry.
  5. Decoupage clippings from a decorative sheet of paper on the exterior of the container if you want even more detail on the baby doll pool.
  6. Layer Mod Podge on top of the outside walls as well.
Both Above and Below, you can see our Mary Kate doll baby sitting and having fun with the baby doll pool.

Friday, August 3, 2018

DIY Pool Floats for Your Doll

This inflatable, Barbie pool with solid colored pool floats dates from the mid seventies.
It is in excellent condition. The straw float craft is an easy one, but like most of the
crafts included here, children need adult supervision to complete it.

        Now is the time for having some fun in the sun with your dolls! Above is an inflatable pool and blue floats from my childhood collection. The straw floats with alternating colors are easy to make at home. But you will need adult supervision because these are melted together using a hot iron.

Supply List:
  • drinking straws
  • parchment paper (to protect the iron and other surfaces from melted plastic)
  • iron and ironing board
  • scissors
  • clear plastic bags (this will act as a layer of glue)
Step-by-Step Instructions:
  1. Choose a pattern you would like for the pool floats. I alternated purple and green straws for one pool float and teal and red straws for the other.
  2. Heat up your iron to it's highest temperature, and ask your parent to watch and help you in your progress.
  3. Lay a sheet of parchment paper on the ironing board. The parchment will separate the straws from the hot iron and keep the appliance clean from melted plastic. The parchment is very necessary for this craft.
  4. Lay the straws side by side and then layer a sheet of plastic bag on top of the straws and fold the parchment paper over the straws before pressing them with the hot iron.
  5. Press down on top of the parchment with the hot iron. It only take a few seconds to melt the straws together.
  6. Now lift the parchment and remove the melted straws carefully.
  7. Turn off the iron.
  8. Trim the excess plastic around the edges of the straws. Turn the straws over; the front side of your melted straws should not appear melted.
  9. You can trim the edges of the straws with scissors if these are uneven.
  10. Now your 12" dolls have new floats for the pool to play with!
Left, fold the parchment paper over the straws before pressing them with the hot iron. Center, Trim the excess plastic
 around the edges of the straws. Turn the straws over; the front side of your melted straws should not appear melted.
Right, Now your 12" dolls have new floats for the pool to play with!