Showing posts with label A Sleepover. Show all posts

Saturday, May 28, 2022

DIY AG doll robe from a pillowcase...

Left is the robe cropped and hemmed at the knee. However, you can make this robe as long
or short as you like. Right is a close-up of the silky sleeve finished in red.

       You can sew a lovely kimono style bathroom for an 18" doll from a silk pillowcase. Then trim it with lace or fur, whatever you prefer. Both examples shown here have silky ties made from the same matching fabrics and fuzzy house slippers too.

 Supply List:

  • one pillow case (Ours came from a dollar store.)
  • ribbon/lace for trim 
  • needle and thread to match
  • tape measure

Step-by-Step Instructions:

  1. Measure the length of your doll's arms and chest combined. This will determine how much of the robe must be cut lengthwise for the doll's sleeves. Ad an inch to this measurement so that the sleeves may be turned under by a little and finished neatly.
  2. Place your doll on top of the pillow case at it's opening in order to determine the length of your doll's robe. Making sure to leave the pillowcase hem intact at the bottom of the robe. You can decide to make a short summer robe or a longer winter robe.
  3. Now you will need to cut away the excess fabric from beneath the robes arms, leaving enough fabric for the doll's torso to fit inside the robe comfortably. (See photo below on the left.)
  4. Cut a "V" shaped opening at the neck. (See photo below on the right.
  5. Turn the front and back sides of the cut robe pieces right sides together and sew the arm and shoulder seam.
  6. Sew the seam under the arms and down the length of the robe's sides.
  7. Turn the robe inside out with the right sides apart and press the garment with an iron.
  8. Finish the remaining edges with a straight seam and ribbon.
  9. I also sewed a lace trim on the red and white version of this pillowcase robe.
  10. Sew a long sash or a ribbon to keep the robe closed on the doll while she is wearing it. (See photo below.)
  11. You may also wish to tack on a few ribbon loops to the side seams to hold the sash or ribbon in place neatly.

Left, this robe is made from an altered dollar store pillowcase.
Right, the 'V' neck cut at the collar of the robe.

Left, the pillowcase robe trimmed with lace and ribbon also has a silky tie for the waist.
Right, the finished robe tied at the front with a silky bow.

More Ways To Sew a Doll's Robe:

Left, this robe design can look very different if made with fur lined sleeves and lime green trim.
See the sleeve close-up with lime green trim. Right, the full-length of the black and white silk robe
for a "My Generation Doll." This robe will fit any 18" doll type, including American Girl Dolls too.


Friday, February 7, 2020

The World's Simplest Camera for Dolls

"DK Ultimate Sticker Collection, American Girl" has
many photo stickers you can use for this craft.
       You can collect and craft with the ordinary supplies listed below to make photos for a doll sized polaroid camera for your American Girl doll, Julie Albright. 
       World's Smallest Toys (multiple store outlets) sells a small polaroid just like the one I once owned as a child. It comes with a key chain but this is easy to remove. For your doll's own polaroid prints, you will need to collect: thin cardboard, white typing paper, photo stickers, scissors, a ruler and white school glue.
       Vintage polaroid prints are actually pretty thick so the cardboard makes an accurate representation of it. 
       Measure and cut the cardboard into 1 3/4" x1 1/4" rectangles. Use the glue to cover your cardboard pieces with white typing paper. I've included pictures below of the process for this.
      Now position the photo stickers (DK Ultimate Sticker Collection, American Girl) in the upper half of the cardboard photo paper, leaving a wider bottom boarder. All polaroid photos from the 1970s look like this. (see pictures below)
       Now brush an even coat of white glue over the entire photograph to help preserve your tiny doll craft during play. Let the glue harden before adding the small polaroid photos to your doll's collections.

Left, thin cardboard from a box of rice will due for this American Girl Doll craft.
Right, clip the corners so that your white typing paper will wrap nicely around the edges.

Left, wrapped faux photo edges. Right, now our mini polaroid camera has plenty of photos to display about it.

Left, press the tiny red button and the photo pops out. Right, measuring photos for size.
       The instant camera is a type of camera which uses self-developing film to create a chemically developed print shortly after taking the picture. Polaroid Corporation pioneered (and patented) consumer-friendly instant cameras and film, and were followed by various other manufacturers. Read more... (visit the new website for polaroid cube)

Old Commercials About Polaroid Cameras:
More Old Technology for Dolls:

Tuesday, January 21, 2020

DIY Doll Sized Jiffy Pop!

Doll sized Jiffy Pop popcorn craft using styrofoam and aluminum foil.
Don't forget to brush on a little glue and sprinkle transparent glitter on
top to add a bit of faux 'salt' for flavor!
       How fun is this? This craft is not only incredibly cute but it is also very easy to assemble! The supply list is long but most crafters will have these items on hand. 
       If you don't have the foam beads, which may be purchased at a dollar store, you can just as easily rip up tiny pieces of foam from larger peanut shapes.
       Two types of paper egg cartons are not necessary if you have a two inch diameter styrofoam ball. If you are making this popcorn craft for a Barbie, just use a 1inch foam ball  for the Jiffy Pop shape and a pop bottle cap for the tray.

Cut pieces from two types of paper egg cartons if you are crafting the 
first Design option.
Supply List:
  • tiny white foam beads
  • aluminum foil
  • egg carton(s)
  • Styrofoam ball (optional)
  • white tissue paper
  • tacky white glue
  • black and pale yellow acrylic paint
  • masking tape
  • thin gauge wire or large paper clips
  • small wire cutters
  • Mod Podge
  • transparent glitter (for the salt on popcorn)
Left, side view of finished Jiffy Pop craft on a 18inch doll size stove top. Center, view of Jiffy Pop food toy from
above. Right, two design variations side by side. Design 1 is left, Design 2 is right. You can also make examples
of unpopped Jiffy Pop for your doll's pantry. Simply cut a few extra shallow egg cups and crush aluminum foil
to line the inside with. Glue a clipped wire handle between these two layers.
Step-by-Step Instructions: Design 1 - using two types of egg cartons and tissue paper.
  1. Cut pieces from two types of egg cartons for the first craft option. (pictured above)
  2. Bend thin gauge wire into approx. three inch length and clip or unbend a large paper clip and clip off one looped end.
  3. Bend down the tips and hot glue these into the shallow cut egg cup. Reinforce this bent wire handle with masking tape on the inside of the egg cup. This will be the doll's wire handle for her Jiffy Pop.
  4. Paint the out side of the egg cup black.
  5. Now crush the white tissue paper into a ball shape and tape it firmly with masking tape. 
  6. Glue the tissue ball inside a second cut, larger egg cup.
  7. Cut a 5"x5" square from the aluminum foil and wrap this up and around the second cup. 
  8. Leaving open the top 1/3 of the wrap, crush and shape the outer edges of the foil. Clip these edges as you desire.
  9. Fill the opening for the doll's Jiffy Popped Popcorn with tacky glue and tiny white foam beads.
  10. After the foam beads have dried, dab a tiny amount of pale yellow paint on top for that melted buttery popcorn look if you wish.
  11. Mod Podge the foam beads and exposed egg cup.
Left and Center, back and front of, a 5"x5" square from the aluminum foil and wrap this up
 and around a styrofoam ball. Right, Leaving open the top 1/3 of the wrap,
crush and shape the outer edges of the foil. Clip these edges as you desire.
Step-by-Step Instructions: Design 2 - with a styrofoam ball.
  1. Cut pan shaped pieces from an egg carton.
  2. Bend thin gauge wire into approx. three inch length and clip or unbend a large paper clip and clip off one looped end.
  3. Bend down the tips and hot glue these into the shallow cut egg cup. Reinforce this bent wire handle with masking tape on the inside of the egg cup. This will be the doll's wire handle for her Jiffy Pop.
  4. Paint the out side of the egg cup black.
  5. Cut a 5"x5" square from the aluminum foil and wrap this up and around a styrofoam ball.
  6. Leaving open the top 1/3 of the wrap, crush and shape the outer edges of the foil. Clip these edges as you desire.
  7. Fill the opening for the doll's Jiffy Popped Popcorn with tacky glue and tiny white foam beads.
  8. After the foam beads have dried, dab a tiny amount of pale yellow paint on top for that melted buttery popcorn look if you wish.
  9. Mod Podge the foam beads and exposed egg cup.
       Jiffy Pop is a popcorn brand of ConAgra Foods. The product combines popcorn kernels, oil, and flavoring agents with a heavy-gauge aluminum foil pan. Jiffy Pop is one of the only popcorn brands that continues to sell popcorn in this form.
       Original Jiffy Pop packages used a plain, bright aluminum pan. This was eventually replaced by an aluminum pan with a black treatment on the outside to improve heat transfer. Also, although at one time a "Natural" flavor and a Jiffy Pop Microwave Popcorn version was manufactured, as of 2016 Jiffy Pop is offered in only one stovetop version, Butter Flavor Popcorn.
1970s Jiffy Pop commercial

       Jiffy Pop has run television commercials dating back at least to 1967. In one commercial, a genie appears and gives two children Jiffy Pop to eat. The slogan was repeated several times to highlight the fact that Jiffy Pop is "as much fun to make as it is to eat".

More Popcorn Crafts from The Web:

Saturday, May 4, 2019

Sew Super Sweet Sleeping Bags for 18inch Dolls

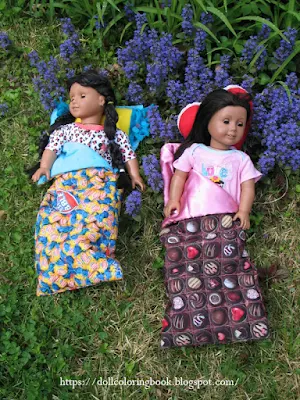
American Girl Dolls camping out in our garden.
       To sew sleeping bags like these, you will first need to purchase candy novelty fabric from an online shop or a sewing store near you. My fabric came from a Joanne's sewing shop. I also lined my doll's sleeping bags to help prevent the stitching from unraveling over time. 
       I chose to quilt the top of my chocolate box, printed sleeping bag with straight machine stitches. You will need to purchase quilt batting to give this top stitching some additional dimension. Otherwise, you could line the inside of the sleeping bag with felt instead of quilt batting.
       I used inexpensive cotton felt to line the bubble gum quilt. Then I tied the lining and the printed fabric together instead of quilting it. This version of my alternative doll sleeping bag was far quicker and less expensive to craft.
       You will need approximately  20"x 6 1/2", novelty fabric to sew the outer portions of the sleeping bags. Also add an additional 1/2" seam allowance to that estimation. I lined my doll's sleeping bags with solid coordinating fabrics using the same measurements of fabric.
       To make your own versions of this kind of sleeping bag simply pin the right sides of the fabric print together and sew a straight seam around one long side and one end of the fabric, plus 2/3 of the way up the second longer half. Do the same for your cotton batting sheet or felt and the inside fabric as well. Insert the batting and interior fabric lining into the sleeping bag and then hand sew using a whipping stitch or invisible stitch to turn in 1/2" seam along the unfinished edges of the sleeping bag.
       I've included several links below to nice doll sleeping bag tutorials from the web. There are plenty of creative folks who have given more details about how to accomplish this popular doll craft already!
        I just wanted to show how the fabric may be chosen to include pillows that can match a theme when designing a doll's bedding or in this case doll sleeping bags.
Left, I chose a chocolate box candy cotton print for one sleeping bag and a bright, bold print of Double Bubble
chewing gum for the other. Right, I also chose to do a bit of machine quilt stitching on the top of the chocolate
box print, just for fun.
Left, close up of the Dubble Bubble novelty fabric. Right, I stitched a fleece pillow with matching colors and theme.
Included here are a large heart shaped pillow and a giant chocolate candy pillow with white icing made from soft twine.
Each pillow is designed to mimic the design elements of the novelty prints.
One of our American Girl Dolls is getting drowsy resting in a bed of Spring flowers.
Our Josefina doll has already fallen fast asleep. She is tucked inside a cozy bubble gum themed sleeping bag.
Here pillow is designed to look like a giant, wrapped piece of bubble gum!
More Doll Sized Sleeping Bags: