Showing posts with label dlg24. Show all posts

Wednesday, August 9, 2023

DIY an AG doll outdoor grill...

Details of our AG doll outdoor grill made using a salt box. Left, the temperature gauge is a compass.
Center, the vent for smoke is from a recycled spice bottle. Right, the grill's rack is made from
wooden skewers.
 
        This 18" doll sized, toy grill is made using a recycled Morton salt box that is then mounted on top of a box-like cabinet. Crafters may alternatively use a Quaker Oat Can or a bread crumb box as grills such as the one designed here often come in a variety of sizes in real life. Hold the paper can next to your doll to determine if it is a size you wish to work with.
       I would consider this craft to be an advanced for a child in 5th or 6th grade, so generally speaking I recommend it for teens or an adult to make for a younger child. However, there are a few ten or eleven year olds who can accomplish crafts like this one.
      The drying time between steps will take several days depending upon the humidity in the air, as well. If you have a dehumidifier in your home, it is best to keep this project drying near it. Some crafters may become frustrated with the amount of time it will take to complete the following steps.
       The 'cuteness' of the craft also depends upon the inclusion of several hard to find items such as the plastic compass, but it really does make this craft adorable and it worth it's making!
 
The finished outdoor grill for AG dolls.
Supply List:
  • one clean Morton salt box
  • tiny gravel (dollar store)
  • wooden skewers
  • Exacto knife (adult use only!)
  • extra cardboard
  • grey scrapbook paper
  • black paper
  • acrylic paints: black, grey, red, orange and yellow
  • white school glue
  • masking tape
  • metallic tape
  • wooden block
  • Mod Podge
  • small plastic compass 
  • plastic inner lid of a spice bottle
  • hot glue gun and hot glue
  • square dowel rod cut to long handle size
  • black Velcro patches

 Step-by-Step Instructions:

  1. Clean the Morton Salt box, remove the label(s).
  2. Cut the box exactly in half including one long side only and the two shorter ends. Leave one of the longer sides intact so that the tubular box may be folded back and opened as though it has one very long "hinge." (see photos below)
  3. Cover all the sides both inside and out with masking tape to strengthen the structure.
  4. Cut a long narrow counter to extent around one corner of the box grill.
  5. Mount this cardboard counter to the upper edge of the opening.
  6. I glued on an additional cardboard 'lip' that tucks down inside an opening in the counter. You can see this step clearly in the first group of photos below. It is an optional step that may be eliminated by younger people.
  7. Cover the interior of the salt box with black paper and Mod Podge. Let dry.
  8. Fill in the space for the faux 'coal' with ample amount of white glue for the miniature gravel to soak in. You can do this in layers or all at once depending on your comfort level. It takes several days for this step to dry.
  9. At this point, you can see that I have used white school glue to paste in the skewers around the inside perimeter of the grill, the longest skewers first and then the shorter ones. I have done this on purpose to keep the grill from warping while I add paint to the gravel. 
  10. Paint all of the gravel black to begin with. Let dry.
  11. Then using a dry brush dab on the redist color, then orange, then yellow and then lastly dab on the pale grey. It might help you greatly to observe hot coals at different stages during a grill prep for this part of the craft. Let the paint dry.
  12. Now you may continue to build the grill rack using identically cut cross skewers and white school glue. Although you may be tempted at this point to use hot glue for this process, do not use it! Hot glue will make this too messy and you want to show off this rack properly in this end. Take the time to use this school glue instead. Let the rack dry before painting it carefully with a tiny brush.
  13. Paint the rack black.
  14. Now you may join the salt box construction with a box that has a slightly shorter length. See the photos below to get an idea about what size you will need. I give the exact measurements under the photos below. But, you do not need to use the same size that I have here.
  15. You will need to cut a half arc into the top of the box cabinet for the salt box constructed grill to rest inside. Use both white glue and masking tape to adhere the edges together inside this arc cut-away.
  16. Glue in a shelf piece of barely equal length and width of the original box. Hold this in place with glue and masking tape to dry.
  17. To make doors that open and shut for this grill's cabinet, which is optional, you will need to cut a long narrow piece of cardboard to paste into the top inside edge of the length of the inside cabinet. This sounds confusing but will be self-evident to you as you work. Use tape and white glue to reinforce it and then cut a vertical cross piece the same width to attach at the top and bottom of the inside of the cabinet. (see photos below) Keep in place with tape and glue.
  18.  Now cut two identical size pieces of cardboard to be the cabinets. 
  19. Tape these to opposite sides of the opening in your box. The tape will act as the hinges for these cabinet doors and will be made into stronger connections as you add more glue and paper in your decoupage finishing. 
  20. At this point I glued the wooden block on the bottom side of my grill to make it taller. However, you may not need to do so, if you have acquired a taller box than mine for the project. I felt my project needed this addition to raise the grill to the proportional height of my 18" doll. I finished it's surface by covering it with metal tape.
  21. Once all of these preliminary steps have been done, I proceeded to cover my grill with black paper and Mod Podge, excluding the counter top.
  22. I used a grey paper to decoupage the counter.
  23. After the decoupage dries you may choose to cover the surface of the grill with black paint and then seal it again with Mod Podge. The necessity of this step is determined by the quality of your grill's surface. I prefer my surfaces to be seamless and so I usually will paint a solid colored surface and add another coat of Mod Podge.
  24. Now you may heat up the hot glue gun in order to add the following details...
  25. Hot glue on a cut square dowel rods to both the hood of the grill and it's cabinet doors. These handles are usually long and strong on real-life grills. I finished this handle with silver metal tape. (see photo for placement)
  26. Remove the inner cap of a spice bottle; it has holes and is usually transparent.
  27. Cover it with metal tape and hot glue it to the upper side of the barrel vaulted lid. (see photo) This will mimic the place where smoke is allowed to escape from a real grill during the cooking process.
  28. Hot glue a plastic compass to the center of the grill barrel lid just above the handle. This is meant to mimic a temperature gauge/thermometer on a real grill. 
  29. Finally, hot glue a Velcro patch to the inside of the cabinet doors on the vertical cross bar. You will need to cut the fuzzy part of this attching patch into two separate halves to glue to each cabinet door. But these meet in the middle of the cross bar connecting into one Velcro strip. Now your cabinet doors may be firmly shut.

Left,  framing in the grill's rack for cooking the pretend food. Right, the mini gravel will be
painted to look like lighted coals.

Left, look inside the cabinets. Center, side view of the barrel shaped grill.
 Right, the hood is bent open to reveal an open grill.

Left, the cabinets are closed. Center, see counter before it is decoupaged with silver paper.
Right, the coals are painted prior to the glueing of the rack.

Thursday, July 13, 2023

Mullion Garden View Windows

       I have made the following diamond lattice windows, or mullions, here for your dollhouse. There are four different views to choose from in brilliant colors. Download, and print them out on a home computer then adhere them to the walls of your dollhouse with tack, glue or tape. Now your dolls may have a garden view from any room in the dollhouse if she chooses... (For play only, not resale, by kathy grimm)

A view of a garden by the lake.

A view of a formal azalea garden.

A garden view of peony bushes.

The wild poppy garden view.

Sunday, May 28, 2023

DIY doll sized patio furniture using clothespins...

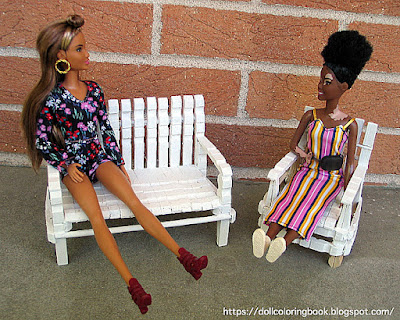
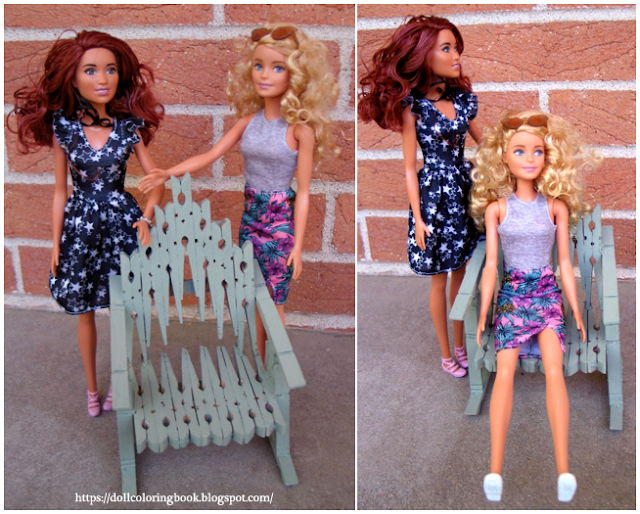
I've included doll picture here to give crafters
 an idea of the furniture's size.

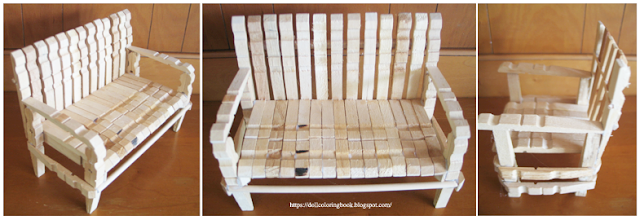
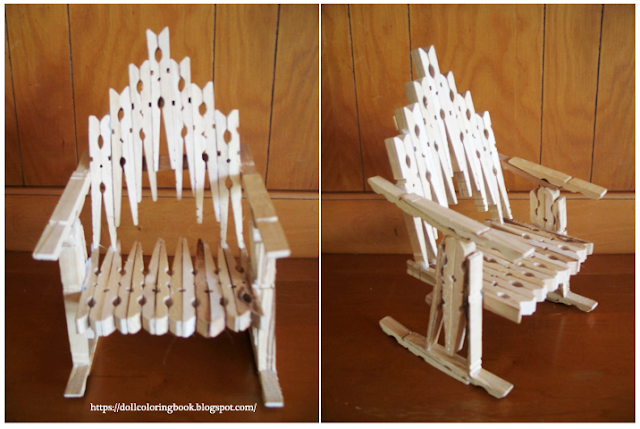
       The classic clothespin patio furniture, a bench and a side chair, painted white after hot gluing all of the wooden pieces together. See the detailed photographs below to figure how many dismantled spring pins you will need to make the doll furniture to fit Barbie and Fashionistas. I also used a few wooden skewers to reinforce the crafted pieces. 
       As you use the hot glue to assemble remember that even this glue needs time to cure in order for it to become strong. Pressure while drying will also speed up the hardening of this kind of glue. 
       If you elect to use wood glue instead, you may need to hold the pieces together with clamps as you craft.
       Finish the wood with acrylic paints or stain, a day or two after gluing everything together.

Side arm-chair from side, behind and front.

Bench from side, front and alternative side view.

Back and underneath the bench. Reinforced both with tongue depressors.

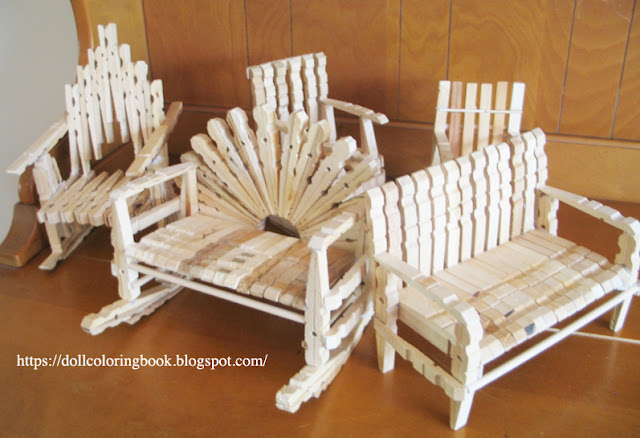
A photo of all the chairs, rockers and bench made from spring loaded clothespins after the mechanism
 is removed. 

Sunday, May 21, 2023

How to assemble a 'Sunburst' Twin Rocker...

Close-up of the sunburst, twin rocker's paint example. Right, dolls posed with the rocker to show
size is appropriate to Barbie dolls or Fashionistas.

        Again, this clothespin rocker, built for two, will require those of you who wish to make one like mine, to remove the springs from the clothespins before hot gluing it together. 
       I also used thin cardboard to mount both the seat and sunburst back together before gluing  the arms and rocker feet to them. I did not remove this cardboard but covered it with decorative paper. This added support and strength to the rocker. See it clearly in the photos below.
       Glue additional wooden skewers between the arms for design detail and to also strengthen the entire construction if you wish. 
       I painted the twin rocker seat and back using acrylic sunburst colors: red, orange and yellow.

Examine the Photographs:

Left, front of twin clothespin rocker. Right, side view.

Left the backside of the sunburst design is backed with cereal cardboard in an arched shape.
Right, the underside of the seat is also glued to a strong, but light weight cardboard to give
the twin bench strength for dollplay.

Make a traditional wooden rocker for a Barbie...

       This traditional clothespin rocker is large enough for dolls measuring 10, 11 and 12 inches tall. It is made from spring clothespins. However, you must separate the springs from the wooden parts before assembling these with hot glue. You may use wood glue alternatively but then you will also need small clamps to hold the parts in place while these dry and also a bucket load of patience! 

Above, you can see that I painted our clothespin rocker green after allowing for the hot glue to
cure over night. On the right I have included a couple of our
Fashionistas to give readers an idea of scale.

Examine the Photographs:

Above are views of the traditional clothespin rocking chair from the front, side and back. Look
at the photos carefully to determine how many pins you will need and where to glue these 
together. Click on the photo to see the photos close up.

Above is the rocker from beneath and right is the detail of the rocker's feet.

Left, the rocking chair from the side and right, the doll seated inside the rocker.

Craft a Clothespin Cathedral Rocker

The finished rocker, painted green.
       For this Barbie sized (11") doll furniture craft, you will need to remove the springs from your wooden clothespins before assembling them into the design featured with hot glue.
        Make sure the clothespins are clean, free of any residue so that these will stick together easily with applied hand pressure. Once the pins are glued in the 'cathedral' shaped rocker, let the glued piece cure overnight. I understand that folks use hot glue because they believe that it hardens instantly but projects like this one actually need time to 'set up' before they become durable. Even the hot glue must be given time to cure; about 12 hours, prior to painting.

 Supply List:

  • wooden clothespins (spring style)
  • hot glue gun and hot glue
  • acrylic paints (for surface, any color)
  • clear acrylic sealer (spray can) to make the paint durable

Examine the Photos:

Above, you can see detailed photos of the design in order to assemble a similar or exact replica 
of the clothespin chair I have made for our 11'' dolls. Left, is the front and Right, is the side view.

Left, here is the back view and Right, is the rocker as seen from the bottom.

Fashionista dolls sit comfortably in this clothespin rocking chair.

Sunday, June 5, 2022

Craft a Daisy Flower Bed for Dolls

Our doll's flower bed is surrounded by a small, white picket fence and felt grass.
The daisies are cut from embroidered lace and mounted onto toothpicks.
 
       With this flower bed craft, your dolls can 'plant' any faux flower they desire. Our dolls chose to plant daisies. They can change the garden over to be full of any veggie or flower that can be glued to the tip of a toothpick! When they need a vase full of blooms, they can pull them from the holes and display them anywhere inside the doll house.

 Supply List:

  • green felt
  • wooden craft sticks
  • twine
  • skewers
  • box the shape and size of your flower bed
  • brown, green and white acrylic paints
  • hot glue gun and hot glue
  • toothpicks
  • tiny machine embroidered daisies 
  • hammer in small nail + a thumb tack
  • an open ended box or box lid

Step-by-Step Instructions:

  1. Turn the box lid with it's flat side facing up.
  2. Paint the lid with brown acrylic paints and let dry.
  3. Take round-ended wooden craft sticks and cut one end flat. Make sure that all of these craft sticks are of the same length.
  4. Glue these to the sides of the box lid, spacing them apart evenly.
  5. Now glue wooden skewers around the outside edge of the faux picket fence approximately 1/2 inch from the rounded tops. Hold these in place with masking tape while the glue cures.
  6. Remove tap and twist a narrow twine, yarn or wire in and out of the faux fence to strengthen it. 
  7. Now paint the entire fence white. Let dry.
  8. Cut long narrow strips of green felt and fringe it to look like grass.
  9. Hot glue this felt grass around the picket fence and inside of your pretend garden.
  10. Take a tack and poke holes through the cardboard wherever you would like to poke a flower inside.
  11. Then use a slightly larger nail to widen the openings of the holes from beneath the box lid where it is easier to see them.
  12. Glue small flowers to tips of the toothpicks. Snip of any pointed ends.
  13. Paint the toothpicks with green acrylics to make these look like stems.
  14. Poke the floral picks into the small holes in your pretend garden bed's soil.

The white picket fence of our doll's flower garden.

Details of the fringed felt made to look like grass or plant life.

Toothpick daisies and the inside of the box lid showing where we made holes.

DIY a Bee Hive for Your Dolls

The doll sized Abbot combination hive reproduced. I made our doll's version to look antique.
I pasted small shavings of bark to the surface and dry brushes white acrylic on top of that.


Bee hive with roof

Supply List:

  • cardboard boxes
  • scrap cardboard
  • masking tape
  • wood printed paper (optional)
  • white, green, grey and brown acrylic paint for painting surfaces
  • wide wooden craft sticks
  • Mod Podge. 

Step-by-Step Instructions: 

  • Start your been hive craft by selecting a simple box. 
  • To make legs similar to the ones we made, glue together three wooden craft sticks in the shape of triangular legs. Use the masking tape to hold these legs together while they dry. 
  • Remove the tape and insert the legs at each corner of the box. This step is entirely decorative. If you want to leave it out of your craft, do so. Most bee keepers actually use wooden hives without legs!
  • After securing the legs to the box, cover the inside of the box with masking tape and paint it white.
  • Cut wooden sticks to line the two longest sides of the top of your box, minus 1/2inch from the top. This is where you will slide in the faux frames for the pretend bees to build their honeycomb. 
  • Below, I've included a bee honeycomb pattern that you may print from your home computer. This may be decoupaged onto your faux frames.
  • Each frame that you use should be cut from stiff cardboard and one end should have a wooden craft stick pasted to the same side lengths of all the cardboard frames. This stick should be slightly longer so that each end may be suspended between the wooden shelves on the interior of the box. (see photo below)
  • I also added a roof to our doll's version of this bee hive. I did this by measuring around the box and creating a second box with a lip around it's outside to fit snuggly on top of the first box. 
  • Cut a triangle shape for the lid on either end; this is where the roof top will rest.
  • Then craft a roof by folding a third piece of cardboard in half to fit to the top of the box. Glue this on top. Use masking tape to aid in the positioning of cardboard pieces while these dry; it will make the process so much easier. Remove the tape after the glue has dried.
  • If you wish to make your bee hive look much more modern just make the roof of your hive flat. In this way you can stack box hives on top of each other to make your hive look more realistic.
  • I cut scalloped cardboard pieces for the roof of my bee hive and glued these on. 
  • Paint your hive with acrylics and Modge Podge the surfaces to keep these strong and clean when you have finished.

Left the stacked, masked and constructed Abbot hive. Center, a side view of the roof tiles.
Far Right, one of our Wellie Wisher dolls presents a tiny tray of honey and bees
.

Left, more detail photos of the roof. Right, the inside of the roof in progress.

Left, you can see that the legs are made from craft sticks, with three sides.
Right, the legs are pushed through the bottom of the box into the interior, 
then glued and masked in place. (see yellow dot highlight for connection.

Left, not the surfaces are covered with shredded brown paper bags and decoupage.
Right, see also the masking of trays and how these fit inside the hive shelves
.

Left, are the hive trays covered in hive paper from below. I then glued tiny, sculpted bees
onto surfaces. Center, the finished decoupaged interior of the hive. Right, see how 
the tray dangles inside the box hive.

Close-up views of the weathered surfaces of wooden hive with bees.

Left the box shaped hive without a roof. Center, the detached roof.
Right the tray removed for display. Learn much more about bees here.


Beehive honeycomb print for students/kids to print on their home computers.
This should not be redistributed from alternative websites.

More Toy Beehives to Play With:

Saturday, June 4, 2022

Sew a Waldorf Garden Bed for Your Dolls

A finished photo of our 18" doll's Waldorf garden bed with veggies.

       Your dolls can pretend to plant and harvest veggies from this garden bed. What is a farm without a garden? Moms and older siblings can help younger ones sew this basic construction for a doll house or a farm camp

Supply List:

  • one regular size brown bath towel
  • scrap green fabric several inches larger than the circumference of your garden bed assembled
  • green embroidery floss
  • large needle (a curved needle if you have one on hand.)
  • stuffing 
Left, include a few baskets and lots of veggies with this toy.
Right, lettuce, cauliflower, cabbage and tiny clay turnips are
 tucked between the rows for play.

       I made this version of a garden bed by cutting lengths of a brown towel 3" wide, stuffing them with a soft cotton filler and sewing them shut. Then I whip stitched the terry cloth rolls together at the bottom edge of each roll. After that, I attached an additional green fabric bottom and edging using a strong embroidery floss, trapping the terry cloth rolls together inside of a soft fabric frame. You can make your garden bed any shape or size you wish; our's measures 12 x 24 inches, with an approximate depth of 2" to 3." I used nearly all of my brown terry cloth towel to make this project.

Left, the tops of our doll leeks peeking through the terry cloth soil. 
Right, see the embroidery stitched edges of the soft green frame.
This "frame" holds the garden bed together. 


More Builds of Waldorf Toys & Puppet Shows:

Saturday, May 21, 2022

Printable Doll Size Seed Packs

        Young students may print out these tiny seed packs to cut apart and carefully paste onto tiny paper envelopes. Fill these with seed beads and then tape them shut. Now your dolls have their very own seed packets to plant an entire veggie garden with this summer!

Our seed selection includes: squash, sweet corn, radish, tomato, lettuce, onion, radish, pumpkin,
 carrot, cauliflower, and lettuce. Our printables are not intended to be redistributed from alternate
 websites or blogs. They are for personal use only.


Saturday, May 23, 2020

How to Sew a Liner for a Picnic Basket

Picnic in a city park.
       Our dolls, Skylar and Kendall are meeting at the park to have a picnic. Their old-fashioned picnic basket contains all of the dishes they will need. Plus there is also a red and white checkered picnic blanket for them to sit on.
       I picked up this doll sized basket from a local resale. I painted the backside of the lid white, decoupaged the top of the lid with bandana printed scrapbook paper and then lined the interior of the basket with a pad, having a similar bandana print.

Sewing The Bandana Liner
Above is the finished project. I picked up the dishes from a dollar store. 
The plastic picnic table cloth/blanket is also from the same place.

       First, you will need to acquire a doll sized picnic basket. Make sure it is clean and well made. Search resale, flee markets, Goodwill for baskets like these. I paid less than a dollar for the example shown here.

Left, the basket with a decoupaged lid. Center, cut pieces for the liner's bottom. 
Right, cut pieces for the liner sides.

       Decoupage the top of the lid using a scrapbook paper that you like. Clean where you will layer either white school glue or Mod Podge with decorative paper. 
       Choose a coordinating fabric to compliment the decoupaged lid. I chose a very traditional theme for my basket. Red checks, plaids and bandanas have been used in decorating picnic baskets for over a hundred years I think. I still have one that was my grandmothers from way back when...
       Flip the basket upside down and measure the bottom with a ruler. Make this part a little smaller than the actual measurements of the basket. Slip the bottom cardboard piece into the basket to check out the size before proceeding to the next step. Cut the cardboard down to a smaller size until it fits inside the basket easily.
       Cut cotton batting sheeting or felt just 1/2 inch larger than the cardboard bottom insert. Cut a piece of coordinating fabric the same size. Use a hot glue gun to adhere these pieces to the bottom, wrapping the sides and corners neatly as you go.
       Cut a slightly smaller cardboard piece to glue on top of the wrapped corners and sides so that none of the frayed edges will be seen.

Left, the finished bottom of the liner. Center the finished top side of the liner. Right, I tucked it 
inside the basket to make sure that it fit properly before sewing on the sides.

       Now make the liners side pieces by measuring the width of the sides with a ruler. To measure and cut the length that you will need for the fabric pieces. Take a string, line it up around the interior basket walls, and clip it off where the two ends meet. Lay the string along side a ruler to see how much fabric you will need to cut.
       Cut out two pieces of fabric to match your measurements, only leave 1/2" more on every side for a seam allowance. 
       Pin wrong side of the fabric together and sew around all four sides leaving a 1" opening to turn the long narrow side pieces inside out. Stuff with a narrow sheet of felt  or batting and sew the opening shut using a whip stitch. 
       Now attach the sides of the liner to the base (botoom) I did this by hand with a threaded needle. (see below center) I simply wrapped the edges of the fabric against the edges of the liner bottom and whip stitched the two together all the way around the cardboard.
       I then folded the corner edges next to one another and stitched up the remaining corner to finish off the liner.

Left, the finished liner seen from above. Center, the finished liner seen from beneath. 
Right, the finished liner tucked inside the basket.

       Tuck the liner inside the basket and hot glue it in place if you wish. You don't need to permanently attach this liner with glue. It should stay in place on its own if you prefer.

Our dolls are meeting in the park for lunch. What do you think Skylar's funny puppy is up to?

More Dolls Go On Picnics:

Wednesday, September 4, 2019

Paint a Miniature Black Cat Planter for A Doll's Garden

       Make your doll's garden festive this year with a black, Halloween feline planter. I purchased the faux flowers for this craft at a dollar store. The terracotta pots come in sets from both dollar stores and Targets, but you can also find these at local hobby shops everywhere.

A black cat pot with large blue eyes and fuzzy tail.
Supply List:
  • miniature terracotta pot(s)
  • acrylic paints: black, blue, pink, white
  • black yarn
  • one cotton ball
  • black construction paper
  • hot glue and hot glue gun
  • artificial flowers from 
  • aluminum foil
  • green felt
Step-by-Step Directions:
  1. First paint the outside of your miniature terracotta pot with black acrylic paint. Let it dry.
  2. Crush aluminum foil to fill the inside of the miniature pot. Poke holes into this foil in order to support the faux, flowers.
  3. Remove the flowers after determining where these will go.
  4. Next, cut up small pieces of green felt to cover the foil showing at the top of the pot. Hot glue this felt around the holes made for the flowers.
  5. Cut two, small black triangles from the black construction paper. Glue these onto the pot for cat's ears. (see picture above)
  6. Paint a smaller white furry triangle inside the black ears to mimic a cat's ear.
  7. Paint a cat's face onto your Halloween planter using white, blue and pink acrylic paints. (see photo)
  8. Hot glue a piece of black yarn directly onto the surface of the pot and curl it around the side to look like a tail.
  9. I wrapped a small piece of cotton on the end of my cat's tail with a bit of glue.
  10. Now poke the artificial flowers back inside the pot's holes at the top of the planter. Now you can display a cut Halloween cat in your doll's garden!
The Ghost of a Flower.

"You're what?" asked the common or garden spook
Of a stranger at midnight's hour.
And the shade replied with a graceful glide,
"Why, I'm the ghost of a flower."

"The ghost of a flower?" said the old-time spook;
"That's a brand-new one on me;
I never supposed a flower had a ghost,
Though I've seen the shade of a tree."