Tuesday, June 12, 2018

Update a Classic Pull-Cart With Chalkboard Paint

Above is an easy toy transformation that any older sibling or parent might accomplish in just one, sunny afternoon.
A classic, wooden pull-cart for baby blocks by Melissa &
Doug may be used for this easy DIY craft. I purchased the
one pictured above, for only $1 in a local thrift store.
       You may have seen a pull cart like this one in resale for a dollar or two and wondered if it might be made useful again? They are usually tossed out after a year or so, when baby no longer seems interested in pulling his blocks up and down the hallways.
       Here is an idea to extend his interest in the cart and you probably have most of the supplies needed stored in your garage at home!

Supply List:
  • chalkboard spray paint (any color)
  • masking tape
  • newsprint
  • large cardboard box
  • a wooden pull-cart (mine was purchased from resale)
  • blocks
  • chalk
  • soft old rag
  • red acrylic paint to touch up the wheels of my cart
  • sand paper
Step-by-Step Directions:
  1. Clean and sand the pull-cart to prepare it for painting.
  2. Use masking tape and newsprint to cover areas that you don't wish to be sprayed with chalkboard paint. I only chose to spray paint the inside, bottom of my wagon.
  3. Now set the wagon inside a large cardboard box to protect the surrounding environment from spray paint as you work. I spray painted my little block wagon outdoors.
  4. Spray three to four even coats of chalkboard paint in order to get nice, durable coverage.
  5. Let the wagon dry overnight.
  6. Remove the masking tape and newsprint. Then repaint the wheels with red enamel paint if these are scuffed up.
  7. Now you can use chalk to trace around a variety of block shapes and sizes that are in your toddler's collection. Challenge him or her to match the shapes and call these by name while they play this simple game.
Ideas like these help parents to recruit family members in the practice of teaching primary learning activities to babies and toddlers.

Chalk Transfer a Parking Lot & Service Station

It's easy to learn how to design a place
 for Hotwheels to go for a tune up,
 tire adjustment or serious car repairs.
       I used a simple chalk transfer method in order to compose a service station/parking lot for any child sized, chalkboard table top. (See full sized table below.) You can print out a service station like mine from my car mat coloring page collection at Crayon Palace.
       You will need both regular white chalk and a liquid chalk pen to complete this craft project.
       If you do not have a chalkboard table it's easy to remedy this by spray painting the top of an old sofa table with chalkboard paint; but that project is for another post!

Steps for The Chalk Transfer Method:
  1. Print or draw a design.
  2. Rub the backside of the drawing with white chalk.
  3. Turn it over drawing side up and position it on the chalkboard.
  4. Use a pencil to trace the basic outline of the drawing.
  5. The chalk should transfer onto the chalkboard. It should appear fuzzy.
  6. Outline the final drawing with a chalk pen.
  7. Dust off the surface using a soft brush.
More Chalkboard Surfaces Crafted for Car Play:
More Crafty Fun With Little Cars:
      Photographs of my friend's chalkboard table. I spruced it up a bit with a new coat of chalkboard paint and a chalk drawing for little cars. When his children tire of this; he can wash off the table top and start over.

 I needed to give this little chalkboard table a fresh coat
 of paint before drawing my service station and parking lot.
 It was apparently, well loved. I thought the pencil table
 legs interesting.
I purchased these two slat bottom, kiddie chairs at resale for three dollars each.
Above is a close-up shot of the "Service, Fast - Service Station"
 from the 1950s, drawn with a liquid chalk marker.
The chalkboard painted parking lot is almost full.
I gave the parking spaces numbers; this is a good opportunity to
 teach counting and number identification with a toy.
I included a flower bed at the front of my chalk drawn service station.
The parking lot as seen from above.
The empty parking lot and little car service station
wait to be played with.

Monday, June 11, 2018

Chalkpaint a Wooden Slat Basket


       I sprayed the end surfaces of this wooden slat basket with chalkboard paint. Then I used chalk liquid markers to hand letter, "Aa is for Apples" on one side of the basket and "Bb is for Berries" on the opposite end. Then I lightly outlined apples and strawberries before coloring them in with pastel chalks.

       Above you can see that I carefully wrapped the parts of this stained wooden basket that I did not want to spray paint with masking tape and newsprint. This keeps the surfaces clean and neat.
       I prefer to use the spray paint version of chalkpaint because there are far fewer drips to clean up!


       I will use this little basket to decorate a market stall in the nursery. Above you can see that I have purchased a few plastic apples and below are the plastic strawberries that I will include inside the basket.
       Even though the little ones who play with this pretend food can not read, it is good to expose them to as much print as possible. Over a short amount of time they will make connections between the words and items these refer to.


       I also used a bit of fixative to help keep my chalk drawings from smearing and rubbing off on cloths. If I should decide to make these designs permanent, I will give them heavier coats of fixative and then a final coat of acrylic varnish. 
       This sweet little basket would make a lovely gift for a child on her birthday. Fill it up with chalks, a felt eraser, and a little bundle of plastic fruits or flowers so that she may make up her own version and decorate the sides of the basket as she pleases.

Thursday, June 7, 2018

Some old technologies make wonderful toys!

Walker, Harry [photographer] A smiling young boy,
in a striped shirt, sitting on a wooden deck next to
 a small toy phonograph.
       You may not consider a record player to be a toy, but these make excellent additions to playrooms for children and grandchildren. Introduce a part of your past to them through music and dance and they will be delighted with the novelty of this former technology!
       In American English, "phonograph", properly specific to machines made by Edison, was sometimes used in a generic sense as early as the 1890s to include cylinder-playing machines made by others. But it was then considered strictly incorrect to apply it to Emile Berliner's upstart Gramophone, a very different machine which played discs. "Talking machine" was the comprehensive generic term, but in the early 20th century the general public was increasingly applying the word "phonograph" indiscriminately to both cylinder and disc machines and to the records they played. By the time of the First World War, the mass advertising and popularity of the Victor Talking Machine Company's Victrolas (a line of disc-playing machines characterized by their concealed horns) was leading to widespread generic use of the word "victrola" for any machine that played discs, which were however still called "phonograph records" or simply "records", almost never "victrola records".
This record player was a favorite toy in
our home when my girls were young.
       After electrical disc-playing machines started appearing on the market during the second half of the 1920s, usually sharing the same cabinet with a radio receiver, the term "record player" was increasingly favored by users when referring to the device. Manufacturers, however, typically advertised such combinations as "radio-phonographs". Portable record players (no radio included), with a latched cover and an integrated power amplifier and loudspeaker, were fairly common as well, especially in schools and for use by children and teenagers.
       In the years following the Second World War, as "hi-fi" (high-fidelity, monophonic) and, later, "stereo" (stereophonic) component sound systems slowly evolved from an exotic specialty item into a common feature of American homes, the description of the record-spinning component as a "record changer" (which could automatically play through a stacked series of discs) or a "turntable" (which could hold only one disc at a time) entered common usage. By about 1980 the use of a "record changer", which might damage the stacked discs, was widely disparaged. So, the "turntable" emerged triumphant and retained its position to the end of the 20th century and beyond. Through all these changes, however, the discs have continued to be known as "phonograph records" or, much more commonly, simply as "records".
       The brand name Gramophone was not used in the USA after 1901, and the word fell out of use there, although it has survived in its nickname form, Grammy, as the name of the Grammy Awards. The Grammy trophy itself is a small rendering of a gramophone, resembling a Victor disc machine with a taper arm.
       Modern amplifier-component manufacturers continue to label the input jack which accepts the output from a modern magnetic pickup cartridge as the "phono" input, abbreviated from "phonograph".

"A welcome gift for any child- an Electric Phonograph of his or her very own! Easy to use...
plays 78-rpm records up to 12 in. Built in tone chamber amplification gives full, rich tone.
Balanced tone arm has tone-set playing head that locks in playing or rest position for safe
carrying and storage. Self-starting electric turntable motor; on-off switch..."

Discovering old technology with kids.

Friday, May 25, 2018

DIY Découpage Dish Craft

Above is a very old set of durable, glass dishes shaped like the flowers of a petal.
I bought the set above, four bowl and four plates, in a local tag sale.
       You can easily customize small sets of desert dishes for a child size, play kitchen. You will only need a few basic tools plus Mod Podge. I chose to decoupage my bowls with a red acanthus design printed on tissue paper; I thought the colors were not only striking but versatile. I will hand-paint the plates to match, in a different post.
       Wash any dishes that you wish to use in this craft thoroughly, with warm water and dish soup. Many crafters use a sponge brush to apply Mod Podge because they think is works better. I just use either my finger tips or a regular bristle brush. There will be creases in the tissue, but the end result will be lovely. If you must remove a layer that you don't like, simple soak the dishes in a pan of hot water and remove the layer of tissue before starting over.
       As I have mentioned, you will need to cover the underside of the desert bowl with Mod Podge, a kind of transparent white glue. Then gingerly layer the tissue on top of the glue. Then cover the tissue layer again and layer a second time with the tissue, wrong sides together. I used this method because the print on my tissue paper was only one-sided and I needed the pattern to be double sided. Cover the final layers with several additional coats of glue and allow each application to dry thoroughly before brushing on another.
       Trim around the dry tissue layers with sharp scissors or a razor blade in order to preserve a final, clean edge around the lip of the bowl. Brush on a final, thick layer of glue to the lip to seal it. Do not wash these dishes after use, this will remove the découpage. Wipe the surfaces down with a damp cloth if they get dirty. This set is intended for play time only!
Above you can see that I covered my bowls with the same tissue print with the reverse sides together. You
 won't need to add this many layers of tissue if you use solid colors or two-sided patterns. Although the  
découpage is quite durable, it is not water proof, so remember that this craft only temporarily alters your glass
 dishes. On the far right, bottom corner, I show that the edges of each bowl have been given a final, thick 
layer of glue in order to seal the rims and keep the tissue dry for longer use. This glue will dry hard and clear.
In this sample video the back of
 the plate is pounced with paint.

See more video about decoupaging dishes:

Thursday, May 24, 2018

Classic Alphabet Blocks

 One of the first references to Alphabet Nursery Blocks was made by English philosopher John
Locke, in 1693, made the statement that "dice and playthings, with letters on them to teach
children the alphabet by playing" would make learning to read a more enjoyable experience.
       Toy blocks (also building bricks, building blocks, or simply blocks) are wooden, plastic, or foam pieces of various shapes (square, cylinder, arch, triangle, etc.) and colors that are used as construction toys. Sometimes toy blocks depict letters of the alphabet like the standardized from our family collections shown above and below.
Witold Rybczynski has found that the earliest mention of building bricks for children appears in Maria
and R.L. Edgeworth's Practical Education (1798). Called "rational toys", blocks were intended to
teach children about gravity and physics, as well as spatial relationships that allow them to see
how many different parts become a whole.
The first large-scale production of blocks was in the Williamsburg area of Brooklyn by S. L. Hill,
who patented "ornamenting wood" a patent related to painting or coloring a block surface prior to the
 embossing process and then adding another color after the embossing to have multi-colored blocks.

What can children learn while playing with blocks:
  • Motor skills: toy blocks build strength in a child's fingers and hands, and improve eye-hand coordination. They also help educate children in different shapes.
  • Socialization: block play encourages children to make friends and cooperate, and is often one of the first experiences a child has playing with others. Blocks are a benefit for the children because they encourage interaction and imagination. Creativity can be a combined action that is important for social play.
  • Academic training: children can potentially develop their vocabularies as they learn to describe sizes, shapes, and positions.
  • Math concepts: are developed through the process of grouping, adding, and subtracting, particularly with standardized blocks, such as unit blocks. 
  • Interaction and play: with gravity, balance, and geometry learned from stacking toy blocks also develops basic survival skills.
  • Creative thinking: children receive creative stimulation by making their own designs with blocks.
       In 1837 Friedrich Fröbel invented a preschool educational institution Kindergarten. For that, he designed ten of the 20 Froebel Gifts on building blocks principles.

Wednesday, May 23, 2018

Push And Pull Toys


        Above is one of many wooden pull toys in our family collection. This alligator was made by hand. The wooden balls spin as the comical reptile is being pulled across the floor. Below is a bouncing, wooden frog by Melissa and Doug and a dancing alligator by Plantoys Planwood.


What kinds of skills can a baby or toddler learn with the use of push or pull toys?
  1. learning to balance his or her body weight on two feet or one foot
  2. coordinating two skills at once, walking and pushing something
  3. selecting a direction to move and successfully accomplishing it
  4. listening and acting according to sounds that the object makes while moving
  5. large motor skills are practiced over and over
  6. developing the sense of one's own body and how that relates to another object
 New games with old toys.
 More About Pull Toys:

More Pull Toys from Our Family Collections:

Fisher Price: Little Snoopy pull toy.

Fisher Price: Toot-Toot train engine pull toy.

Fisher Price: Classic telephone pull toy with rolling eye-balls.


Give An Old Set of Blocks a New Life!

Left, I've even added a few unique pieces to this collection like this wooden castle craft that originated from
 a Home Depot kit. It was marked up but a bit of new primer and fresh paint makes it a charming addition
 to our family block collection. Right, you can see that I used many different shapes and sizes of blocks
to include in this DIY toy block project.
Preparation of surfaces.
       All woodwork must be sanded and thoroughly dried before any paint is applied. Care should be taken to see that all sharp surfaces and edges are smoothed to the touch so that a baby or small child does not get cut or poked with a splinter while playing with the blocks. You may wish to apply a primer first to your block surfaces prior to painting them depending upon the wear of their surface areas.
       After the priming coat of paint is dry, putty up all knot holes, dents and cracks, and other defects on the surface of your blocks.

Left, are the sizes and styles I was able to collect from resale. Right you can see how I laid the blocks out
 inside of a deep cardboard box before spray painting many of them. I also painted my blocks
 with a brush and acrylic paint sometimes. I use what was on hand to complete the project.
Application of Paint.
       In applying the paint to the toy the first coat should be thinned. This will act as a kind of primer or undercoat for the succeeding coats of paint. Care should be taken that plenty of time is allowed between coats for the paint to dry completely. Three coats of paint will produce a good finish.
       I used a variety of enamel and acrylic paints that I already had purchased for previous craft projects. This is a great way to use up all kinds of paint that you may have tucked away in cupboards and drawers around the house. Try to use water based paints for easy, nontoxic application. I will, however, seal the painted surfaces by coating them with a wood varnish. This will help prevent chipping; wooden blocks take lots of tumbles while in use!

So many colors of blocks: rose, rust, red, orange, magenta, grey, pink, purple, brown,
lighter versions of purple, ocher, green, orange and four different blues, yellow ect...
  Varnishing.
       Two or three coats of varnish will produce a very durable finish. The first coat of varnish ought not be quite as heavy as the succeeding coats. If the varnish is of extra heavy body it should be reduced slightly for the first coat. The best varnish reducer is thin varnish. The prepare this reducer, take one part varnish (the same varnish to be reduced), and two parts of turpentine. Shake these together well and let stand twenty-four hours before using. This will reduce the consistency of the varnish without tearing down the body as pure turpentine would. The first coat of varnish should be allowed to dry thoroughly before the second is applied.
This collection is sure to please any small aspiring architect!
Points on Varnishing. 
  1. The less varnish is worked under the brush the better its luster
  2. Use clean brush and pot, and clean varnish. See that the surface is clean before beginning to varnish.
  3. Allow a coat of varnish plenty of time for drying until it becomes hard.
More Tips for Prepping & Painting Blocks:

Wednesday, May 2, 2018

Make Simple Beanie Caps for Baby Dolls

This little Berenquer Doll came dressed from the local Goodwill! He is the
 perfect companion to my other little boy, baby dolls. I think he needs a hat.
    It seems as though you can make just about anything from a nice pair of socks these days. If you don't feel your up to knitting little beanie caps from scratch, cut up a some of those socks that you can't find a match for! Suddenly, knit baby bonnets will become fashionable in your doll nursery. 
   Using a sharp pair of scissors, cut across a sock just above the heal. Turn the sock piece inside out and sew a tough seam across the end cut side. Repeat this seam several times to eliminate the prospect of the sock unraveling. Turn it back to the front sides facing out and fit it over a bald doll's head. Now tuck in the peaks until you've got the beanie looking fit and trim. Thread an embroidery needle with contrasting floss and sew the nips and tuck down securely to the shape of your doll's head.

Socks Make Great Garments for Dolls:
Tuck in the corners of the sock and sew them down with a embroidery thread and needle.
I did this using a blanket stitch. The trick to getting this just right is to do it while it is
 stretched over the surface of a bald dolls head. Don't do it if your doll has a wig! 

These socks no longer have a matching partner so I've decided to reshape them into nursery beanie caps for a few dolls.
Introduce your child to sewing with this simple doll cap craft. My grandmother taught me to sew on a machine
 step-by-step by adding costumes to my doll's wardrobe many years ago.
Their heads are warm, now all they need are some booties.

Altering infant clothing to fit a baby doll...

Another doll from our family nursery by Berenquer Doll Designs.
This doll has hazel eyes and an open mouth for a bottle.
   I found these little Carter shorts in a resale shop not far from my home and I paid only a dollar for them. It is so much easier and cheaper to resize baby clothes for your dolls than it is to sew them from scratch. When altering shorts or pants, remove the elastic and cuffs with a seam ripper. If you take the time to do remove these, your end product will look clean and custom made.  Always trim pants from the outside seam, so that the detailing on the front zipper will remain intact. 
   Many vinyl baby dolls can be dressed in diapers intended for real preemie infants (premature) so don't cut the shorts or pants down too much; leave some wiggle room. Also, you don't want the clothing to be so tight fitting that little ones can't dress and undress their dolls. Repeating this process over and over helps them to develop small motor skills and it should be encouraged. 

Alter Baby Cloths Into Doll Clothes:
Left, A pair of Cater shorts for infants, very classic plaid and durably made. Center, remove the upper seams,
 elastic and cuffs at the bottom before altering. Right, trimmed and the waist band restrung,
this pair of shorts has been successfully altered for a variety of doll body types and sizes.
Left, this baby doll has a simple altered tee shirt made from a recycled baby onesie. (see method here)
Right, Now my little fella wears a pair of altered infant shorts. I chose to make them a little large in order to
accommodate a diaper and/or a larger doll. 

Sew a Nightshirt for A Doll

A Berenquer Doll, these were very popular with my girls,
when they were little. Consequently, there are many in the
Grimm family toy collections.
    Many a mother or grandmother may consider sewing nightshirts for their child or grandchild's massive baby doll collection to be a daunting task. Given the size of that collection in our own pretend nursery, this would be a considerable effort that might take, at the very least, a week to finish! However, we are far more practical in the production of doll clothes than you might anticipate. Especially when one must consider the small people who will be dressing and undressing these bulky vinyl infants to begin with. 
    First and foremost, learn where to find the most economically priced baby clothes in your area, that may be a baby resale, Goodwill outlet, or perhaps even a garage sale at the end of your neighborhood street. Look for clean, like new onesies in the smallest sizes that you can find. (0 to 3 months or preemies ) I found half a dozen of these for three dollars and spent about ten dollars at a Once Upon A Child one afternoon. These onesies had adorable prints and applique designs and the best part of the bargain, I didn't need to spend hours trimming them to look adorable!
    I could have chosen to make nightgowns less contemporary but these would not have been as easily manufactured or as easy for little hands to manipulate around big headed dolls. So I opted for the simplest and most economical solution. Don't forget to get a selection of blues and pinks. Although most baby doll mothers insist on determining their pretend children to be girls, there are a few boys that seem to sneak in with the bald heads and mischievous grins.
    Trim off the bottom edges of your onesies, before altering the gowns. This will allow young parents to use the gowns to dress a variety of dolls of different sizes.  
    I chose to alter my doll's nightshirts using French seams. French seams are durable, clean, and visually attractive in my opinion. There is no need to worry if the seams will unravel with rough use. In a French seam, the raw edges of the fabric are fully enclosed for a neat finish. The seam is first sewn with wrong sides together, then the seam allowances are trimmed and pressed. A second seam is sewn with right sides together, enclosing the raw edges of the original seam.

I rolled the bottom edge of this baby doll's night shirt and
then added a blanket stitch to finish off the night gown.
Left, lay the doll on top of the baby onesie in order to measure how much you need to trim off in order to fit it to your doll.
 Center, I drew directly on the onesie with a pencil, in order to see just where I needed to sew. Right, here you can see that
 I have made my alteration and trimmed away the excess material just before turning the garment inside-out and sewing
 a second seam around the edge of the material. This is called a French seam. French seams help keep fabric edges from
 unraveling over time and heavy use.
Sewing French Seams:

No matter how large and absurd the head of your doll, the lap
shoulder neckline makes dressing this type of doll easier.
A toddler can even manipulate this stretchy made knit over her doll's
permanently bent arms with a bit of a tug here and there.
Soon... I'm getting there.
Ah ha! presto-chango, a well dressed baby doll, ready for the land of nod!

Thursday, March 29, 2018

Dolly's Wings

DOLLY'S WINGS.

Mamma Biddy, look up here,
See my dolly; ain't her dear?

Love your chickens? So does I.
Wish my dolly''d learn to fly.

Mamma Biddy, how get wings?
Buy 'em with the pedlar things?

Guess I'se got free cents and two;
Mamma Biddy, won't that do?

by Laura Loring, in Wide Awake.

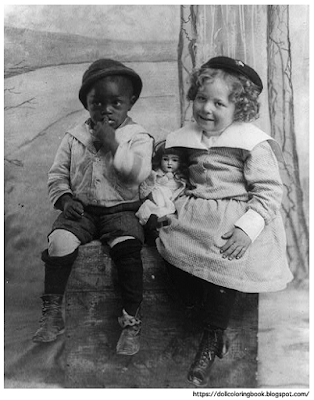
Old photo from 1900; children in studio with doll.

Baby

Baby

Where did you come from, baby dear?
Out of the everywhere into here.

Where did you get those eyes so blue?
Out of the sky as I came through.

What makes the light in them sparkle and spin?
Some of the starry spikes left in.

Where did you get that little tear?
I found it waiting when I got here.

What makes your forehead so smooth and high?
A soft hand stroked it as I went by.

What makes your cheek like a warm white rose?
I saw something better than any one knows.

Whence that three-cornered smile of bliss?
Three angels gave me at once a kiss.

Where did you get this pearly ear?
God spoke, and it came out to hear.

Where did you get those arms and hands?
Love made itself into bonds and bands.

Feet, whence did you come, you darling things?
From the same box as the cherubs' wings.

How did they all just come to be you?
God thought about me, and so I grew.

But how did you come to us, you dear?
God thought about you, and so I am here.

 by George MacDonald