Showing posts with label dk24. Show all posts

Thursday, June 12, 2025

A Closer Look at The Latest American Girl Gourmet Kitchen

        This newest gourmet kitchen with two units by American Girl features: open shelving, subway tiles, sink, a detachable faucet, dishwasher, oven, stove, microwave, glass front refrigerator freezer, three cupboards for storage. The stove top, microwave, refrigerator, and oven all have working features sound/lights.
       Again, I will link to those simple crafts featured on our blog that may be followed in order to replace lost accessories for these doll-sized kitchens. Look for more groceries here and more dishes here to elaborate on your doll kitchen accessory collections!

The Accessories That Come With the Kitchen:

  1. Salt and Pepper Shakers: the pepper is in a silver container and the salt is in a transparent container - learn how to make button top salt and pepper shakers
  2. Pink and Lavender Sugar and Flour Canisters
  3. Big Pink Colander 
  4. Two green cereal bowls - quill craft: green bowls 
  5. Two green plastic drinking glasses
  6. colorful stack of measuring cups
  7. Two white and green dinner plates
  8. 2 pairs of forks and spoons - cut, paste and paint doll sized silverware
  9. A cluster of ripe bananas
  10. a pale green carton of eggs - newsprint and bean egg carton craft
  11. a cluster of red peppers - red peppers sculpted for playsets
  12. lavender oven-baking dish of lasagna - 
  13. hot pink oven-baking dish of homemade cinnamon buns - newsprint cinnamon buns craft and a grey oven-bake dish of cornbread handcrafted here
  14. A tall red pasta pot and a small lavender skillet - Pots for the stove top made using toilet paper rolls . . . 
  15. colorful measuring spoons, plus whisk and serving spoon - make doll kitchen tools
  16. A silver cheese grater comes with a block of cheddar to pretend grate . . . 
  17. green berry basket with strawberry insert -  Our Sculpey versions of baskets of berries, plus a berry basket pattern
  18. a half gallon of milk - doll-sized dairy handmade
  19. A box of pretzels that includes one large plastic pretzels - variety of pretzels: dipped in chocolate, shaped from synthetic twine
  20. "The secret ingredient is Love" tea towel
  21. An empty yogurt container
  22. three carrots stuck together - single servings doll foods
  23. A pale green ice-cube tray with separate pieces of ice cubes

Friday, September 8, 2023

How to Make Utensils For Your Doll's Kitchen

       A variety of handmade kitchen tools for doll may be made from wooden picks, paper and wire that folks have stocked in their kitchen drawers. Working this small can get tricky; it's best to use very small scissors, files, clippers and very tiny paint brushes when working to make such miniature kitchen tools!
        I used plastic twine for the whisk top because it holds it's shape no matter how much wear or tear it receives. Simply tape three loops down to the wooden handle. Then wrap that same handle with a thick layer of masking tape to hide 'lumps.' Decoupage the finished handle with silver tissue paper and paint the whisk with silver acrylic paint.
       To make the potato masher bend a thick wire into the top shape. Hot glue this piece to the top of a wooden golf tee. Cover the handle with silver tissue and white tacky glue. Then paint the wire top black.

Supply List:
  • Left, unpainted whisk and potato masher.
    masking tape
  • wire
  • wooden skewers
  • wooden golf tees
  • wooden cocktail spears
  • white tacky glue
  • scrap cardboard
  • plastic twine
  • mini wooden clothespins
  • silver tissue paper
  • acrylic paints
       Above Left, "A whisk is a cooking utensil which can be used to blend ingredients smooth or to incorporate air into a mixture, in a process known as whisking or whipping. Most whisks consist of a long, narrow handle with a series of wire loops joined at the end. The loops can have different shapes depending on a whisk's intended functions. The wires are usually metal, but some are plastic for use with nonstick cookware Read more...
       Above Right, "A potato mashertater masherbean masherpea mashermasher, or crusher is a food preparation utensil used to crush soft food for such dishes as mashed potatoes, apple sauce, or refried beans. Potatoes mashed using a potato masher tend to be fluffier and lighter in texture compared to other methods of mashing, because use of the device reduces cell damage to the potato, releasing less starch. Read more...
 
Left, you can see that I've cut and drawn my patterns for these 18" doll spatulas.

       Above Left and Right, "A spatula is a broad, flat, flexible blade used to mix, spread and lift food. The dull blades on these are usually made of metal or plastic, with a wooden or plastic handle to insulate them from heat. Read more...

       I made the above variety of 18" doll sized spatulas by cutting small templates for the spoon portions, tracing around these on top of a thick cardboard, cutting them out and then wedging these cut between the prongs of wooden cocktail spears. I cut the blunt end of the cocktail spears short and wrapped the ends with masking tape and a loop of wire. I made sure that all of the surface areas where covered with masking tape and uniform before painting these mini spatulas.

Left, tongs and carving fork shaped from small wooden parts.

       Above Left, "Tongs are a type of tool used to grip and lift objects instead of holding them directly with hands. There are many forms of tongs adapted to their specific use. Read more...
       Above Right kitchen knives and Right, "A carving fork is a  two-pronged fork used to hold meat steady while it is being carved. They are often sold with carving knives or slicers as part of a carving set. Read more...

       The doll size 'tongs' where made by altering the length and surface of a tiny clothespin with flat edged toothpicks. Then I painted the tongs silver. 
       Likewise I also painted the tips of my doll's kitchen knives silver the the handles black after having shaped this small cutting instruments using masking tape and wooden cocktail skewers. 

More spatulas shaped from flat wooden picks and cardboard.

      Above art the kinds of spatulas our dolls use to scrap out the contents of bowls after measuring cake batter etc... Their tips are cut from cardboard pieces that are taped to the ends of flat toothpicks. Then these are painted.

See More Doll Utensil Crafts:

Monday, September 4, 2023

How to craft a cardboard doll toaster

Two sample toasters: one grey and square shaped and the other coral and oval shaped.

       The supplies that you will need for this doll kitchen craft are: scrap cardboard, sandpaper, a black permanent marker, masking tape, white school glue, metal tape (optional), acrylic paints and Mod Podge. You will also need a silver or black button that looks like a 'dial'. for the toaster and hot glue to attach it with.

Step-by-Step Instructions:

  1. Both of our 18" doll toasters measure approximately 2 1/2" across by 2 1/2" tall. The grey version is constructed on top of a rectangular base and the coral version on top of an oval. 
  2. There is a third wall in each that is glued between the outside walls so that two pieces of toast fit neatly inside each toaster for play.
  3. You will need to both tape and glue these small boxes into shape and let them dry over night.
  4. I made the tiny mechanical parts on the side of each toaster using cardboard and also a button for the temperature control. I opted to draw in details for the switch to be pulled down instead of putting in a real working switch and opening on the side panel. 
  5. The surfaces are painted with acrylic colors of your choice; the two I chose are complementary to our own doll kitchen for 18" dolls.
  6. Cut and layer cardboard 'toast' slices to fit the openings. 
  7. Glue on sandpaper to give your toasted bread a convincing finish. 
  8. Paint the edges of the toast last.
  9. Mod Podge the finished toaster to make it durable for play.
  10. Cut more details from metal sticky tape to add on in the end if you wish.
See the grey toaster from all angles: front, side and above.

See the oval, coral toaster from the front and top.

See examples of cut toast, the sandpaper has been glued on but I still need to paint edges here.

Wednesday, August 30, 2023

DIY Doll Dairy for Play

Above are milk carton types and butter
sticks, one whole and the other sliced.
      Shown in photos here are the extra dairy foods that I made for our 18" doll kitchen refrigerator. 
       To make the pretend bottled milk, I filled two mini glass bottles with white paint and then sealed the openings with hot glue. I then wrapped the outer edges with tape and a cardboard tops to make simple lids. The lids were then painted with a grey acrylic paint.
       I crafted the box shaped milk carton using cardboard, white paint, and a milk label cut from a grocery flier. Then I Mod Podged the surface to make it durable for play.
       The small butter trays are cut from cardboard and the butter is shaped from Sculpey and painted a creamy, pale yellow color. Then the surfaces are also sealed with Mod Podge. These butter sticks fit perfectly in the door butter compartments of our doll's refrigerator. 
       Below are the cheeses sculpted from oven-bake clay and painted to resemble cheddar and Swiss cheese varieties. I also picture the slices of Swiss and cheddar cut from Fun Foam and wrapped in tiny plastic bags. The shredded faux cheese is also meticulously cut from a yellow foam sheet as well.

Left, are the sculpted cheeses and butter prior to painting. 
Right, are the finished versions of foam cheese slices, painted cheese
bricks and shredded cheese for pretend doll recipes.

Tuesday, August 15, 2023

How to make an 18" doll sized rolling pin and cookie dough...

        Every doll needs a rolling pin to help them bake sugar cookies for the holidays and this is a very simple craft for a child to make. After making a set like ours, include it in a bakery or kitchen if you like.

Above is our handmade rolling pin, cookie dough and 
cardboard chopping block.

Supply List for Rolling Pin & Sugar Cookie Dough:

  • one recycled toilet paper roll
  • oven-bake clay
  • scrap cardboard
  • red and tan acrylic paints
  • faux wood shelf paper
  • Mod Podge
  • white school glue
  • masking tape
  • hot glue gun and hot glue

Step-by-Step Instructions:

  1. First it is best to acquire a set of mini cookie cutters so that you will be certain the sizes to be made to go with your cookie bake set. The set I have pictured here is vintage but it cost me no more than a few dollars. Each cutter measures no larger than an inch. These will make 'jumbo' sized cookies for our 18" dolls but that's o.k. The love cookies!
  2. I chose to use the star four our example but you can make as many sugar cookie cut-outs as you wish. 
  3. For the sugar cookie dough, roll out oven-bake clay to the size you will need to surround the cookie and leave approximately 1/2 inch extra dough. This will ensure that the cookie dough can be played with and not broken as quickly. 
  4. Cut out the sugar cookie using a mini cookie cutter. Remove it from the dough and bake both in the oven.
  5. For the rolling pin, cut a recycled toilet roll length-wise and then cut it down to approximately 2 1/2 inches in length. 
  6. Roll the pin into a narrower shape and tape/glue in place.
  7. Draw around the end of each side of the rolling pin, cutting out these shapes from scrap cardboard. 
  8. Glue the circle pieces to both ends of the tube. Let dry.
  9. Shape from the oven-bake clay, two reasonably identical handles. I made mine to look like the handles on the cookie cutters.
  10. Bake these as directed.
  11. Hot glue these to opposite ends of the doll rolling pin and paint. Finish with Mod Podge.
  12. Cut and cover the rolling pin with faux wood shelf paper.
  13. Paint the ends of the pin using a tan colored acrylic paint.

Above you can see the mini cookie cutters that 
were used to cut-out our doll's pretend sugar 
cookie dough. There are a selection of 5 designs:
5 pointed star, moon, ruffled square, diamond
 and an 8 pointed star.

See how I made other cookie sets for our dolls:

Sunday, August 6, 2023

How to craft a coffee maker, pot and grinder for your doll's kitchen...

        We are designing a Coffee Bar/Station for our 18" doll's kitchen. Every coffee bar needs at least a coffee maker, pot and a grinder so we've included these crafts below to begin with. 
       Our coffee maker is a design that is common for a home use kitchen appliance, not the type you would find in a Diner. However, I will show you how to make one of those later. Gather your supplies and let's get started...
 
Left, Coffee maker is shaped using cardboard, jar lids and masking tape.
Center, coffee maker decoupaged with layer of black paper.
Right, coffee maker painted and silver tape added.

Acorn containers and
 small jars.

Supplies for The Coffee Maker:
  • scrap cardboard
  • masking tape 
  • two identically sized lids  2 3/4 inch wide
  • black paper
  • Mod Podge
  • silver tape 
  • buttons or beads
  • twine
  • black acrylic paint

Step-by-Step Instructions:

  1. First, make the coffee pot below in order to measure it's size to fit properly into the coffee maker.
  2. Now cut the back half of the coffee maker's main housing/water tank from sturdy cardboard. 
  3. Hot glue both the top and bottom edges directly into two identical lids. The top lid will hold up the control panel and the lower will be where the pretend warming plate resides.
  4. Cut a piece of cardboard to glue around the upper lid. Keep it hollow so that the coffee pot fits snugly inside slightly. This would be where the pretend coffee grounds would reside inside of a basket if this were a real coffee maker. This is also where you will use puff paints to make pretend buttons for the control panel on the outside of the coffee maker.
  5. Now cover everything thus far in masking tape. Black paper and then paint it black, in order to give the coffee maker a smooth, finished surface.
  6. Add a bit of silver tape for sophisticated trim work to make the coffee maker look like a real one.

18" Doll Coffee Pot Diagram
Supplies for The Coffee Pot: See DIY Coffee Pot Craft by Totally Rudy at YouTube - Her craft video is adorable!

  • hot glue gun and hot glue
  • scrap cardboard
  • soda cap
  • soap pump
  • acorn capsule
  • acrylic paints: dark brown, silver, black or red

Step-by-Step Instructions:

  1. Make sure your recycled Acorn novelty container is clean and free of dust before filling it with dark brown paint. Don't make the application too thick or it will tale forever to dry out. It is better to layer the paint in thin coats until the coffee pot looks full.
  2. Snap the lid back on and turn the flat side down, this will be the bottom of your coffee pot.
  3. Hot glue a recycled lid from a water bottle on top of the inverted Acorn container.
  4. Cut a cardboard spout and hot glue this to the top of the water bottle lid.
  5. Remove the pump top spout from a empty bottle of hand soap and hot glue this to the side of the water bottle cap.
  6. Now paint the coffee pot as you like. I painted all of the parts black, apart from the plastic, faux glass where the coffee resides. Then I cut silver tape to trim the finished example. (see finished photos below) 
Left, see coffee maker, pot and grinder in progress. Center, photo of coffee
 grinder before paint and tape. Right, coffee grinder from bottom.

Left, finished grinder, coffee maker and coffee pot.
Center and right, finished electric coffee grinder up close.

A modern coffee maker for 
home use similar to the one
we made for our dolls.
Supplies for an Electric Coffee Grinder:

  • scrap cardboard
  • hot glue and hot glue gun
  • white school glue
  • acrylic paints: black
  • silver tape
  • coffee grounds
  • a short mini glass container (bean hopper)
  • masking tape
  • puff paints

Step-by-Step Instructions:

  1. Fill the tiny jar container with real coffee grounds. Screw the cap back in place.
  2. Turn the jar upside down. Cover the lid with masking tape.
  3. Roll cardboard cut to size around the cap with white glue between it's layers. Let dry.
  4. Trace around the bottom of the play coffee grinder on top of a piece of cardboard.
  5. Cut out the round and glue it to the bottom of the pretend grinder.
  6. Cut a long narrow piece of cardboard to glue onto the glass jar and down it's side on top of the cardboard. This is the large button used to grind the beans in the jar.
  7. Cover this button in black paper.
  8. Cover the bottom of the grinding chamber with silver tape or paper.

Saturday, August 5, 2023

Braid Vintage Fruity Potholders for Dolls

One strawberry and one watermelon braided
potholders for our 18 inch doll's kitchen oven.
       If you know how to braid yarn, you can make fruity potholders for your doll's kitchen. 
       The size of these potholders will be dictated by the size of your doll's hand.

Supply List:
  • red, melon, white and green yarn
  • needle and matching threads
  • black seed beads
  • a small clamp
Step-by-Step Instructions:
  1. For the potholders, it is best to braid a length of 12 inches at a time. 
  2. For instance braid from red a length of 12" and then use a small clamp to hold the 3 strands together while you work at the sewing part of this craft.
  3. Thread a needle of matching red thread. 
  4. Roll the braid around itself and whip stitch the sides together at use work the red into a round strawberry shape. 
  5. Once it is the size you like, cut the braid, and sew the ends neatly to the last side length. 
  6. Tack on a loop of yarn for hanging it you like and then shape green loops of yarn about the top of the strawberry to add detail.
  7. Do the same steps for the watermelon and then sew on tiny black seed beads to finish.
  8. If you need the potholders to be larger, simply continue to braid longer lengths of yarn after the clamp has been removed and so on...
More Doll Sized Potholders:

Wednesday, August 2, 2023

How to sculpt a doll piping bag for cake decorating...

Finished piping bags for American
 Girl dolls or other...

       If your American Girl doll loves to bake, she will need a few piping bags  to decorate her cakes with! Here is how I made mine...

Supply List:

  • recycled glue bottle nozzles or tips
  • two very short pencils
  • masking tape
  • newsprint
  • white typing paper
  • white school glue
  • hot glue gun and hot glue
  • Mod Podge
  • puff paints
  • acrylic paints: grey and white
Step-by-Step Instructions:
  1. First, you will need to cut the tips off of a glue bottle to use for the piping bag tips in this craft. 
  2. Next, wrap newsprint into the shape of a piping bag using masking tape
  3. Hot glue the ends of the recycled pencils inside of the glue tips or caps.
  4. Paint the piping tips grey and the body of the piping bag white.
  5. Squeeze a dot of icing inside the tips any color you like...
  6. Finish the completed faux piping bags with a layer of Mod Podge.
Left is the mini tacky glue bottle that I recycled for the piping bag tips. Center, see the
short, recycled pencil tips I used to "wrap" faux piping bags around. Right, see how the
piping bag bodies are shaped and masked with tape and newsprint. Then these are hot
glued inside of the craft glue tips.

Saturday, July 29, 2023

How to make single servings of doll foods...

        Contrary to popular child opinions at YouTube, Americans do eat a varied diet of many healthy foods for breakfast, lunch and dinner! Below, I will share just a few of our 'single servings' for AG doll play dinners. Single servings may be individually plated on your dolly's favorite china, along with an entree. In other words, mixed and matched according to whatever she or he feels like pretending to eat at the moment.
       The collection of 18" dolly single side servings on this post includes: glazed carrots, pickled red beets, sautéed mushrooms, steamed green beans, asparagus with Hollandaise sauce, Brussels sprouts in dill sauce, avocado and tomato salad, pan-fried cinnamon apples, tater tots, steamed broccoli, mashed potatoes with brown gravy, bird's nests (peas served inside mashed potatoes), sliced melons, apple sauce, and apricots or tomatoes and pineapple served with cottage cheese, stuffed celery sticks and carrot and raisin salad. All of these sides are common to our family's dinner menus and may be eaten with a variety of entrees any night of the week.

Above is our first collection of hand-sculpted, hand-painted foods made
for individual plating.


Asparagus with Hollandaise sauce, Brussels sprouts in dill
 sauce, pan-fried apples, tomato and okra, green beans
and sliced sweet and sour beets.


Center, are the baked turkey legs. To see the entire 
Thanksgiving turkey go here.

 
       Dinner in the U.S. is served on average to families with young children at approximately 6:30 to 7:00 in the evening. After our children entered college, our family dinners returned to being served later in the evening. I will share single servings (crafts) for lunch and breakfast on future posts.
       The following single servings are made from oven-bake clay. I encourage parents here to introduce their young ones to simple sculpting techniques as these are easily achieved for little pocket change. By the time a child is in fourth grade, he or she should have the small motor skills needed to roll out simple shapes: spheres, snakes, cubes etc.. and stick these together gently in order to achieve the following food crafts successfully.


In the center are cheese burgers including sliced tomatoes
and lettuce between buns.


In the center is steamed broccoli made using both Sculpey
and hot glue. The stems are first sculpted and baked. Then
the tops are formed using hot glue. While the glue is still
warm the tops are rolled into beads. After cooling down
the broccoli is then painted green.

Tips for Crafting Doll Sized Foods:

  • Paste small cardboard rounds to the bottom of each single serving in order to give the tiny foods strength to survive play!
  • Use inexpensive acrylics from a hobby store to paint the single servings in 'life-like' colors. Seal the projects with Mod Podge after the paint has dried.
  • Alternative craft materials like: paper pulp, mini foam balls, beads, hot glue and string can also be used to make tiny foods as well.
  • If you are unsure about how large or how small you would like a serving to be, simply look at the real food on your plate at night for the answers. Hold your own hand up next to the plated food and compare the size of your hand to the food size. Now compare the size of the sculpted food with your doll's hand. Does the size seem similar to your own?
  • Collect small tools to make marks into your food crafts: things like a toothpick or a plastic knife.
  • Collect very tiny paint brushes to color your food with.
  • Use objects to print textures into the mini foods too like: a comb, things with rippled edges, sandpaper and interesting rocks.
 
Salmon fillets, Salmon steak, tomato, olive and
avocado salad.


Fruits for dinner: musk melon, tomatoes cottage cheese,
apricots and cottage cheese, honeydew melon and
cottage cheese, celery stuffed with cheese spreads,
carrot and raisin salad, slice of watermelon,
avocado and tomato salad.


Stewed prunes and baked acorn squash.


Sweet Potatoes, peas, glazed carrots, corn, yams,
stewed prunes, sliced beats and sautéed mushrooms.


Mashed potatoes and peas or "Bird's Nests." made
using paper pulp and Styrofoam beads.


Meatloaf sliced with tomato sauce. These were made
using paper pulp, dried and then painted with acrylics.
The glazed tomato sauce was painting using puff paints.

 
In the lower left corner is a canned peach slice.
In the center are tomatoes stuffed with tuna salad.
In the lower right corner is stewed tomatoes and okra.


Pineapple and cottage cheese, corn bread, applesauce
avocado and tomato, and macaroni and cheese.

Tuesday, July 4, 2023

What is inside Maryellen Larkin's Refrigerator?

        Maryellen's refrigerator/freezer was first sold in stores in 2016. It sold for $150. retail. This doll appliance, like many kitchen appliances of the 1950s, came in perfect pink and aqua.

The Accessories That Come With Maryellen's 1954 Refrigerator: Our own versions of these crafts will be linked to as these are published...

Reviews About the Above Set at YouTube:

1956 Frigidaire Refrigerator Ice Box Commercial.
See also the video about A Step Saving Kitchen, 1949

More Posts About Dollhouse Kitchens:

Thursday, May 11, 2023

Crafting a Herb & Spice Collection for AG dolls...

The finished spice cupboard for those dolls who love to cook!

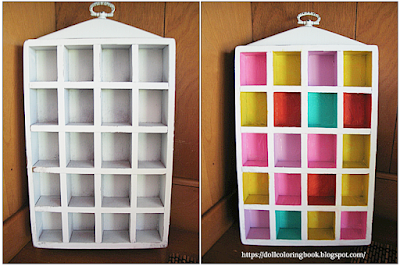
       This spice rack hangs in our AG dollhouse kitchen. I painted the interior compartments in the same accent colors used inside our largest dollhouse.
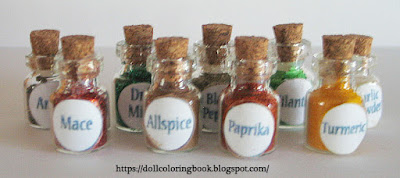
      The spices listed on the labels above include: Allspice, Basil, Bay Leaf,  Caraway, Seed, Chives, Cilantro, Cloves, Cumin, Parsley, Sage, Thyme, Black Pepper, Dill, Ginger ,  Mustard, Nutmeg, Paprika,Oregano, Celery Seeds, Salt, Curry, Mace, Chilli Powder, Red Pepper,  Anise, Bay Leaf, Flax, Garlic Powder, Onion Powder, Fennel , Poppy Seeds, Saffron, Turmeric, Dry Mint.

I painted the small spice cupboard to match our 18" dollhouse
kitchen that has similar accent colors.
Supply List:

  • tiny glass bottles with corks
  • wooden box with small compartments
  • acrylic paints
  • spice label printable (below)
  • double sided tape
  • clear packing tape
  • home printer
  • glitter, paper, spices (for stuffing  glass bottles)
  • hot glue gun and hot glue

Step-by-Step Instructions: 

  1. First, you will need to acquire a small spice rack sized for an 18" doll. The example show here is made from wood. However, you can make one similar to this using a small cardboard box. This one is made to hang on the wall; see the fancy metal loop at the top. (photo above.)
  2. My doll sized spice rack was originally stained. I painted the who shelf white and then the interior shelves in accent colors found in our large, 18" doll kitchen. Our kitchen is grey with pink and coral accents.
  3. I filled the tiny jars with glitter, beads, real spices and shredded paper.
  4. Then I squeezed hot glue just inside the lip of each jar and pressed the cork inside so that the bottles would not leak during play.
  5. Below are the spice labels that I printed out for this craft. Each one was cut and pasted initially with double stick tape and then taped over the front of the label with clear packing tape. 

Photo, closeup of tiny glass bottles with cork plugs. I purchased
these in the craft aisle at a Dollar Store. They are less than an
inch tall and are filled with glitter, paper, and some with real spice.

Spice labels printable for very tiny jars.

See also button top salt and pepper shaker craft

Saturday, January 14, 2023

How to craft a mop and bucket for your 18" dolls...

This pet dog above is watching his mistress mop up his muddy paw prints on the
kitchen tile floors!
 
       To make this mop and bucket set you will need the following supplies: cardboard tube, grey and  yellow paints, white school glue, scrap cardboard, natural looking yarn, green embroidery floss, a dowel rod, hot glue gun and glue stick.

Left, the yarn is wrapped around a 3" length of scrap cardboard until it is very thick. Center,
Use an embroidery needle and floss to sew the lengths together across the top of the card
before you ever remove the mop head from it. (I used a blanket stitch for this.) Right,
sew a second seam using a straight stitch across the yarn top approximately
 1/4 inch below the top seam.

Step-by-Step Instructions for The Mop:

  1. Decide in advance how long you will need your doll's mop to be and cut this length from a dowel rod. 
  2. The finished mop head will be approximately three additional inches in length. However, that means that these lengths are actually double that length because the mop head is wrapped around a piece of cardboard. (see photo above.)
  3. Don't remove the yarn loops from the cardboard until these are sewn together across the top using an embroidery needle and floss. Then remove the card.
  4. Sew a second seam in a straight stitch 1/4" below the top stitch if you wish. (optional step)
  5. Take your scissors and cut the loops across the bottom.
  6. Now you will need to apply hot glue to the end of the dowel and roll the mop head around it's tip. 
  7. You may also need to squeeze extra hot glue into the interior of some of the mop head to secure it more to the stick. If your yarn is thick like mine, you won't even see this extra glue.
  8. Paint the dowel yellow. (optional)
  9. Braid an additional loop as a handle for holding and hot glue this to the top of the mop stick. 
  10. Wrap and glue a thinner piece of embroidery floss around the loop's ends to finish the mop neatly.

The finished mop for an 18" doll measures 11 1/4 inches.

I recycled a tube and cap from  Pillsbury Cinnamon Rolls with Icing dough pack to make this large
 mop bucket for the dolls to use along with the mop. As you can see, I glued a faux water paper
inside the tube and the bottom as well. I also painted the outside of the bucket grey and twisted
a wire into each side of the bucket so that a doll could carry it.