Showing posts with label dd24. Show all posts

Monday, May 22, 2023

Knockdown Mini Dining Set

I purchased this laser cut dollhouse furniture kit second hand. The seller said that this kit
was at least 40 years old. I'm not sure of that age so if any of you are familiar with this
unbranded kit; I'd like to hear from you in the comments below. 

       I used bright pinks and dull blues along with a decoupage technique for the seats and tops of this finished dollhouse furniture. As some of you may have guessed, it has been finished for a little girl's toy dollhouse especially. 
       Furniture kits like these may be found all over the internet. Sometimes the thin balsa wood comes warped because of the age of the kit, so one should not purchase similar items like mine expecting everything to be perfectly flat. However, you can make some charming little pieces of play furniture for young ones... Just don't pay too much!

Photo of brightly painted dollhouse furniture for the dining room in pink and blue.

Saturday, April 1, 2023

Three Printable Doll Dish Patterns

        Printable dishes below are made available for young students to craft with using their personal home computer printers. Carefully cut out the designs below and decoupage them with Mod Podge onto cardboard or oven bake clay. Choose the pattern that best compliments your doll's dinnerware! 

Old-European Dishes


Persian Rose Dishes


Spinning Star Dishes

Wednesday, February 8, 2023

Blue and White Chinaware for Dolls

On the platter is Fair Mount near Philadelphia
by Stubbs Staffordshire. I've made it printable
and of a color similar to the Blue Willow plates.

        "Transfer printing is a method of decorating pottery or other materials using an engraved copper or steel plate from which a monochrome print on paper is taken which is then transferred by pressing onto the ceramic piece. Pottery decorated using the technique is known as transferware or transfer ware."
        Indigo or Cobalt blue and white are by far the most popular combinations in transferware but it also comes in brown and white, black and white, green and white, red and white....well, you get the idea. It has been manufactured for over 100 years from many different ceramic companies. Staffordshire is probably the most famous company to produce collectible transferware.

The Blue-Willow Plates that tell a legend of two lovers.

Small sauce bowls. These are hand painted blue and white.

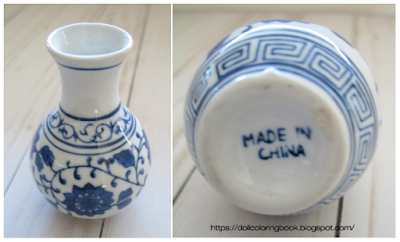
A small, three inch tall vase made in China and it is blue and white.  


Blue and white doll sized tea set, added to the set this week.


Lovely small salt cellars fit in perfectly with this collection. 

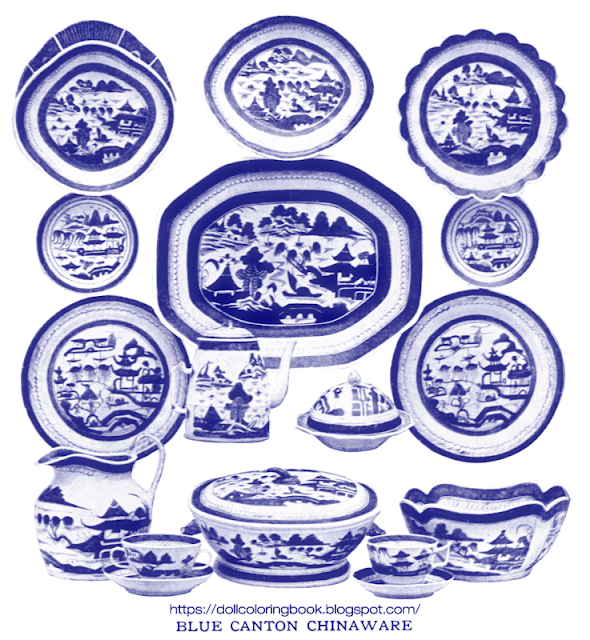
Collection of Blue Canton Chinaware sold 100 years ago.

 The Legend Behind Blue Willow China

       "Everybody knows Canton Chinaware - the always popular open stock "willow" pattern - with its pagodas, bridges, streams, boats, little figures of men and women, and the love birds. A quaint legend has it that the story depicted on the china tells how a mandarin had an only daughter, Li-Chi, who fell in love with her father's secretary, Chang.
       The mandarin forbade the match, so the lovers eloped, hiding for a time in a gardener's cottage, until at last they attempted to make their escape to an island which was Chang's home. The mandarin pursued them, whip in hand and would have killed them had not the gods come to the rescue and changed the two into a pair of turtle doves.
       In the design will be seen the mandarin's house with a fence round it, the gardener's cottage, a bridge over which the mandarin ran after his daughter, who, with a staff in hand was accompanied by Chang. Above are the turtle doves, and beyond is a boat crossing to the island. At the time of the elopement the willow was shedding its leaves, hence the name of the design.

Above is the original antique blue willow legendary plate design. It is a printable for those
 students who would like to decoupage a set of china plates for their dolls. Cut cardboard to
back the plate designs and stick them together with Mod Podge. Give your doll's dinnerware
several coats of Mod Podge to make them durable enough to play with!


Saturday, January 28, 2023

Doll Sized Fruity Porcelain Plates

       There is something very charming about small dishes, especially sets that are as lovely as these. Together with the bowl of vegetables they will make an irresistible table setting.

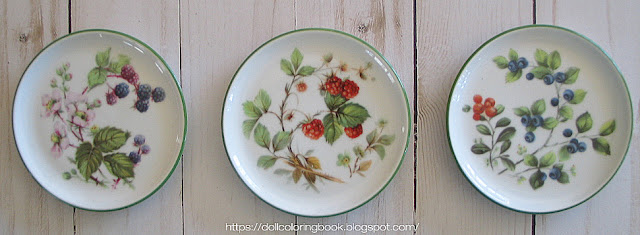
Left, strawberries. Center, gooseberries. Right, rose hips.

       I did not find them in the same place but picked up the hand-sculpted dish of veggies in an estate sale and the bone china coasters online. They are all so perfectly sized for our 18'' dolls.

These small, doll sized veggies are hand sculpted porcelain from France and so is the bowl.

       In the future, I will continue to include more additions to this set on this post as these are either collected or crafted.

Left, blackberries. Center, raspberries. Right, blueberries.

More Fruity Crafts:

 
Very delicate lattice porcelain dishes with fruit decal centers and gold painted edges.

Wednesday, January 25, 2023

Elegant Bird Printed China for Dolls

       K & A Krautheim Selb Bavaria Germany Bone China coasters make lovely formal place settings for the 18" dolls. You can hang them on the walls of a dollhouse dining room or set an adorable table for your dolls to eat at. We are going to collect center pieces and occasional china pieces to accompany this set in the future. Then I will post the editions here for visitors to see.

Left, Eurasian Blue Tit. Center, Yellow Bellied Flycatcher. Right, Eastern Red Breasted Blue Birds.

       Coasters make perfect tableware for 18-20" dolls. These may range from 3 1/2" to 4" depending on the company that produces them. The plates here include birds that start off as decals that are then fired onto the china in a kiln. Then after the plates cool and real gold rim is painted on by hand.

Left, Goldfinches. Center, Chaffinches. Right, Splendid or Scarlet Chested Parrots.

Carved marble fruits and dish from Mexico make a festive tropical center piece to go with the bird plates!

A lovely doll sized teapot trimmed with gold leaf on the spout, knob and handle. Pink and yellow roses
plus a gold and navy boarder are used in it's design. This teapot looks as though it goes well with our
 gold trimmed bird dishes/flowering trees above.

Saturday, April 16, 2022

Antique Printable Rugs

        Two printable antique rugs below for your personal dollhouse decor in a doll dining room, parlor, bedroom or living area. Drag them into a Word Document to make them smaller if you need to. Click directly on the images to download the largest available size. Cut them a bit longer and paste on a fringe if you like.

A floral motif for a formal Asian Rug.


Decorative birds, horses, elephants etc... on an antique rug from India.

Thursday, April 14, 2022

Cut, shape and paint doll sized silverware...

        For this craft you will need a small, sharp pair of scissors, light wt. cardboard, white glue, white typing paper, grey acrylic paint and Mod Podge. This project is not recommended for young children; it is quite difficult for them to manage the detailed cutting. But, if you are an adult or older sibling you may have the skill and patience needed to make the cuts.

Above, the finished sample fork, spoon and knife made from cut, layered and pasted cardboard.

       I gave the pattern for the fork only three prongs because I thought it necessary to make the design here as simple as possible. My versions of this craft layer three clippings of each fork, knife and spoon with white school glue in between. Then I covered the silverware with a final layer of white typing paper to give each piece of flatware strength. While working with the tiny cardboard fork, I bent the prongs upward and shaped the spoon gently with the rounded end of a pen. The results were better than I expected but the items are still relatively fragile for a child to play with. I chose to paint the finished pieces light grey before giving each a coating of Mod Podge.

As you can see from the ruler included in the photograph these
sample fork, knife and spoon shown are very tiny, even though
 this silverware was crafted for 18" dolls. Can you imagine how
 tiny these utensils would need to be for a Barbie doll?


The tiny pattern for our 18"
doll sized silverware.

Similar Doll Flatware:

Tuesday, April 6, 2021

Floral Printables for Dollhouse Dishes

        Below are three sheets of flowers for you to cut and paste onto doll sized dishes. Decorate with Spring blossoms in a rainbow of colors: blue, purple, yellow, pink, red and russet. Many varieties are included here: tulips, coral bells, wild roses, daisies, morning glory, violets, mums etc...

Sheet of printable wild flowers for your dollhouse dishes.

Cut and paste lovely pastel printable flowers for your doll's dishes.

 
These spring flower designs for doll sized platters.

Friday, January 22, 2021

Painting a faux wood grain on doll chairs...

Left, Bold green and purple paint, stripes and polka dots. Right, painted with gray base coat.

        I picked up these sturdy but ugly doll chairs at my local Goodwill for three dollars a piece. They fit our 18" American Girl dolls perfectly and will make a nice option for dining room seating. However, the bold colors and patterns will not match any of the other furnishings in our giant dollhouse.

Left, I've painted the cracks in my chairs with black acrylic. Right, chairs dry between coats of paint.

        Something about these chairs reminds me of fairy tale decor. They are the kind of chairs one might be seated on inside of a cottage in the woods, surrounded by seven little men. In any case, they will look much more attractive in my own estimation after I've repainted them.

Above, stripes of grey in many tones and shades are layered on top of the chairs until transformed.

       I have lived with old furniture for so long that painting something to look antique has become second nature to me. I sometimes feel like I have cobwebs between my knees! After painting so many stripes, I combine the last grey layer with white and soften the remaining wet surface with a dry, soft brush. The chairs are ready for play once these are sealed with a clear acrylic varnish.

Monday, October 26, 2020

Printable Dollhouse Tapestries

       Tapestry is a form of textile art, traditionally woven by hand on a loom. Tapestry is weft-faced weaving, in which all the warp threads are hidden in the completed work, unlike cloth weaving where both the warp and the weft threads may be visible. In tapestry weaving, weft yarns are typically discontinuous; the artisan interlaces each colored weft back and forth in its own small pattern area. It is a plain weft-faced weave having weft threads of different colors worked over portions of the warp to form the design. Read more... 

       Printable tapestries below may be used in a dollhouse of any size, because tapestries come in any size, from the very small to the giant. 

Late Gothic Hunting Tapestry.

This tapestry is even larger; click on it to download the largest available size.

Tuesday, March 10, 2020

DIY Cardboard Plates for 18" Dolls

Green and white print dishes for our doll's St. Patrick's Day Celebration.
       These cardboard doll plates are so easy to assemble and then layer decorative papers on top for effect. You can choose any designs you like, for any or all of the holidays. Make a set of dishware for everyday use and extra sets for the change of season. Your only limited by your imagination and your cardboard supply.
       I used a white tacky glue for assembling the cardboard pieces that I cut from the template below. Then I layered on the decorative paper with Mod Podge. This technique is called decoupage.
       Mod Podge is a relatively tough glue that will hold up to all kinds of play inside your doll's kitchen. And when the dishes wear out, you can simply make more!

Cardboard cutouts for our doll's dishes before they are assembled.
Templates for a service plate and a dinner plate for 18" dolls. Remember
you may size these down for other dolls by dragging the template 
into a Word Doc File and clicking on the image to drag the corners.

Friday, January 24, 2020

Sew A Doll Sized Table Skirt

The table skirt beneath is made from a silk ivory colored fabric and the
 table cloth on top is cut from a plastic sheet from the dollar store. The
 dolls are ready for a formal summer banquet. The top plastic table 
cloth is from a dollar store.

       Granted, table skirts are not something that every little girl requests for her dolls. But because I use them in doll displays, I've decided to include some quick general instructions for those of you who may be interested in hosting a doll party, wedding, or formal event in the near future. 
       A table skirt is a tricky sewing project because it requires patience, so sign up the nearest adult for help if you are not an experienced sewer. 
       First, you will need to do a little measuring of your doll's table. Wrap a tape measure around the entire outer edge of the table and double that measurement for the length of fabric that will be required to create the gathered table skirt. Allow for a seam at the bottom touching the floor and also 1/3" seam at the top of your table skirt for hemming to the table top cover.
       To cut enough fabric to cover the table top, lay your doll's table upside down on top of the wrong side of your fabric. Trace around the table's edge with chalk and then measure approx. 1/3" more outside of this tracing for a seam allowance with a second chalk mark. Cut out this fabric rectangle, square, oval or circle and iron on a lining of the same size, if your fabric of choice is flimsy. 
       Sew the short wrong sides together of your table skirt. Then ad a hem on the bottom half of the skirt using a straight stitch by hand or with a sewing machine. Press open the side seam and press down the hem. 
       Gather a ruffle using a large bias stitch and a bright red thread so that you can easily remove this stitch after the ruffle has been sewn into the table top cover with a tighter seam.
       Use straight pins to evenly attach the ruffled skirt to the table top fabric wrong sides together. Sew in a hem around this piece approx. 1/3" or 1/4". If you are doing this with a machine, be careful to remove the pins before letting the needle run over them. This is tricky work but once you have made the table skirt in a few neutral colors, you will be able to set up some fairly glamorous displays for your doll's parties!

Left, is the sewn table skirt finished. Right is a closer view of the pleated/ruffled edge.

More Table Skirt Projects and Example Displays:

Wednesday, November 27, 2019

Shape and Decoupage Coffee Mugs for Your Dolls

10 tiny, doll sized, paper mach mugs are cut from tubes and decoupaged in fun scrap paper prints.
 
Cut tubes to the desired size. Cap off the bottoms of mugs
 with cut, molded bottoms of a recycled egg carton.
        These colorful, printed, doll coffee mugs are made from supplies you can find in almost any crafter's stash.

Supply List:
  • decorative papers
  • tacky white glue
  • Mod Podge
  • paper tubes
  • paper egg carton
  • acrylic paints
  • tiny paint brushes
  • light weight cardboard
       Cut the lengths you desire from a long paper tube for these mugs. I prefer the paper tubes that come in packaging for wax paper or parchment. You may need to ask an adult to help you cut these mugs because the cardboard tubes that are thicker make the nicest coffee mugs and these thicker tubes must be cut with an X-acto knife or sharp blade. 
       I then cut the bottoms from a paper egg carton for the bottoms of my doll sized mugs. Glue these to one end of each paper tube using tacky white glue. Let the seams dry.
       Decoupage printed scrapbook paper to the outside of each mug and white typing paper to the inside of each mug.
       Cut narrow strips of cardboard and use tacky glue to attach these at the top and bottom side of each coffee mug. After this dries, add a second cardboard layer to the handle to give it strength. Paint the handles to make these a uniform white that match the inside of each coffee cup.
       Mod Podge the little coffee mugs for a clean professional finish.
Left, decorative scrapbooking paper stack. Right, finished coffee mugs for our dolls to fill with their favorite beverages.
Cover the cardboard handle where it attaches at the lip of the coffee mug
with matching paper on either side. (see arrows)
More Miniature Doll Mug Crafts:

Thursday, November 14, 2019

Sew Four Reversible Pumpkin Placemats

Our festive Halloween table is set for serving up some delicious pumpkin pie!
A few festive touches set apart the Halloween table: paper/sticker 
napkin rings, punched fall leaves from construction paper and a 
painted black and white Jack-O-Lantern.

Steps for cutting and ironing the placemats.
       Your dolls can use Autumn themed placemats  to decorate for more than one holiday; just make them reversible! I chose a Halloween pumpkin theme for one side and a playful Thanksgiving print for the other. (I will link to pictures of the Thanksgiving print as soon as I post a dinner menu.)

Supply List:
  • Thanksgiving and Pumpkin Novelty Fabric Scraps
  • sewing machine or sew by hand
  • needle with matching thread
  • pattern (below)
  • thin cardboard
  • iron (adult supervision for this) and ironing board
Step-by-Step Directions:
  1. Download and print the free pattern for our doll placemats below.
  2. Cut out the pattern and trace around it with a pencil on the back of an old cardboard cereal box. 
  3. Cut out the cardboard template.
  4. Turn to the wrong side the pumpkin novelty print fabric and use a piece of chalk to trace around the cardboard template. 
  5. Make a 1/4" seam allowance when cutting out the fabric placemats. 
  6. Repeat the above steps 3-5 using a novelty Thanksgiving Day print.
  7. Center the cardboard template on top of the cut placemats and iron down the seams by folding these around the template and pressing them down with a hot iron. Remove the cardboard.
  8. Layer wrong sides of each cut placemat back-to-back and sew a straight seam around the outside edge of each placemat. 
  9. Now you can use one side of the novelty print placemats for Halloween and the other sides for Thanksgiving.
I used acrylic paints to transform the Jack-O-Lantern above. I painted 
some of the ridges of my pumpkin black and others white. Then I 
decorated the Jack-O-Lantern more using stripes, polka-dots and 
zig zag patterns. Lastly, I painted his scary grin using a bright 
yellow paint. Now he glows bootifully from within!
I made tiny paper napkin rings by pasting together strips of orange 
construction paper. Then I cut out four tiny white napkins to roll up and 
thread through the napkin rings. I used Jack-O-Lantern stickers to 
decorate the tiny napkin rings.
A birds-eye-view of our Halloween table from above. I used a fall 
leaf hole punch to make my leaves that are scattered about the 
table. Punch out a variety of fall colors: black, grey, white, and
orange for the finishing touch.
Free placemat template for 18" doll dinner table.