Thursday, July 18, 2024

How to make a doll's turntable for your 80s and 90s doll fans

I was thrilled to come across this product while surfing ebay.
 A set of coasters that look just like old-fashioned records that
came on a realistic looking turn table! Wow, a perfect faux,
music themed item; so easy to convert it into a photo prop for
our doll themed blog. Remember, the manufacturer says this
is not a toy and the parts are not intended for play. A teenager
or adult could include this craft inside of their doll collections
but a small child should not be led to believe that it is safely
assembled for general play. If the small parts broke, these 
could be choked on.

       Sometimes I stumble across items not intended for play that would make perfect photo props and this is a prime example of one of these. An 18'' doll-size turn table; manufactured and marketed to be used as coasters beneath a glass. 
       Ironically, the records meant to be coasters have a hole in the middle so liquid can seep through and damage a table anyway? Well, I'm not going to use these for their original purpose so, it won't ultimately matter to me. If you order this set through the mail you will get the black plastic turntable only with six faux records. The records are very heavy and durable. The tonearm looks very real and swings easily over the top of the records.
       If you lived during the 1980s or 90s you would probably play your music at home using a turntable just like this one.
       I chose to make a set of speakers to go with the turntable out of wooden blocks, but small boxes or stacked cardboard cuts may be fashioned into a set of these just as easily. 
       Speakers during the 80s and 1990s came in all different sizes. So crafters could elect to make much larger ones than those pictured here if they prefer.
       I chose to use the plastic woven sheeting purchased from a garden center to mimic the speaker grill cloth stretched over the audio components; I have a roll of it left over from other projects. There are other materials like this one that are common and easy to recycle. The plastic woven bags used to package veggies in the grocery store may be upcycled into crafts like this one. The nicest packaging is often used to protect and redistribute garlic cloves. Crafters can use this alternative to save money if they do not have what I used for my doll speakers. This plastic, woven bag may be painted in advance of use with acrylic paints so that it matches the color you need, but you must stretch it first and then lay it on top of a piece of wax paper to dry.

Supply List:

  • scrap cardboard
  • 2 identical blocks (mine are approx. 3'' x 1 1/2'' x 1 1/2'') or substitute 2 identical boxes for the dolly speakers
  • woodgrain scrapbook paper
  • masking tape
  • white school glue
  • hot glue and hot glue gun
  • plastic weave (purchased from garden center)
  • one package of vinyl coasters (found on ebay or somewhere else)
  • black acrylic paint
Step-by-Step Instructions:
  1. Measure the turntable and then cut several pieces of heavy cardboard approximately 1/2'' larger for a platform. The turntable may be glued then directly onto the cardboard platform using hot glue. 
  2. Decoupage the platform using white school glue and woodgrain paper.
  3. I decoupaged this same woodgrain paper to two identical wooden blocks to make my dolly speakers. 
  4. Then I cut a frame for each speaker from cardboard and attached the plastic weave to the backside of the frames using masking tape.
  5. Paint these frame black to match the plastic weave and attach them to the front of each ''speaker'' using  

Left, see speakers in progress. Center, the vinyl coasters ordered from ebay. Right, the coasters
look exactly like real records only much smaller, perfect for an 18'' doll craft.

More About Music Sound Systems:

Silver and Turquoise: A Story of Navajo Jewelry

Navajo bowguard.
       A Navajo native silversmith sat in the shade of a gnarled juniper tree, fashioning a bowguard for his son. He had bought silver and a fine piece of sky blue turquoise from the white man at the trader's store. For many days he had thought about the shape and design of the ''gato."
       With his chisel and awl the smith carved the design in a flat piece of sandstone. He took another flat piece and made a hole in the middle of it, and, after greasing the stones with some mutton fat, tied them firmly together.
       He melted the silver in an old tomato can over a hot fire of juniper charcoal and, grasping the edge of the can with a pair of tongs, slowly poured the liquid into the hole at the top of the mold. After several hours, when the metal had hardened, he carefully separated the two stones and lifted out the bowguard. The work was well done. Now he had only to file the rough edges and polish the silver to satiny smoothness with sand and ashes. With a tiny strip of silver he fastened the turquoise in the center of the bowguard. The father smiled. His son would be proud to wear such a fine gato when he went rabbit hunting on the desert. The boy would wear it on his left wrist, strapped on with a piece of leather, so that when he shot an arrow from his bow the bowstring would twang against the hard metal and not cut his arm.
       The man's own bowguard was worn thin from many years of use but it still gleamed against his brown skin. He had watched his father make it long ago, and he had learned how to use the tools and work the silver.
       He had made beautiful bracelets and rings and earrings for his wife and children and for himself, and little flat buttons to decorate the bright-colored velveteen shirts that they wore. He had also made belts with round flat pieces of silver, called ''conchas," fastened to them, and fine necklaces of hollow round beads with a crescent-shaped pendant, the ''naja," hanging from the bottom. Between the beads hung silver ornaments shaped like tiny flowers.
       He did not often cast the silver in molds as he had done in making the bowguard. Usually he hammered the soft metal into the shapes he wanted and carved or stamped designs on them. In some of the jewelry he set pieces of turquoise. Turquoise was a sacred stone and every Navajo wore a piece for protection from evil. Their ancestors had made necklaces and earrings and other ornaments from turquoise hundreds of years ago.
       The man's grandfather used to tell him stories of the time when the Navajos did not wear silver jewelry. That was before the year 1850 when Atsidi sani, ''The Old Smith,'' had learned how to forge iron and silver from a Mexican metalworker. After he had mastered the craft he had taught others.
       Many Mexican people lived in the southwestern United States at that time and the Navajos copied the silver ornaments that the Mexicans wore, the buttons and tiny ornaments shaped like pomegranate fruits worn on the outsides of the trouser legs, and the flashing bridles on the horses. The Navajos did not wear trousers, so they strung the buttons and pomegranate fruits on strings and wore them as necklaces.
       From their neighbors the Plains peoples, who lived on the grasslands farther east, the Navajos got bracelets and rings and belts made of silver, copper, or brass. The Plains Indians did not know how to make these things themselves, but got them from the American traders in exchange for furs. The white men knew that the natives liked these shiny ornaments, and in the big cities of the eastern United States there were metalworkers who made them especially for trade with them. At first the Navajo silversmiths copied the white man's jewelry, but soon they began to create their own shapes and designs.
       Besides being lovely ornaments the jewelry was useful as money. In fact, most of the early pieces were made from Mexican and American silver dollars, melted or hammered into the desired shapes. The traders would accept a ring or a bracelet in exchange for food. And if sometime later a Navajo wanted his ring back, he would bring a sheep or a fine blanket woven by his wife and exchange it for his piece of jewelry. Even nowadays the Navajos pawn their jewelry this way when they are poor and buy it back when they can afford to.  Hambleton 

Wednesday, July 17, 2024

The Fish That Children Catch

Fresh water, sun fish from North America.
       Have you gone fishing this year? If you have, perhaps you have caught little, round, spotted fish, long thin, silvery fish and plump green and yellow ones; but do you know even their names? 
       Many of the fish caught by boys and girls are the little round fellows we know as sunfish. There are a number of different kinds of sunfish to be found in the Midwest; and perhaps the most popular of all is the pumpkin-seed or sunny. These fish grow to a length of eight inches; but most of those that reach a boy's string are not more than four or five inches long. What the pumpkin-seed lacks in size is made up in color; for it is one of our most beautiful fish. The green of its back shades into a delicate blue on its sides and the blue, in turn, blends with the orange-yellow of its stomach. Its cheeks are orange streaked with blue; a dot of bright scarlet marks the lower part of the gill cover; and scattered all over its body are orange-red spots. The pumpkin-seed can be caught in nearly all clear brooks, ponds and lagoons; and it will bite on almost any kind of bait.
       As well known as the pumpkin-seed, but far more important as a food fish, is the bluegill. It, too, belongs to the sunfish family and has the round, flattened body and shiny scales characteristic of that group. The bluegill's body shades from dark green above to light green or white below; and the delicate blue of its gill covers and cheeks gives it its name. On each side near the head is a spot of rich, velvety black. Bluegills are the largest of the sunfish. They sometimes reach a length of fourteen inches and a weight of one and one-half pounds. The best place to fish for them is off the edge of a sandbar where there is a patch of water weeds. The fish go in rather large groups or schools and where one is caught there are almost sure to be others. The best baits for them are angleworms and grasshoppers; but they will take many other kinds.
       A third plentiful sunfish in the smaller lakes and streams near Chicago is the rock bass. Like the bluegill, it lives among the plants found in clear, cool water or hides among the stones of rocky bottoms. Some boys call it red-eye or goggle-eye because it has large red eyes. Its body is light green banded by darker green streaks. In the spring, the father fish can often be seen near gravel or sand bars. There he hollows out a nest and, after the mother fish has deposited her eggs, remains near it protecting the eggs until they are hatched. Any kind of bait may be used in fishing for the rock bass; but it seems to relish small minnows, grubs and angleworms more than anything else.
       Two other sunfish which you may catch are the warmouth and the green sunfish. The warmouth has red eyes like those of the rock bass; but it is much darker in general color and its scales are often tinged with red. It is found in shallow, mud-bottomed streams and lakes and its flesh is apt to have a muddy flavor. The green sunfish is a beauty. Most of its scales are marked with a sky blue spot edged with gold; and, at a distance, these colors blend to a bright, brassy green. Its sides are sprinkled with dark spots and its cheeks are striped with narrow blue lines. Like the other sunfish, it can be caught readily with angleworm bait. It is not an important food fish; for it never weighs more than four or five ounces.
       One of the finest fish of our area and one as easily caught as any of the sunfish is the yellow perch. It is valued by older fishermen as well as younger ones; for it grows to a length of fourteen inches and a weight of two pounds and it is an excellent food fish. The yellow perch's body is longer and narrower than that of a sunfish. Its back is green, its sides are yellow and its stomach is usually white. The upper fins are green and the lower fins, red or orange. The perch bites on almost any sort of bait in practically all of the lakes of our region.
       From the piers and docks jutting out into Lake Michigan, many lake herrings are caught each spring and fall. The herrings spend their winter and summer in deep water where they are caught in nets by commercial fishermen. In the spring and fall, they come in to shallow water and there may be caught with hook and line. They are slender, silvery fish and resemble somewhat their large and important relative, the whitefish, although their own weight seldom exceeds two pounds.
       The sunfish, perch and herring all wear an armor of shining scales. Bullheads are protected only by their tough skin. Their large head, wide mouth, curious barbels or whiskers and their dull color make them the homeliest of our fish; but they are, none the less, the favorites of many young fishermen. Perhaps it is because they are plentiful in almost every pond, small lake, water-filled quarry and sluggish stream and because they usually hook themselves firmly when they take the bait. Cockrell


Flicky Flies shows the fish in the rivers in and near Chicago.

Lovely Floral Still Life Paintings...

Lovely geraniums in many colors: lavender, pink, red, magenta inside of a wicker basket.

       These lovely, old-fashioned floral paintings may be resized into any proportions needed, printed on. home computer and framed for hanging in a dollhouse.

Delphinium in many shades of purple and blue in a glass vase.

Sunday, July 14, 2024

''Belinda'' by Eric Parker

Belinda, the kitten cat, ate-up each and every rat!
 

Belinda by Eric Parker

Belinda was the smallest cat
That ever you did see.
One day Belinda met a rat
Quite twice as big as she.
Now, what are you to do
When a rat's as big as you?

Belinda said: ''I'm not afraid
Of any rat alive.
I'd swallow any rat that's made,
Or two, or four, or five.''
Now, how could she do that-
Such a very little cat?

The rat replied: ''I never knew
A cat as brave as I.
But as for such a cat as you,
I'll make you into pie.''
Did you ever see a rat
Dine off a pussy-cat?

Belinda said: "Superior cats
Think fighting only fun.
Just call a lot of other rats;
I'll eat them, every one.''
Now, don't you think that that
Was a most courageous cat?

Then other rats joined in the fight.
Big, little, short and tall,
Gray, brown, and brindled, black and 
white-
Belinda at them all!
D' you wonder how I know?
Belinda told me so!

''My Little Delft Friends'' Poem

 
My Little Delft Friends
by Margaret L. Ollman
 
1.
On the bright tiling they stand
My friends on the battered Delft plate,
And out on the window-frame land
Blue windmills are whirling in state.
Her knitting has dropped from her lap;
Puss anxiously watches its trail-
The little Dutch girl wit her muslin cap,
And the cat with a twist in its tail.

2.
Sometimes in Dreamland she smiles,
And I climb to the little blue room,
And play with the girl on the tiles,
While the kitten goes chasing a broom.
And when I awaken, mayhap,
They will toss me a glance from their nail-
The little Dutch girl with her muslin cap,
And the cat with a twist in its tail.

3.
If ever I go to the land
Where Dutch people fish and make cheese,
Where wooden shoes trudge o'er the sand,
And windmills grow thicker than trees,
I'll search every place on the map,
And hunt in each village and vale,
For the little Dutch girl with her muslin cap,
And the cat with a twist in its tail.

More Blue Delft Content:

Saturday, July 13, 2024

Fashions for Spring/Summer 18'' Dolls

        The following doll clothes are for Spring or Summer weather. Most of what our dolls are modeling this Summer is made from altered children's clothing. Sizing unwanted items down, is in my opinion, the most economical way to dress dolls. It eliminates the need for purchasing extra trims; recycling zippers, buttons, embroidery and elastic can save quite a bit of cash! Of course, there is also the added bonus of outfitting your dolls in some very professional looking pieces.

Left, is a lovely printed garden party dress that includes a butterfly 
embroidered to the bodice. Right a colorful hot pink, sleeveless knit top
coordinated with white, knee length shorts. The shorts have a cheerful
butterfly motif printed on them.

       Butterflies, polka-dots and stripes are all in fashion this year; you may see these woven, printed and embroidered into all kinds of juvenile garments! Classic sneakers, sandals and flip-flops are made to coordinate with every look as well.

On the left, stands our doll Christine dressed for a visit to a summer
theater performance. Standing on the right, is her friend, Candace; 
She is dressed in her favorite overalls and stripped long sleeves. She 
is on her way to watch fireworks in the park. Candace is also wearing
hand-painted sneakers made to look like the night sky.

       Dolls have all kinds of event to attend and participate in during warmer months, so they need flexibility in their wardrobe: skirts, shorts, dresses and overalls. Even a pair of colorful cut-offs may be included in our doll's summer mix. 

Christine and Kit both wear summer time knits with embroidered features. 
Christine is in a floral print skirt and Kit in the latest blue, stretch jeans.

       Christine is wearing metallic strappy sandles and Kit is in neon orange sneakers. Fun footwear is always an added bonus to dolly coordinates. No outfit is complete without just the right shoes!

Mesha shows off a lovely, ethnic blue skirt, trimmed in beads and tiny
mirrored sequins. She pairs the skirt with a simpler, grey knit top. The 
top is worn off the shoulder to repeat the horizontal design found in 
the skirt. Her white strappy heals finish the look. Now she is ready for
a fun day sight seeing in the city.

Left, Christine wears a simple Searsucker striped dress
is just the right choice to wear to church on a warm summer
 evening. Right, Kit wears a bold floral knit print along with her
bunny ear tee-shirt when playing in the park or watching a
movie at home with her parents.

Mesha's peplun top is decorated with 3D silk flowers and Candace wears
a cheerful green polka-dot dress. The tiny embroidered lady bug on her
bodice is pink, just like her flip-flops below.

       Mesha and Candace are ready to visit the market in town. They have so much to do to plan their family picnic but perhaps they will also have time to eat at the local pizza parlor and admire the flowers in the park. There is a free art show going on in the park too. Their fashions are perfect for all of their plans.

Left, Kit wears a popular polka-dot motif for summer, this one is pink 
and white knit with cut-off sleeves. Christine ties a cozy cardigan sweater
about her shoulders while it is not quite chilly enough to put it on. She 
will need it as the cool night air settles around her if she decides to
walk through the park in the evening.

Kit's top has a splash of yellow at the shoulder to make it look unique.
Mesha pairs classic overalls with trendy polka-dots.

       Summer fashions don't need to be fussy. Keep them on the light side, make them playful and charming. Above you can see Kit wears blue stretch shorts and a white and blue printed floral top. Mesha wears a polka-dot top with her buff pink overall shorts. These dolls are ready for fun and play but may still be dressed just right for a day at the zoo, shopping in a mall, attending a ballgame or visiting with girl friends at home. 

Now Kit wears horizontal stripes and a cozy hooded sweat shirt and
Christine shows off her ''Old School Gym'' tee shirt with bold black
and white color blocking. Both dolls are ready for sporting events!

Friday, July 12, 2024

DIY Boogie Boards and Surfboards for Dolls

Our doll, Christine with her boogie board (12'' x 6'')
       These doll-sized surfboards and boogie boards are cut from cardboard and decoupaged. Young students may use tracing paper and pencil to copy the shapes of our versions, if they wish. Otherwise, there are many different surfboard shapes on the web that they may work from when designing their own doll ocean crafts. 

Supply List:

  • heavy corrugated cardboard
  • decorative black and white patterned papers
  • decorative ocean wave or colorful printed papers
  • Mod Podge
  • white school glue
  • fun stickers to further decorate the doll surfboard/boogie board
  • Velcro
  • felt scraps
  • masking tape
  • twine

Handmade 18 inch, doll boogie boards, front and back. The fronts are decorated with
tropical papers and one with text, 'Ride The Waves.' The backs are papered 
with black and white prints to keep sharks disinterested in human prey. Small cuffs
with Velcro attachments and twine help child dolls hold onto their boogie boards in
the rough ocean waves.

Step-by-Step Instructions:

  1. Cut a surfboard or boogie board in a shape similar to our own from the corrugated cardboard. I doubled each of my four examples, gluing the layers together with white school glue.
  2. Mask all of the surfaces of cardboard entirely with tape.
  3. Now layer decorative papers and stickers using white school glue. After the final layer is completed, brush on Mod Podge  to seal the papers, keep them clean and strengthen the surfaces for play.
  4. If you are designing a boogie board cut a hole through the paper layers in the center of the board, near the top using a nail. 
  5. Fill the hole with glue and thread a piece of twine into the hole. Let it dry inside.
  6. Next, cut a piece of felt and stitch Velcro on each end to make a ''cuff'' for the twine to attach to with stitching. Now the cuff may be wrapped around the dolls wrist to keep the Boggie board with the doll. Boogie boards have this added feature to prevent them from floating away should a small child or doll in this case, fall off their boards in the water.

Left,  an ocean themed surfboard, decoupaged with wavy paper and shark stickers.
The backside is papered with a black and white, zigzag pattern to ward-off sharks!
The next example of a doll surfboard was decoupaged with ''groovy'' colorful
patterned wrapping paper and the underside decorated with a black and
white wavy pattern. Both surfboards are 18'' tall.

Prevent Shark Attack at Sea:

Thursday, July 11, 2024

Make Fun, Easy Beach Balls!

Our Mesha doll waiting to swim.
       I made two decorative versions of this beach or pool craft. One ball is red with white polka-dots and the other with large color blocking in: yellow, green, pink and lavender colors. The polka-dots where cut from typing paper and glued to the surface after the ball was layered in red tissue. The color blocking on the second beach ball was made by marking the masking tape surface in advance with a pencil and then filling in the four areas with different colors of tissue.
        To make a beach ball for a doll in any size or in any color you will need the following supplies: masking tape, colorful tissue paper, a Stryrofoam ball, white school glue and Mod Podge. You can purchase water resistant Mod Podge if you believe that this pretend beach ball will come in contact with water during playtime. I used ordinary Mod Podge because our 18'' doll pool is a dry playset.
       Cover the surface of the Styrofoam ball entirely with a layer or two of masking tape. Do so gently but with some small pressure of your fingertips. If you press too firmly, you could end up denting the surface unnecessarily. Judiciously squeeze small amounts of white school glue directly on top of the layered masking tape and press colorful tissue paper on top of the glue. Cover the entire surface one section at a time, allowing areas to dry entirely before covering other parts of the foam ball. 
       Drying times between each application are not lengthy, but you do need to be patient and methodical during the process. After the ball is covered with tissue and glue, brush on several layers of Mod Podge to seal it's outer surface completely before play. The Mod Podge will harden and take on a vinyl appearance after it dries.
 
Left, Styrafoam balls. Right, decorated to look like beach balls.

Monday, July 8, 2024

Find a doll sized crane arcade game . . .

A child's bank operates like a crane toy arcade when collecting coins for safe keeping.

       This ''Crane Bank'' is a miniature version of a crane arcade game. If you insert a quarter, the lights on top will flash, circus music plays and you can use the control knobs on the side to manipulate the mini crane inside to drop a toy down the chute. Claw machines in life-size versions may be found in a variety of shops and entertainment venues like: bowling alleys, arcades, pizza parlors and grocery stores in the U.S. This small bank version stands 12 inches tall and is the perfect size for our 14'' - 18'' dolls to play with.

Sunday, July 7, 2024

Maui Souvenirs and Snacks Shack

           As we recreate our own version of a Hawaiian family market, we will post pictures, instructions and links to product crafts and furnishings included in our Maui Souvenirs and Snacks Shack here.

Hawaii General Store and Souvenirs:

Tropical themed, window seat display
 
       To make this window display, acquire a box measuring approximately 19'' x 13'' x5'' deep. Cut a grid from additional light weight cardboard for the window and paste it to the back of the box. Cut also a from a thicker cardboard, a ''seat'' to glue inside the box 4 1/2'' from the base of the open box. I then cut additional pieces of cardboard to support the seat from underneath and make a short wall. 
       Then decoupage the inside grid ''window'' using an outdoors scene. A decorative paper of clouds or a view from a magazine (page) are easy to find and paste carefully between the mullions or panes of a window to make it look like a real window. Also decorate the interior walls of the window display using tropically themed wrapping papers and faux wooden papers on the exterior. Press on tiny hooks where you think it best to hang merchandise.
This grocery counter is made from a recycled desk supply catty and box ''stand'' beneath.

        Above and below are detailed photos of another display counter included in this doll shop playset. I decoupaged the large front shelf using a cheerful printed lemon paper, the exterior sides of the box stand using a textured woven canvas and finally the interior of the stand using a Shabby Chic wooden paper print. This is where our dolls display tropical fruits to sale inside the snack shack.

The top opens up for more storage and the bottom box ''stand'' can be easily removed.


The spinning eyeglass display case on and off stand.
       To craft this ''spinning'' display stand for sunglasses, you will need a tall spool (thread cone) with a stand combined. Plus a toilet paper cardboard roll and an additional large, recycled cap off of a juice carton. Cut sunglasses or sunshades from fashion magazines and also purchase tiny, white head stick-pins to fit beneath the nose piece under each pair of eyeglasses on the carousel display.
       It is important to make the carousel display one uniform color at the top and bottom. You could paint these components if you can not find them in the same color. Mine were already originally green. The toilet paper tube may be any color. I needed to cut the tube lengthwise in order to fit it snugly up inside the cap at the top. I then secured it with tape and additional glue.
       Glue the sunglasses or eyeglasses directly onto the tube, equally spaced. Stick the tiny pins at the nose piece for each pair of eye-wear to look like these are balanced on ''hooks.''
       The top tube piece is not permanently attached to the serger spool so that when it is put over the cone it may be easily to spin the display by the attached cap. Now your dolls can pretend to purchase twelve different  styles of eye-wear if they choose.

''fresh'' silk flowers, you-pick from old crayon catty

Dollar store wash clothes make easy beach towels.

''Aloha'' dollar store sign

Bolts of Hawaiian print fabrics wrapped around cardboard
cut-outs, 6 1/2'' x2 1/2 inches. These were made to fit into
a merchandise cabinet display.
More Related Content:

Saturday, July 6, 2024

DIY a Doll Sized Hostess Stand and Grill

Hostess Stand made from a box.

        A hostess stand may be used as either a reception desk or a concession stand in a doll playset, depending upon the theme of the toy. It is a counter where doll visitors are greeted often in hotel or restaurant toys or counters where food or other shop merchandise is payed for by dolls while living in their pretend environments. 
       Just right, you can see that I have constructed a homemade hostess counter that is very tall, 9 inches, because it is designed to suit several of our family's 18 inch doll playsets. It is constructed from a simple box, 8 1/2'' x 11'', and four recycled wooden marble runs. I attached these marble runs with wood glue, groove side facing inward, at each corner of the box. Then I decoupaged the walls of the hostess stand with contrasted faux wooden panel papers. After all of this dried, I then cut a counter and glued it to the top of the stand and then decoupaged another wooden paper pattern to it's surface.
       I could have left this doll furnishing alone at this point but I decided to glue in shelving so that it would better serve as a concession stand for the ''Americana Bowling Alley.'' 
       This stand will also be used in both a pizza parlor and a hotel in future displays. It is much more practical to build one of these counters for multiple playset themes than to make many of them. However, some parents/children may prefer to design more than one hostess stand in order to expand play with multiple sets at the same time. I will include a few lower counter tops in future posts that are designed to accompany this one under alternative themes.
       As for the color, I chose to keep it a bit modern with clean simple lines and in natural stained wood tones because this is my personal preference, not because it is popular. Your child may wish her hostess stand to be hot pink or purple. Many doll crafters are also still devoted to the grey, neutral color palettes used in early 21rst Century dollhouses and will select white for their doll furniture no matter what the latest furniture craze is about.
       In our bowling alley, I use this hostess stand as a counter for the dolls to serve the traditional foods purchased at bowling alleys in the United States. This fare includes things like hot dogs and chips, burgers and fries and also malts and milkshakes.
       I wanted to make a more authentic looking commercial grill with glass windows in order to view the food as it cooks. But, I wasn't really sure how to make one until I spied a small, plastic earring box at a garage sale. Apparently, these are often sold at dollar stores according to my adult children who often marvel at my ignorance...

Supply List for The Commercial Grill:
  • one plastic earring jewelry box
  • grocery fliers with interesting pictures of grills, hamburgers and hotdogs, flames and charcoal
  • silver metal tape (This gives the grill a commercial grade feel)
  • small cardboard tubes (roll these and make alternatively)
  • extra cardboard (cereal box)
  • Mod Podge for sealing and applying the decoupage
  • Sculpey for food (coming soon)

Left, The doll sized commercial grill assembled without food. Right, the grill and it's parts.
 
       To make this commercial grade grill the unique features are necessary. This kind of grill allows hungry dolls to see through the top while the hot dogs are spinning on the warming tubes and the hamburgers are sizzling on the grill. I will post pretend food for the grill and link to it here soon!

Step-by-Step Instructions for The Grill:
  1. Wipe down the plastic jewelry box with something like Windex. This will remove dirt and oil from it's surfaces so that glues will work better. It will also improve the application of the metal tape.
  2. Cut pictures of grilling dogs and burgers from your local grocery store fliers and apply these using Mod Podge on the sides only of the plastic jewelry box. You may also decoupage the lower front half of the box in front using clippings of words like: ''Summer Fun'', ''Sizzling Hot'' and ''Grilling Greats'' Just as long as you leave enough of the transparent lid undisturbed for the viewing of grilling meats.
  3. Cut and shape slender tubes to fit on and over the first plastic earring bar and glue them together.
  4. There are four tubes, the same shape but the second tube from the front has a slip down it's length so that this tube fits over the plastic earring bar and hold the rest of these tubes in place. 
  5. Cover the cardboard tubes with metal tape.
  6. Underneath the earring bar is a plastic shelf, cut a piece of cardboard to fit over this shelf and cover it with metal tape. Fit it tightly in place, this is where hamburger patties are grilled.
  7. Inside of the drawer shape vertical, thin walls cut from cardboard and covered with metal tape. I made two inserts to create three sections inside the drawers where condiments may be stored.

The grill shown open, lid up and the grill shown with the extra drawer for assembling the hot dogs
 and burgers with toppings is seen open and empty.


Above are three signs, print and choose one to decoupage to the front of your grill.

Lounge Seating for Our Doll's Bowling Alley

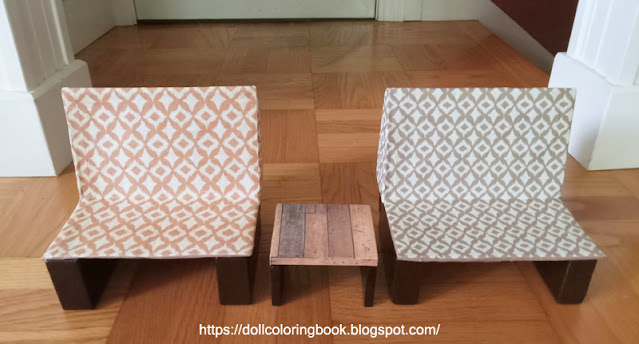
Lounge seating for our doll's bowling alley is made with cardboard boxes and wooden blocks.

        Box seating for dolls can be made with just a bit of imagination and a few supplies. The seating here was made with cardboard, decorative paper, wooden blocks, white school glue, masking tape and Mod Podge. This set may also be used as additional seating for our Sock-Hop Diner. I covered the lounge chairs with a paper that would look attractive across the room from the My Generation Diner playset. (I have restored this piece for our Sock-Hop Diner that I will link to from here in a future post.)
       The table was purchased from resale. It was once a votive candle stand. I painted and decoupaged it with faux wooden paper to compliment the seating in our doll's bowling alley. The dolls can set their scorecards and drinks on the table as they compete with their friends.

Left, the beginnings of a lounge seat made using cardboard and masking tape. Center, the seat
covered with decorative paper and white school glue and the wooden blocks attached at the 
bottom using wood glue. These have yet to be painted. Right, a detailed look at the side table
used between the two lounge chairs.

       To make seating like mine you will need to cut cardboard in one long length measuring approximately 18''x 8 1/2''. I bent one long piece of cardboard into sections approximately measuring 4 1/4'' x 5 1/2'' x 5 1/2'' x 2 1/2 inches. (see photo, above left) Use masking tape to hold this shape for one of two identical seats. Then glue wooden blocks for tall, heavy legs. These blocks for my set are 5 12'' x2 3/4''x 1 1/4''. I also used small triangular blocks glued to the upper corners of the seat backing and the wooden legs to give the lounge even more strength. This is not really a necessity but an option. You can see the small triangular block in the photos. The last two steps were Mod Podging the paper surfaces and painting the wooden blocks a brown color to go with my bowling alley color scheme.

What the lounge seating looks like from three different angles.

Craft a Cart for Bowling Balls

       Colorful doll sized bowling balls, pins and a cart are needed for the doll's bowling games. I used a box measuring 9''x 2'' x5'' to make the cart. 1 1/2 inch wooden blocks were glued to the bottom of the cart for legs. Glue inside just one shelf of equal size to divide the box into a cart big enough to store bowling balls.

Left, I use these balls from a dismantled tabletop pool table for 18'' bowling balls. I suppose that
the table was lost or damaged because I found the balls along in a bag for sale at our local flee
market. They are the perfect weight and size for our bowling playset. Right, see how the
balls are stacked in the cart.

What the cart looked like before I papered it. See it has wooden blocks for feet.

The bowling ball cart from three angles, finished with pastel color in the interior shelves and a hand
drawn, wooden exterior.

Both this large set of bowling pins measuring 4 inches tall
and the smaller set with 2 1/4 inch pins fit into our bowling
alley playset. This set may be used by both 14-18 inch dolls
and the standard sized 12 fashion dolls like Barbie.