
Our 18 inch doll family's festive, chocolate fountain was a bit frustrating to make. This is definitely not a craft for little kids to undertake for several reasons. The first being that working with hot glue by these methods is very dangerous. The child will likely get burned during the process and the process, however interesting to look at, is haphazard at best. Don't get me wrong, I think the outcome to be as cool as most people . . . but the making of it gets even hotter than you might expect.
One way to eliminate some of the burn 'potential' would be to work with plastic caps and containers only. I used metal ones. So my project became increasingly hot as I progressed through it. Originally, I tried making this fountain with plastic lids and I didn't like the look of them. However, a young person would probably not be as picky as I am!
Also, the dry time for this abundance of glue is quite long and the longer one needs to wait for 'hot' glue to dry, the more likely they are to get burned.
Layering hot glue to look the way you want it to is also a very fussy prospect. However, because I wanted this piece for our collection, I persevered and repeated the craft until I was satisfied with the results.
This is a very old doll craft first designed by Totally Rudy, watch her video here for additional directions if you like...
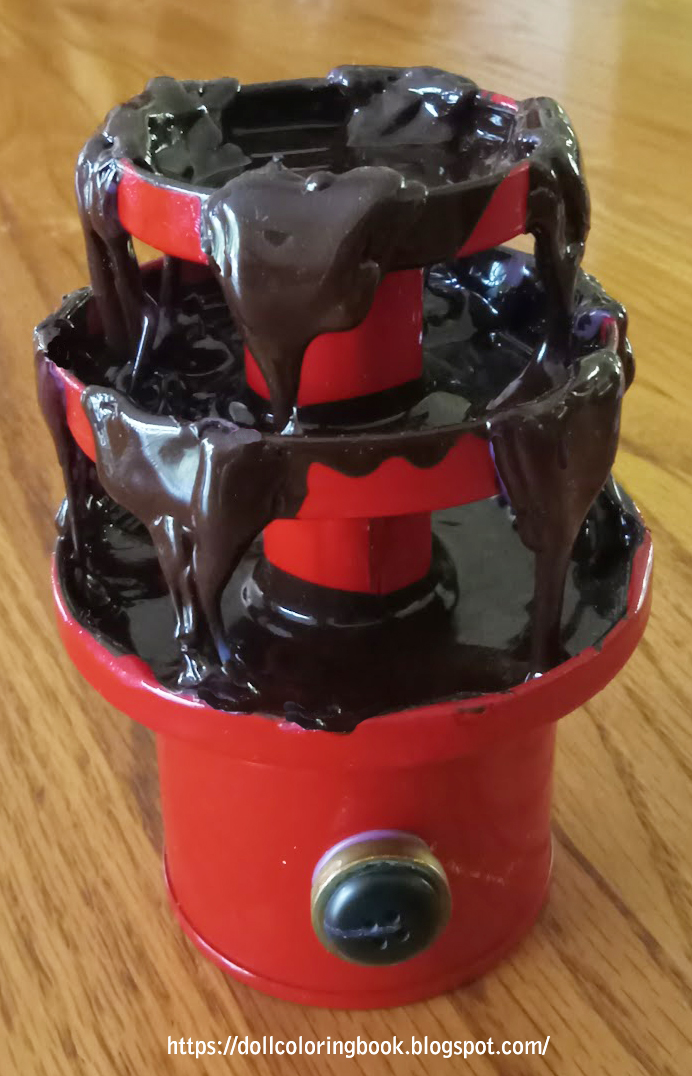
The finished chocolate fountain craft.
Supply List:
- 3 can lids
- hot glue gun and hot glue
- 1 small recycled fruit cocktail can
- two buttons, fit inside each other
- red spray paint
- brown enamel paint
- 2 empty spools
Step-by-Step Instructions:
- In advance of gluing the stacked lids and spools, try different formations to decide 'how' you want your chocolate fountain to look. You could have more or fewer levels for this faux appliance tower than what you see here. Chocolate fountains are certainly intended to be showy on a buffet during a party and like wedding cakes, these may look very different depending upon the tastes of the host.
- Hot glue the lids and spools alternating them. Then glue these platforms on top of a recycled fruit cocktail can.
- Spray paint the entire appliance one color. I chose red because our dolls will use it during holidays and red is the most common color used in America for a variety of holiday traditions.
- Hot glue the buttons on next in the center of the bottom fruit cocktail can.
- Next, is the tricky part, hot glue the chocolate flow along the edges of the lids so that it drips down into the lid below it.
- I chose not to fill my lids using the hot glue after doing this once before in a sample fountain that I tossed out. Instead I decided to try and fill the lids with the brown enamel paint and found this to be more aesthetically pleasing.
- After the paint in the lids has dried, and it will take several days, paint the glue 'drips' with the same chocolatey paint. Let dry.
 |
| Above are details of our doll's chocolate fountain under construction. I stacked empty spools and can lids to make this configuration. I have yet to paint the glue to look like chocolate in these photos... |
 |
| Above Left, detail of on/off switch for heating hot chocolate fountain. Center, the glue now painted to look like a rich, dark brown confection. Right, the fountain seen from above. |
Good news for those of you who get frustrated with this craft, Our Generation toy company has one of these chocolate fountains in their own Birthday party set for sale. It is pink and adorable but, I haven't a picture here for you to see it. Just look it up folks...
No comments:
Post a Comment
Thanks for your thoughts. All comments are moderated. Comment spam is not published here ever. Have a good day!