Friday, September 1, 2017

One Reason Older Children Dislike Poetry Is Because They Don't Read It Well

       So much for the reason why little children like verses. But children do not stay little; they grow up, and the trailing clouds of glory disappear. The fact that most girls and boys of fourteen do not, of their own accord, read poetry, is as axiomatic as that most little children love verses. What has happened? If rhythm is a human law, why should not a big child feel its power as keenly as does a little one?
       There are, it seems to me, two answers to this question. The first is, that the little child has verses read to him, while the big child is expected to read them to himself. The average boy or girl, entirely unaided, cannot read poetry skillfully enough to bring out its beauty of rhythm, let alone its meaning. Its form looks strange and forced to him; to his untrained mind the thought is "twisted all around to fit the foolish rhymes and feet and things." It is small wonder he docs not like poetry. It would be a greater wonder if he did. The love of verses he had when he was five was based on the sound of those verses. His first rhymes and jingles were read, recited, or sung to him; their rhythm was accentuated by the reader or by the music, and his inborn human sense of rhythm was therefore pleased. If a kindergarten taught songs and verses by the method of making the children sit quietly in their little chairs reading verses to themselves, the songs would be the least popular part of the day's program. But when the kindergarten child becomes the boy or girl of fourteen, he or she is expected to read poetry to himself. This he cannot do, because he doesn't know how to read poetry. I know a woman who disliked poetry intensely until last summer, when, for the first time in her life, she heard a large part of "The Oxford Book of English Verse" read aloud by a man who knew how to read aloud.
       "Why," she said to me, "I never dreamed English poetry was so beautiful! I have always hated every bit I tried to read myself." 

reading poetry versus reciting poetry 

 1 - you are on page 2 - 3 - 4 - 5 - 6 - 7

Why Little Children Love Poetry

       The answer to all these questions is simple, but like most simple things, it goes deep into the heart of life. We live in a rhythmical world, a rhythmical universe. The stars in their courses, the seasons, the tides and waves of the sea, the beat of the human heart, even the measured pace of a horse's sounding hoofs on the road, or a carpenter's unconscious hammer on the new house across the way, -- all these elements, great and small, are moving in accordance with a great natural law, the law of rhythm, of stress. Now a child is a natural creature; he comes into the world intensely, unconsciously subject to the laws of all being, which are the laws of his being. One of the greatest of these laws is that of rhythm,, So the child, when he meets one of his first human problems, -- the relation of speech, of words, to thought, -- takes rather more naturally to rhythmic expression than to prose.

"Not in entire forgetfulness,
And not in utter nakedness,
But trailing clouds of glory, do we come
From God, who is our home."

One of these clouds which the child brings with him is his love for rhythmical sound; and this love is satisfied by music or verses. "Poetry," says Wordsworth, "is the breath and finer spirit of all knowledge." Just think a moment how much that means when you put it beside the fact that your little boy or girl loves:


It means that he has, working dimly within him, together with all the other great forces of nature's laws, this law of rhythm. If you are to educate him aright, you must remember that his love for a musical child-rhyme goes deep into the great spiritual meanings of his life, and is fraught with great possibilities for his future, and through his future, for the better race of men to come. 

 The rhythm of Seuss.

More Related Links:
you are on page 1 - 2 - 3 - 4 - 5 - 6 - 7

Thursday, August 31, 2017

Betty Bonnet's Halloween Party


       This set of colorful paper dolls is by Sheila Young is very old. I have restored it for little ones to print, cut and play with. There are six children altogether dressed up for a Halloween party.
Boy dressed as a Halloween jester.

Boy dressed as a Halloween clown with a candle on his hat.

Girl dressed as Mother Goose.

Girl dressed as a forest fairy holding an owl.

Boy dressed as a traditional clown character who carries a straw broom and cat.

bat lamp and jack-o-lantern

Sculpt a clay doll from a pinch pot

I painted my doll using pink, lavender and purple paints, but you can paint
your doll's clothing using any colors or shapes. Use your imagination!
       What to do on a rainy day? Gloomy days are perfect days for crafting a new doll. All you need is a bit of air dry clay (or oven bake clay) and paint. The little clay doll above was sculpted on one day and painted on the next. I used a hot glue gun to attach black yarn under her bonnet to mimic her hair, but you could use slower drying, sticky craft glue and let your doll dry over night.  A project like this one is perfect for little ones ages 9 - 11 years old.
Start sculpting your doll by shaping a pinch pot first.
Supply List:
  • clear enamel nail polish or transparent acrylic varnish
  • yarn for hair
  • hot glue and gun
  • tacky glue (alternative)
  • wooden dowel measuring 3 inch or plastic pen cap for air dry clays
  • air dry clay or Sculpey oven bake clay (Read instructions on the packaging. )
  • acrylic or water color paints
  • cardboard or newspaper surface for rolling out clay
Step-by-Step Directions:
  1. Shape the skirt of your doll first by rolling a ball between the palms of your hands.
  2. Now insert your thumb and position your five other fingers outside the surface of the ball.
  3. Pinch and turn the ball clockwise. Soon the clay will open up to shape a small pot.
  4. Take the cap of a old marker or pen and insert it through bottom of the pinch pot.
  5. Turn the pinch pot upside down Now you have the shape of your doll's skirt. (see picture above)
  6. You will need to use a short wooden dowel approx. three inches long if you are sculpting with oven bake clay. The plastic cap will melt in an oven, folks.
  7. Now cover this cap with a bit of clay and shape a rustic figure using simple clay shapes: like a rolled tube for arms, a ball for a head and a flat circular shape for the bonnet. 
  8. Dab on a bit of water to smooth out the surface of the clay doll before setting it aside for baking or air drying time.
  9. When your clay doll has dried, you can paint it with acrylics or watercolors.
  10. Seal the doll with a bit of varnish or clear nail polish.
This is what your doll could look life from different angles.
Air dry clay is perfect for shaping 
a doll to display in your room.

Color this waving toddler doll...

Description of Coloring Page: knitted clothing, dressed for cold weather, waving hand, composition doll, curly wig, knitted booties, Toddler Dolls

Don't forget to drag the png. or jpg into a Word Document and enlarge the image as much as possible before printing it folks. If you have a question about this coloring page, just type into the comment box located directly below this post and I'll try to get back to you as soon as I can.

These wooden spool dolls look very suspicious...

Description of Coloring Page: wooden dolls, folk art dolls, nursery dolls, made from spools and string, folk art dolls, 

Don't forget to drag the png. or jpg into a Word Document and enlarge the image as much as possible before printing it folks. If you have a question about this coloring page, just type into the comment box located directly below this post and I'll try to get back to you as soon as I can.

A bright eyed teddy bear anticipates color...

Description of Coloring Page: furry, open arms, funny faced teddy, stuffed bear

Don't forget to drag the png. or jpg into a Word Document and enlarge the image as much as possible before printing it folks. If you have a question about this coloring page, just type into the comment box located directly below this post and I'll try to get back to you as soon as I can.

Color this rag doll dressed as a policeman...

Description of Coloring Page: baton, uniform, uphold the law, badge, old-time cop, mustache

Don't forget to drag the png. or jpg into a Word Document and enlarge the image as much as possible before printing it folks. If you have a question about this coloring page, just type into the comment box located directly below this post and I'll try to get back to you as soon as I can.

Wednesday, August 30, 2017

How to cut stands for your paper dolls...

These paper Barbie and Ken dolls by Mattel were cut from an old coloring book and pasted to heavy card stock before
 their stands were drawn and cut out. Children may use any figures from their coloring books for this craft project.
Little boys could make an entire army of soldiers or famous American heroes; little girls could choose to make
their own free standing princesses, mermaids, fashion dolls, etc... This simple paper, stand design is perfect for
smaller figures. The versions shown above measure approximately five to six inches in height, including their stands.
        Crafting stands for your favorite paper doll creations is easy once you get the hang of it! Below I have photographed all of the steps you'll need to take in order to make your paper dolls stand on their own. You will need to collect a few simple supplies first:
  • scissors
  • white school glue or a glue stick or cement glue
  • heavy card stock
  • paper dolls or coloring pages of doll figures
  • a ruler
  • a stencil or plate for drawing circles or compass
  • pencil and eraser
Step-by-Step Directions:
  1. First you will need to decide which of your paper figures to cut and mount onto heavy card stock using white school glue. Some paper dolls are printed on stiff enough paper that you won't need to do this step before drawing a stand behind the figure. However, paper dolls made from coloring pages that come from a book are usually printed on paper that is too thin to stand on it's own. For these dolls you will need to cut and paste and then cut again in order to craft a strong enough doll that will stand on it's own.
  2. Use your best cutting skills for this project, take your time. Make sure to allow plenty of room around the paper doll for drawing the stand. 
  3. Include a 1 inch to 3/4 inch margin below the paper dolls feet for the stand. Making this edge straight.
  4. Draw a arched shaped design directly behind the knees of your paper doll or higher up the doll's thighs. You don't want the stand's arch to be so low that the doll may bend over without enough support.
  5. Cut a half inch slit on either side of the stand, approximately 1/2 inch from the edge of the arch as well. (see pictures below)
  6. Now cut a long narrow strip from the card stock that is approximately one inch longer on both ends than the paper doll's stand and 1 inch wide.
  7. Cut a half inch slit on either side of the strip. Bend this strip behind the paper doll to meet the slits on either side of the paper doll's stand. 
  8. Your paper doll should now be able to stand on it's own!
On the left, you can see that I cut out Barbie and Ken figures from an old coloring book. Your paper dolls can be ones that you
draw yourself, figures that you cut out from old magazines, or they can even be made from coloring pages of dolls, just like the
ones I've posted under my doll coloring book index. I've even cut out Barbie, her pet poodle and her sports car to include in
 this project; you can make a paper stands for all kinds of figures, cars, houses etc... when putting together your own paper
doll collection. 
Above you can see that I used a transparent template to draw a perfectly arched stand
 behind my cut figure of Ken. You don't need such a complicated tool to do the
 same. You can even use a dinner plate if you want too!
Now you can see that Ken can stand on his own.
This simple kind of doll stand is perfect for small paper dolls.
Little girls and boys would both love to cut stands for all kinds of cars, trucks, trains and planes!

Découpage a wooden box to store your paper dolls in . . .

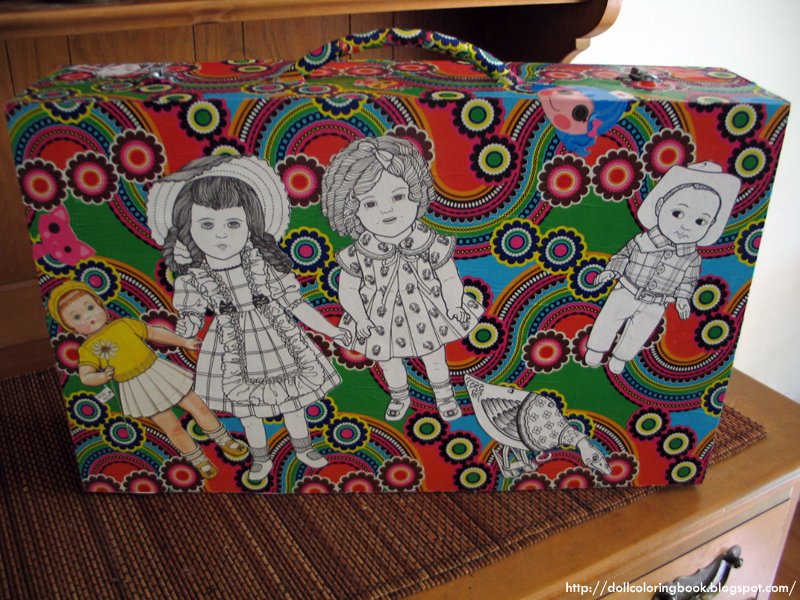
The front side of my découpaged wooden box. I chose to decorate this carrying case with  paper
dolls from an old Troubador Press coloring book and a bit of groovy wrapping papers.
Clippings from a Lalaloopsy coloring book were découpaged to the case as well.

         Once you have begun to collect, craft, and keep your paper dolls, there always will remain the problem with storing them properly. Most children can feel a bit overwhelmed with the prospect of cramming their delicate creations into an old desk or sliding these haphazardly under a bed and we all know that there can be all kinds of dusty sticky disasters underneath a child's bed! So what is a little, budding artist to do? 
       First, I suggest that whatever is under that bed or in that desk should be cleaned out and if it can not be organized in some fashion, throw it a way! Second, devise a plan to decoupage a few excellent boxes, wooden or cardboard, for the storage of finished paper dolls only. This project will present many opportunities for your little one to organize their creativity and play. A Clean, well organized work space makes for a happier learning environment. Also the particular attention given to completed crafts or artworks will teach your child to better appreciate their own work and respect the work of their peers as well.
       I often scour second hand shops for items such as wooden boxes to repurpose for crafts. There is no good sense in paying more for containers than one must, especially if these are to be made over anyway. Look for well built, strong storage boxes. The one I am using here has a handle; this makes it easier for a child to carry and to slide in and out from under a bed. He or she may also carry it along on a trip somewhere to play with or work on it's contents. Crafting paper dolls is a fun and affordable activity for young children to take along with them during summer vacations or most important, when they pay a visit to a grandparent's home overnight or for the weekend.
       To découpage a wooden box similar to the sample I have photographed here, you will need the following supplies: Modge Podge, a soft bristled brush or sponge, scissor, bright, colorful wrapping papers, paper dolls colored and uncolored, a recycled wooden box is preferred, sand paper, a sturdy, well built cardboard box (if there is no other available wooden box).
I even découpaged the handle.
       You may also wish to think about collecting a few things for the interior of the box to help the child organize his play habits or crafting impulses as well. Things like: accordion files, small boxes and a few craft supplies, although it may be best to give him/her an additional container for the craft supplies apart from the storage box in order to prevent spillage or accidental mess.

Step-by-Step:
  1. Sand lightly the surfaces of your box that you wish to cover with paper. This will greatly improve the adherence of the glue.
  2. Cut and measure your wrapping paper to fit the box, both inside and out. If your child is very young, you may need to do this part of the craft before-hand for them. 
  3. Cut out the images of paper dolls that you wish to apply over the surface of the background as well.
  4. Apply a layer of Modge Podge to the lightly sanded surface of the box before layering the background paper. Smooth the papers down with your clean hands as you go adding an additional coat of glue between every new layer of pictures you put on the surface of the box.
  5. If the paper puckers a great deal, this may be because it is very thin. I used wrapping paper for my background application. The wrinkles disappeared as the paper dried. I also simply applied my paper doll cut-outs over any small rips so these would not show, adding more Modge Podge to the surface as it dried and as I applied.
  6. Proceed to brush on the final layer of Modge Podge to the finished surface to seal it properly.
I chose to découpage an old wooden carrying case for a little girl's paper doll collection.
This case will slide in and out from under a bed nicely.

Color a Victorian Child Doll

Description of Coloring Page: old-fashioned clothes, ribbons on kid leather slippers, socks, heavy lace trim, curly wig, dimples, china head, big bows, Childlike Dolls, porcelain or china dolls

Don't forget to drag the png. or jpg into a Word Document and enlarge the image as much as possible before printing it folks. If you have a question about this coloring page, just type into the comment box located directly below this post and I'll try to get back to you as soon as I can.

Color this doll ready for school...


Description of Coloring Page: school clothes, pleats, hat, large bow, high collar, plaid dress, Childlike Dolls, porcelain or china dolls

Don't forget to drag the png. or jpg into a Word Document and enlarge the image as much as possible before printing it folks. If you have a question about this coloring page, just type into the comment box located directly below this post and I'll try to get back to you as soon as I can.