Thursday, August 9, 2018

Assemble a Bathroom Pedestal Sink and DIY a Custom Backsplash

The pedestal sink here is made from two separate types
 of candlesticks stuck together with a very sticky,
 aluminum foil adhesive tape.
       I made this particular pedestal sink from recycled, glass candle sticks. It is very near to impossible to glue together these kinds of parts. So the answer to a successful assembly is not to use glue! Use an aluminum tape from a hardware store to adhere the two pieces together. Either a silver foil tape or duct tape will work. I prefer the foil tape because it is more attractive and has a stickier backing.
       Position the silver button inside the candle stick where a drain would naturally exist in a sink. Pool white glue over the top of the cavity. This will hold the button in place but will appear transparent. It takes three to four days for this ample application of glue to become transparent; be patient with it.

Supply List:
  • one glass candlestick that looks like a basin or sink
  • one glass candlestick that measures approximately 4-5 inches tall
  • aluminum foil tape  
  • white school glue
  • one silver button (drain detail)
How to make more bathroom sinks for your doll's house:
       The backsplash is not permanently attached to the sink in this project. It is optional for those of you who would prefer to have faucets and handle details in your doll's bathroom. Although young children do not always need so much detailing in their doll furnishings, as children mature they seem to crave doll furniture with many tiny, realistic parts.

White school glue will hold the button in place but will appear transparent.
It takes three to four days for this ample application of glue to become
transparent; be patient with it.
Supply List:
  • cardboard
  • masking tape
  • paper mache pulp
  • tiny tiles
  • white acrylic or enamel paint
  • recycled nozzle from a handsoap bottle
  • silver buttons
  • silver spray paint
  • Mod Podge 
  • hot glue gun and glue
Step-by-Step Directions:
  1. Construct the backsplash by cutting away a corner from a recycled cardboard box. I also glued a thin strip of cardboard to reinforce this corner cut and added a floor piece for the pedestal sink to stand on.
  2. I traced around the outer edge at the bottom of my sink base to cut away a hexagon shape from the cardboard in order to lend the backsplash some stability.  (see photo above)
  3. I also taped in a shallow shelf, just above the sink for my facet and knobes to be glued to.
  4. Next, cover the entire cardboard backsplash with masking tape.
  5. I chose to Mod Podge tiny tiles to the backsplash that match the bathtub in an earlier project.
  6. Then I hot glued the facet and buttons onto the narrow ledge. These should be positioned above the pedestal sink.
  7. Next, I added some paper mache to the walls of my bathroom backsplash for strength.
  8. Then I painted the cardboard parts of the backsplash that were not tiled, with white enamel paint. You could also could use acrylic paint for this. 
See the bathtub crafted to coordinate with this custom backsplash...

Craft a Faux Stainless Steel Doll House Sink

Barbie sized paper towels and toilet paper balance on a
soap dish rack converted into an entire doll sink counter.
        This stainless steel, doll house sink is made from upcycled house hold things. The sink itself was formerly a 1/4 cup measuring cup used for baking and the steel frame once held shampoo, conditioner etc... The custom miniature toilet supplies are made from the very materials they are intended to copy. The toilet paper rolls and paper towels are cut and shaped from life sized toilet paper rolls and paper towel rolls and the tiny tissue box was made from the cardboard and tissue of an actual box of Kleenex.
       A modern sink like this one, is perfect for display in a contemporary doll house bathroom. Later, when I have finished more furnishings for a modern bathroom, I will show you how it looks inside of our doll house display.

Supply List:
  • stainless steel measuring cups
  • stainless steel soap dish dispenser or display unit
  • aluminum foil tape (industrial)
  • masking tape
  • heavy cardboard
  • wood glue
  • buttons and plastic ring for the faucet
  • tiny sharp scissors with a sharp point (ask for adult help)
  • silver spray paint 
  • hot glue gun and glue
  • white school glue
Step-by-Step Instructions:
  1. Clean all soap residue from the items you intend to work with.
  2. Turn the soap display unit upside down and trace around it's outer edge with a pencil on top of a thick piece of cardboard. 
  3. Trace around the outer edge of the 1/4 cup measure on top of the cardboard bathroom counter top. I positioned one single sink in the middle of the counter for my bathroom counter, but you could choose to cut two sinks if you prefer.
  4. Cut out the cardboard and repeat step two and three in order to cut two identical counter tops. Then glue these together with wood glue.
  5. Tear a very narrow strip of masking tape to adhere to the outside edge of your measuring cup. You must have a 1/4 inch masked area along the rim of the measuring cup in order to successfully stick the small steel bowl down between the cut cardboard holes of the sink counter. 
  6. Squeeze a bit of wood glue along the inside edge of the cut hole before firmly pushing the measuring cup part down through the opening. Let this part of the assembly dry thoroughly over night.
  7. Now you are ready to wrap the entire sink counter in aluminum foil tape. I wrapped together the edges of the cardboard counter onto the first wire rung of my soap dispenser with small strips of tape to insure that the top of my lavatory would stick to it's cardboard counter.
  8. Then I wrapped the entire counter top on top and underneath with the aluminum tape.
  9. I had to trim out the covered sink cup with a tiny pair of scissors. Then I carefully folded a small edge of tape over the edge of the sink.
  10. Hot glue the cut plastic ring and button knobs to the sink counter after spray painting these silver.
  11. Use white school glue to add in a small snap for the drain. Hot glue may cause a filming looking mess in this case, but the white glue if pooled will dry clearer and look more like water. It takes several days for this glue to dry before you can see the sink's drain, so be patient. 
  12. To make the facial tissue box, see instructions here.
Left, a up-close look at the toiletries balanced on the stainless steel rack beneath the sink.,
Center is a view of the sink from above. Right, is looking at the doll sink from the backside view.
Left, is the 1/4 cup measure with it's handle removed. Center, is the cut cardboard counter top with
the sink hole trimmed out., Right, is the stand/dispenser made to hold bathroom supplies such as:
 soft soap, shampoo, conditioner etc...
Left, Use white school glue to add in a small snap for the drain. Center, Cover the snap completely.
Right, It takes several days for this glue to dry before you can see the sink's drain, so be patient.


Above is a very old Scot Tissue advertisement that 
explains why absorbent toilet tissue is good for hygiene
and therefore for everyone. The logo is very old,
but the company still produces the same product today!

Wednesday, August 8, 2018

Tile A Bathtub From An Ordinary Shoebox

       This doll bathtub looks like a built-in, however, I have applied a 'tile' design to all four of it's sides so that it may be turned in any direction, positioned into an alcove, and even placed into the middle of a room, if that is your preference. The shoebox bathtub is slightly larger so that it may accommodate both a 12" doll or a 14" doll.
       I tiled this tub using glue, without the grout, in order to keep it lighter in color. I have no intention of ever filling it with real water both because it is made from cardboard and also because it will be used inside of an actual doll house, so it is not terribly necessary for it to be grouted. The tiles are also very tiny and do not need grout for support.
Notice, I have chosen to use multicolored tile work so
that several colors will coordinate with the tub, should
a smaller person wish to decorate her doll house
bathroom differently. Go here to see a shoebox bed.

Supply List:
  • tiny tiles, one or two types (I found these at Hobby Lobby)
  • Mod Podge
  • white acrylic or enamel paint
  • masking tape
  • a thick cardboard shoe box
  • extra cardboard
  • paper mache pulp (optional)
  • plastic pump parts from a recycled bottle of hand soap
  • hot glue and hot glue gun
  • silver buttons for the drain and handles
  • silver spray paint (optional)
Step-by-Step Instructions:
  1. Cut and shape the cardboard shoe box into a tub shape. You may need to reinforce it's sides to accommodate the extra weight of the tiny tiles. To do this you will need to cut extra cardboard to sizes matching the walls of the shoebox. Glue these to the interior of the shoebox.
  2. Make sure to add or retain a generous backsplash and/or deckmount around the top edge of the shoebox. You need this little ledge for the faucet and knobs! I also cut hole large enough so that dolls measuring 11 1/2 " to 14" can fit inside the tub space. 
  3. Cover the entire surface of the shoebox bathtub with masking tape.
  4. Using Mod Podge, tile each side of the outside walls of your shoebox. Give the process generous time to dry between the applications. This will take several days. It is best to let your shoebox dry in the warm sunshine as you proceed with the project. Take your time, the slower you proceed, the less likely the mosaic will warp the sides of the heavy cardboard box.
  5. Leave a bit of space for the faucet and knobs on the deckmount of your doll bathtub. (see picture) You will need to hotglue these on after spray painting the 'faucet' silver.
  6. I applied a small amount of paper mache pulp to a few areas of my bathtub's rim and outside walls to give my tub extra rigid walls. Let it dry and then painted it white. This is an optional step.
  7. I hot glued a large silver button to the inside of my bathtub to mimic a drain.
  8. I used silver buttons to represent the hot and cold water nozzles.
  9. I then painted the interior of my doll's bathtub with with enamel paint, but you may use acrylic paint if that is all you have on hand.
Left a close-up view of the facet and dials, these are made from the parts of a hand soap pump and buttons.
Center, all of the shoebox sides are covered with tile work so that the tub may be seen from any angle as finished.
Right, A retro G. I. Joe, (11 1/2 " doll) models the tub with his pipe cleaner pup. This tub is not intended to
 hold actual water, however, it includes soap bubbles here for the photograph only.
Left, the shoebox is covered on all of it's sides with masking tape, Right, Midway through the tiling process.
See the custom built backsplash that was made to coordinate with the tub shown here...

Craft more bathtubs:

Sunday, August 5, 2018

In Storyland

       The reference to stories naturally brings us to another domain of children's imagination: the new world opened up by their story-books, which is all strange and far away from the nursery where they sit and listen, and in which, nevertheless, they manage in a sense to live and make a new home.
       How is it, one is disposed to ask, that most children, at any rate, have their imagination laid hold of, and  fired to a white heat, by mere words? To watch the small listener in its low chair, with head raised, eyes fixed, and hands clasped, drinking in every word of your story, giving sign by occasional self-cuddling and other spasmodic movements of the almost over-powering delight which fills its breast, is to be face to face with what is a mystery to most "grown-ups". Perhaps we elders, who are apt to think that we have acquired all the knowledge and to forget how much we have lost, will never understand the spell of a story for the lively impressionable brain of a child One thing, however, is pretty certain: our words have a way of calling up in children's minds very vivid and very real images of things, images quite unlike those which are called up in the minds of most older people. This magic power of a word to summon the corresponding image, has, I suspect, a good deal to do with a child's intense way of realizing his stories.
       The passionate interest in stories means more than this however. It means that the little brain is wondrously deft at disentangling our rather hard language and reducing the underlying ideas to an intelligible simplicity. A mother when reading a poem to her boy of six, ventured to remark, "I'm afraid you can't understand it, dear," for which she got rather roughly snubbed by her little master in this fashion: "Oh, yes, I can very well, if only you would not explain". The "explaining" is resented because it interrupts the child's own secret art of "making something" out of our words. 
       And what glorious inner visions the skillful little interpreter often manages to get from these troublesome words of ours. Scene after scene of the dissolving view unfolds itself in definite outline and magical coloring. At each stage the anticipation of the next undiscernible stage is a thrilling mystery. Perhaps no one has given us a better account of the state of dream-like absorption in storyland than Thackeray. In one of his delightful "Roundabout Papers,'' he thus writes of the experiences of early boyhood: "Hush! I never read quite to the end of my first Scottish Chiefs. I couldn't. I peeped in an alarmed furtive manner at some of the closing pages. . . . Oh, novels, sweet and delicious as the raspberry open tarts of budding boyhood! Do I forget one night after prayers (when we under-boys were sent to bed) lingering at my cupboard to read one little half-page more of my dear Walter Scott — and down came the monitor's dictionary on my head!" 
       The intensity of the delight is seen in the greed it generates. Who can resist a child's hungry demand for a story? and after you have satisfied his first request, he will ask for more, and if then you are weak enough to say you know no more stories he will catch you by answering: "Tell me the same again".
       As a result of the intensity with which a child's imagination seizes on a narrative it tends to become afterwards a record of fact, a true history. That children look at their stories in this way till they get undeceived seems to be shown by the respect which they pay to the details and even to the words. Woe to the unfortunate mother who in repeating one of the good stock nursery tales varies a detail. One such, a friend of mine, when relating "Puss in Boots" inadvertently made the hero sit on a chair instead of on a box to pull on his boots. She was greeted by a sharp volley of "Noes!"
       As the demand for faithful repetition of story shows, the imaginative realization continues when the story is no longer heard or read. It has added to the child's self-created world new territory, in which he may wander and live blissful moments. This permanent occupation of storyland is shown in the child's impulse to bring the figures of story-books into the actual surroundings. It is shown, too, in his fondness for introducing them into his play, of which I shall speak presently.
       To this lively imaginative reception of what is told him the child is apt very soon to join his own free inventions of fairy and other tales. These at first, and for some time, have in them more of play than of serious art, and so can be touched on here where we are dealing with the play of young fancy.
       We see the beginning of such fanciful invention in childish "romancing" which is often started by the sight of some real object. For example, a little boy aged three and a half years seeing a tramp limping along with a bad leg exclaimed: "Look at that poor ole man, mamma; he has dot (got) a bad leg". Then romancing, as he was now wont to do: "He dot on a very big 'orse, and he fell off on some great big stone, and he hurt his poor leg and he had to get a big stick. We must make it well." Then after a thoughtful pause: "Mamma, go and kiss the place and put some powdey (powder) on it and make it well like you do to I". Later on children of an imaginative turn wax bolder and spin longer stories and create scenes and persons with whom they live in a prolonged companionship. But of this more presently.
       Partly by taking in and fully realizing the wonders of story, partly by a more spontaneous play of creative fancy, children's minds often pass under the dominion of more or less enduring myths. The princes and princesses and dwarfs and gnomes of fairy-tale, the generous but discriminating old gentleman who brings Christmas presents, as well as the beings fashioned by the more original sort of child for himself, these live on just like the people of the every-day world, are apt to appear in dreams, in the dark, at odd dreamy moments during the day, bringing into the child's life golden sunlight or black awful shadows, and making in many cases, for a time at least, the most real of all realities.
       I am far from saying that all children make a fancy world for themselves in this way. As I said at the beginning of the chapter the differences among children in this respect are great. Yet I think it is safe to say that most children, and especially lonely children who have not a full active life provided for them by companions and opportunities of adventure, do live a good fraction of their life in dreamland.
       Where the active life is provided a child is apt to play rather than lose himself passively in fancy dreams. But play, too, is to a large extent a product of the liveliness of the young imagination. We will now glance at it in this light. 

Saturday, August 4, 2018

Collecting Rugs for Your Doll's House


       Covering the floors of your doll house may seem a tedious prospect if you believe that these must always be handcrafted by yourself. 
       In truth, the successful decorating of a doll's house may have more to do with your ability to reinterpret the use of items that are already in your actual home, objects such as placemats for example. Placemats come in all kinds of textured surfaces and are produced in a wide range of color combinations. Some of them are woven from grass, others are printed on cotton. If purchased from a department store, placemats come with finished edges too. Find the perfect placemat and you've found a Barbie sized rug that you need not alter in the least, unless you want to. 
       I have even found smaller bath mats in dollar stores that look exactly like sophisticated area rugs when displayed inside a doll's house. 
       Often I use one item in a doll's room to imagine additional furnishings that would normally accompany it, if it were included in an actual adult sized space. If I had this rug on the floor, which couch or bed would go best with it and so on...
       Placemats are best purchased for a doll's house when they are most affordable. These are frequently tossed on clearance tables in stores and sold for pennies on the dollar at the end of a season. You can pick them up at a thrift stores and garage sales as well.
       An unfashionable placemat may make a far more attractive rug for your doll. I have frequently discovered that things considered ugly when designed for one use, become marvelously unique when repurposed for another.
       So take your little ones shopping for these affordable area rugs this weekend. They'll enjoy the novelty of the hunt and you will enjoy less money spent!
      

Distressing a Sideboard or Buffet for Barbie & Family

       This old, discarded jewelry box will fit into our doll's dining room perfectly. Our twelve inch dolls will love displaying holiday dinner selections on this upcycled, sideboard for all their friends to admire. The grey distressed paint on this pretend sideboard looks classy in a formal dining room setting too!

How do you best determine which jewelry box will fit into your doll's house? Take a tape measure with you on your
 shopping trip. A real sideboard and/or buffet stands approximately four to five feet tall, depending on the age and
style of the piece. The jewelry box pictured here is approximatly 5 1/2 inches. So, my 11 1/2 inch fashion dolls look
just fine standing next to it. It is a bit wide for an actual sideboard but I don't mind the extra width; I will have more
 room for the display of dishes and food items in the end.

       A sideboard, also called a buffet, is an item of furniture traditionally used in the dining room for serving food, for displaying serving dishes, and for storage. It usually consists of a set of cabinets, or cupboards, and one or more drawers, all topped by a flat display surface for conveniently holding food, serving dishes, or lighting devices. The words sideboard and buffet are somewhat interchangeable, but if the item has short legs, or a base that sits directly on the floor with no legs, it is more likely to be called a sideboard; if it has longer legs it is more likely to be called a buffet.

Supply List:
  • sandpaper
  • masking tape
  • grey acrylic or enamel paint
  • paint brushes
  • acrylic clear sealer
  • old, dark stained jewelry box
  • terry cloth
Step-by-Step Instructions:
  1. Rub down the surfaces of the jewelry box with an old terry cloth towel. Make sure that you remove dust and dirt from the box's surfaces.
  2. Wrap the handles of the box doors with masking tape in order to protect these from paint.
  3. Brush on one layer of enamel grey paint.
  4. Let the paint dry thoroughly.
  5. Use a relatively smooth sandpaper to remove paint from the edges and some flat surfaces of the jewelry box.
  6. How much paint you remove is entirely up to your own sense of taste. You want the surfaces to look older and worn, as though the piece were an antique.
  7. Rub down the box again with a towel to remove sawdust.
  8. Seal the "sideboard" or "buffet" for your Barbie's dining room with clear acrylic.
Above you can see my doll sideboard from different angles and up close.
More Doll Furnishings from Transformed Jewelry Boxes:

Friday, August 3, 2018

Use Vintage Display Box for Barbie's Living Room

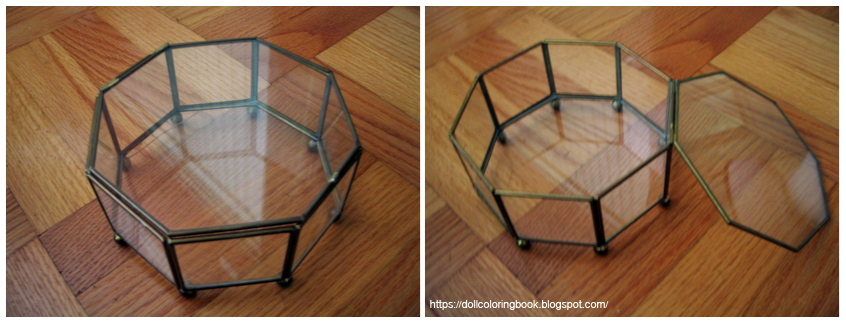
A glass and brass vintage display box in the shape of a
hexagon. Sometimes these were used for jewelry or as
miniature terrariums in the mid 1970s.
        I picked this vintage glass display box from the 1970s at a local Goodwill. I thought it would make a lovely sofa table in our doll's house. Little ones can display whatever treasure they think their dolls would enjoy inside of it.
       I cut a clear plastic sheet, the same size of my box/sofa table by tracing around the top of the box with a marker and cutting out the shape  slightly smaller. Then, I hot glued the shells onto this plastic hexagon in order to keep them in place. When the dolls tire of their beach themed living space, their child mothers may change out the displays for something else like flowers or holiday decorations.
       Some parents may believe that the fragility of such a item will not suit for a younger girl or boy of three or four. However, I believe that it is good to give children six to eight years of age the opportunity to handle and care for some fragile items. Small responsibilities that can bring no serious harm to others but that still require special maintenance, will help grow an appreciation for property in your child. Once they prove that they can be trusted with small things, parents may then increase their levels of responsibility for other items in the home. The child's personal play space is the perfect place/opportunity to begin training them in responsible behavior.
A special display box, small enough for a doll's house, affords an opportunity to introduce concepts
 like discipline or appreciation in order to keep a fragile thing safe. Your child may also begin to
 take notice of the world around herself; she could also be encouraged to record details or make lists
of those things connected to themes in order to include them in her displays.

In the 70s, people also used these boxes as terrariums. Parents can help their little ones to grow a miniature garden
inside the glass display for their child's doll room or doll house alternatively.

DIY Pool Floats for Your Doll

This inflatable, Barbie pool with solid colored pool floats dates from the mid seventies.
It is in excellent condition. The straw float craft is an easy one, but like most of the
crafts included here, children need adult supervision to complete it.

        Now is the time for having some fun in the sun with your dolls! Above is an inflatable pool and blue floats from my childhood collection. The straw floats with alternating colors are easy to make at home. But you will need adult supervision because these are melted together using a hot iron.

Supply List:
  • drinking straws
  • parchment paper (to protect the iron and other surfaces from melted plastic)
  • iron and ironing board
  • scissors
  • clear plastic bags (this will act as a layer of glue)
Step-by-Step Instructions:
  1. Choose a pattern you would like for the pool floats. I alternated purple and green straws for one pool float and teal and red straws for the other.
  2. Heat up your iron to it's highest temperature, and ask your parent to watch and help you in your progress.
  3. Lay a sheet of parchment paper on the ironing board. The parchment will separate the straws from the hot iron and keep the appliance clean from melted plastic. The parchment is very necessary for this craft.
  4. Lay the straws side by side and then layer a sheet of plastic bag on top of the straws and fold the parchment paper over the straws before pressing them with the hot iron.
  5. Press down on top of the parchment with the hot iron. It only take a few seconds to melt the straws together.
  6. Now lift the parchment and remove the melted straws carefully.
  7. Turn off the iron.
  8. Trim the excess plastic around the edges of the straws. Turn the straws over; the front side of your melted straws should not appear melted.
  9. You can trim the edges of the straws with scissors if these are uneven.
  10. Now your 12" dolls have new floats for the pool to play with!
Left, fold the parchment paper over the straws before pressing them with the hot iron. Center, Trim the excess plastic
 around the edges of the straws. Turn the straws over; the front side of your melted straws should not appear melted.
Right, Now your 12" dolls have new floats for the pool to play with!

Thursday, August 2, 2018

Retro Tinsel Trees For a Doll's Christmas

Right, I trimmed my retro Christmas trees with old Mardi Gras beads. Right, The silver tree is
 trimmed in purple, pink and silver Mardi Gras beads and the gold tree is trimmed in red, green
 and gold beads. These beads add a professional looking, decorative touch to finish off this DIY
 Christmas project for Barbie's house.


       Adding both sparkle and glamour to your doll's surroundings for the holiday season doesn't need to cost much. You can create these retro metallic Christmas trees from cast off supplies that you can find in your home.
       I purchased the silver and gold stems from a dollar store and made my cone forms from a recycled cereal box!
       Finish them off by upcycling Mardi Gras bead necklaces and the caps from the empty spray paint cans.

 Supply List:
  • silver and gold metallic chenille stems (one full bag each)
  • large discarded, clean cereal box
  • masking tape
  • silver and gold metallic spray paint
  • hot glue and hot glue gun (recommended use for adults only)
  • plastic Mardi Gras beads
Step-by-Step Directions:
  1. Cut triangles from the cardboard cereal box. I cut one triangle lengthwise and the other across the width of my box in order to shape two different tree sizes.
  2. Roll these shapes into cone shapes and tape them firmly into place with the masking tape
  3. Draw around the bottom of each cone to transfer an accurate shaped circle onto the remaining cardboard scraps.
  4. Cut out a bottom circle for each cone from these measurements and glue them to the bases of your cardboard tree shapes.
  5. Spray paint each cone with silver or gold paint.
  6. Snip of the very tips of your cone shapes at the top so that you can insert a chenille, metallic stem into the whole before twisting it round the cone shape.
  7. As you twist the stems around the cones you will need to twist new stems to each end in order to create a continuous wrap. 
  8. Push the stems gently up the cones as you proceed so that there will be a nice thick layer of metallic branches around your retro Christmas trees.
  9. When you get to the base of each tree and all the surfaces have been covered, hot glue the final twists so that the wrap stays firmly in place.
  10. I hot-glued the caps of my silver and gold spray paint cans to the bottoms of each little retro tree to create metallic finished tree stand.
  11. Now cut the plastic Mardi Gras chains open and proceed to hot glue these around the retro trees as you twist them round each form.
Right, Cut triangles from the cardboard cereal box. I cut one triangle lengthwise and the other across
 the width of my box in order to shape two different tree sizes. Center, Here is what your cones
should look like. Right, Spray paint each cone with silver or gold paint.

Left, I hot-glued the caps of my silver and gold spray paint cans to the bottoms of each little retro tree
 to create metallic finished tree stand. Center, Snip of the very tips of your cone shapes at the top so
that you can insert a chenille, metallic stem into the whole before twisting it round the cone shape.
If you get tired of twisting the stems and need to take a break, you can tape a piece of masking tape
to the stem and cone to hold your place.

Wednesday, August 1, 2018

Christmas Yard Art for Your Doll House

       Wire frames like these are easy to find in thrift shops. I paid less than a dollar for each of mine. These are just the right size for standard sized 12 inch fashion dolls. Some of my packages have removable lids so that little ones can fill them with real gifts come Christmas!
We don't have any snow on the ground here in Missouri right now, so my garden evergreens will need to suggest the season.
Supply List:
  • wire sleigh and wire reindeer forms (found at resale shop)
  • Christmas wrapping paper or Christmas scrapbook paper
  • cherry red spray paint
  • red wire
  • gold beads
  • small cardboard boxes
  • Christmas Washi Tape
Step-by-Step Instructions:
  1. Wash the wire shapes, the sleigh and reindeer, with warm soap and water. Let them dry completely in the sunshine.
  2. Place both in a scrap cardboard box to keep your work place clean.
  3. I spray paint in the outdoors only. Read the directions on the spray paint can and follow them carefully.
  4. Spray an even coat of paint. Let it dry for twenty minutes and repeat several times. Turn the objects between paint applications in order to cover all the surfaces bright cherry red.
  5. Now you can wrap tiny boxes with Christmas paper and then decorate them with Christmas Washi tape.
  6. I also used a red wire and gold beads to randomly wrap the figure of the reindeer.
  7. Display this miniature yard art on the front lawn of your doll house whenever you'd like your dolls to celebrate Christmas.
Left, green wire sleigh. Center, spray painting the wire elements. Right, small, Christmas wrapped packages.
Left, a wire frame in the shape of a reindeer. Center, spray painting the reindeer. Right, the reindeer dry and on display.

Tuesday, July 31, 2018

Fancy's Resting-Places

       Most people, perhaps, can recall from their childhood the pleasure of cloud-gazing. The clouds are such strange-looking things, they change their forms so quickly, they seem to be doing so many things, now slumbering lazily, now rushing wildly on. Cloudland is safe away from the scrutiny of fingers, so we never can be sure what they would be if we got to them. Some children take fright at their big, strange forms and their weird transformations: but a happy child that loves day-dreaming will spend many delightful hours in fashioning these forms into wondrous and delightful things, such as kings and queens, giants and dwarfs, beautiful castles, armies marching to battle, or driven in flight, pirates sailing over fair isle-dotted seas. There is a delicious satisfaction to young minds in thus finding a habitation for their cherished images. (To project them in this way into the visible world, to know that they are located in that spot before the eye, is to "realize" them. In the sense of giving them the fullest possible reality.
       Next to the cloud-world come distant parts of the terrestrial scene. The chain of hills, perhaps, faintly visible from the home, has been again and again endowed by a child's fancy with all manner of wondrous scenery and peopled by all manner of strange creatures.  At times when they have shown a soft blue, he has made fairy-land of them; at other times when standing out black and fierce-looking against the western sky at eventide, he has half shuddered at them, peopling them with horrid monsters.
       Best of all, I think, for this locating of images, are the hidden spaces of the visible world. One child used to wonder what was hidden behind a long stretch of wood which closed in a good part of his horizon. Many a child has had his day-dreams about the country lying beyond the hills on the horizon. One little girl who lived on a cattle-station in Australia used to locate beyond a low range of hills a family of children whom she called her little girls, and about whom she related endless stories.
       With timid children this tendency to project images into unseen places becomes a fearful kind of wonder, not altogether unpleasant when confined to a moderate intensity. I remember the look of awe on the face of a small boy whose hand I held as we passed one summer evening a dark wood, and he whispered to me that the wolves lived in that wood.
       This impulse of timid children to project their dark fancies into obscure and hidden places often stops short at vague undefinable conjecture. "When (writes a German author) I was a child and we played hide and seek in the barn, I always felt that there must or might be something unheard of hidden away behind every bundle of straw, and in the corners." Here we can hardly speak of a housing of images: at such a moment perhaps the little brain has such a rush of weird images that no one grows distinct.
       The exact opposite of this is where a child has a very definite image in his mind, and wants to find a home for it in the external world. This wish seems to be particularly active in relation to the images derived from stories. This housing instinct is strong in the case of the poor houseless fairies. One little boy put his fairies in the wall of his bedroom, where, I suppose, he found it convenient to reach them by his prayers. His sister located a fairy in a hole in a smallish stone.
       As with the fancies born of fairy-tales, so with the images of humbler human personages known by way of books. Charles Dickens, when a child, had a strong impulse to locate the characters of his stories in the immediate surroundings. He tells us that "every barn in the neighborhood, every stone of the church, every foot of the churchyard had some association of its own in my mind connected with these books (Roderic Random, Tom Jones, Gil Bias, etc.), and stood for some locality made famous in them. I have seen Tom Pipes go climbing up the church steeple; I have watched Strap with the knapsack on his back stopping to rest himself on the wicket-gate." 

 from Science Friday

Monday, July 30, 2018

DIY Pet Beds for Your Doll's Dog or Cat

       Covering doll furniture with cotton and fabric is not as difficult as it looks. However, it does take a bit of practice and patience! After awhile you will get used to the process and improve greatly as you go. Start with something simple, like a tiny bed for Barbie's pets.

Barbie and Ken have many pets, so they need to have pet beds for both dogs and cats.

These little cats sleep in the utility room so we've
trimmed out their bedding with yellow calico to match
 the decor of the doll's utility room.

Supply List:
  • Calico scraps and matching felt colors
  • cardboard
  • hot glue and hot glue gun
  • needle and thread
  • oval sponge (one cut in half or two separate)
  • masking tape
  • four beads of equal size for each bed
Step-by-Step Directions:
  1. Purchase your round sponge first before cutting or measuring any of the materials for this project. I cut my sponge in half to make two beds. However, you may decide to use two separate sponges for each bed instead. Cutting a sponge in half is not very easy to do. 
  2. Choose your pet's bed fabric to coordinate with other furnishings inside in your doll's house if you like. 
  3. Place your sponge on top of a piece of cardboard and draw around the circumference of it. Now you can cut this oval shape out to use as both a pattern and a part of your pet's bed.
  4. To fashion the sides of the pet bed, cut a one inch strip of cardboard out and round off the corners a bit.
  5. Now tape and paste this strip to the outside edge of the cardboard base to form the side. Let this dry. Make sure to leave a space around one half of the pet's bed without a side. This will make the bed easy to get in and out of. (shown just right)
  6. Set your sponge onto the wrong side (A sewing term that means backside.) of the calico you have selected. Draw with a pencil around the edge of the sponge on top of the fabric. Now draw a second line approximately 2 inches away from this shape. You need to cut your fabric just a little bit larger than the actual sponge so that you can wrap the fabric and tape it in place over the top half of the sponge.
  7. Don't worry about wrapping your pieces to look clean where you will be putting hot glue anyway. 
  8. Now, wrap the cardboard pet bed in the same way, taping down the left over corners down to the inside interior of the bed. (see photo below)
  9. Hot glue the covered sponge into the covered pet bed frame. 
  10. Hot glue a oval piece of felt to the bottom of your pet's bed. (see photo below)
  11. Hot glue on four beads for feet. (see photo below)
  12. Sew seams down around the bed's wrapped edges if necessary.
Right, see how messy the inside of this bed looks! But, I'm going to hot glue the covered sponge
over this, so it's o.k. if it's a bit messy! Center, I have hot glued the matching felt to the bottom
of each pet bed and this covers up the tape used to wrap the bottom edges with fabric. Then I glued
four beads on the bottom to act as 'legs' for the pet beds. Right, my finished projects. I used a needle
 and thread to sew the seams down as well.


The doll's dog sleeps in the blue and green bedroom so we've selected a coordinating calico print to
 trim out his bed. The dog is made from chenille stems.