Monday, February 11, 2019

How to Make Felt Roses for A Doll

Our "Cheyenne Rose" Magic Attic Doll
models with the roses.

"A rose by any other name would smell as sweet"
William Shakespeare's Romeo and Juliet

       Every little doll loves to receive roses for Valentine's Day, especially if these flowers are made from felt! Felt roses are not only soft, but they also have a very long shelf life! 
       Here you can see that I chose to craft roses from white, red and hot pink felt for our Doll's Valentine Party. But you could choose to make your own pretend roses from any color of felt you like such as: peach, coral, buff pink, ivory, yellow or maybe even lavender.
       You will also need a selection of green felts for the petals of your roses. I chose to use three variations of green.
       Clip chenille stems in advance to three or four inches in length. I used both fuzzy chenille stems and sparkly metallic green stems because this is what I already had on hand. 
       You may need to purchase a new, sharper pair of scissors in order to the complete the craft. Felt has a tendency to quickly dull scissor blades. Duller scissors could make this craft seem somewhat tedious.

Step-by-Step Instructions:
  1. Cut petal shapes from your felt. You can see that my petals are arched at one end and flat on the opposite end. Cut many of these shapes in advance prior to the gluing process for whatever color of flower you prefer. For an 18inch doll you will need to make the petals approximately 3/4 to 1inch in diameter. Center the tip of your chenille stem on the felt petal with a small amount of hot glue beneath it.
  2. Press together the sides of the petal around the chenille tip and hold it in place until the glue dries. This is a quicker process with hot glue but not a safe one for very young children. If you are too young to use a hot glue gun, you may use tacky white glue and hold the petals a little longer as you go. 
  3. Next you will need to squeeze a bit of glue on either side of the first petal in order to stick the next petal around the edges of the first. Hold the two in place until the glue dries.
  4. Now proceed to add more petals around the circumference of the growing blossom. 
  5. You can add as many petals as you like, depending on the size you would like your rose to become. Rosebuds are obviously smaller with fewer petals.
  6. When you have finished making your felt rose, you can then decide if you would like to glue on a few green felt leaves as seen in the photos below. If you are using tacky white glue to make the rose, wrap a tiny rubber band around the thickest part of the flower to hold all of the drying petals in place until they are dry.
More About Crafting Candy Roses:
More About Crafting Flowers for Dolls:
More About Fabric Rose Crafts:
Left, cut rose petals from hot pink and red felt. Center, Clipping the fuzzy edges of the felt rose stem and adding the
 leaves of the rose. Right, the white felt roses as seen from the top.
Above are the felt roses from a variety of angles. 
Left, a green vase of felt roses. Center and Right, Our lovely Magic Attic, Rosa doll holds a bouquet of felt roses.

Our Dolls Host a Valentine's Day Party

       Our dolls are setting up a dining area for their Valentine's Day Party! There are so many things to get done before the sister's guests arrive. 
       You can play a game with the photographs once you print them out. Try to remember the order they appear in under this post. Once you can remember that information, try to remember the order of the things each doll sister says to one another, while they are busy working at preparing their party buffet table. Memory games such as these, help develop pre-reading skills in the very young.

"It is time to set up the buffet table for our Valentines Day Party! First let me straighten the wreath," said Zoe.
"Help me get the table in place, Elula," said Zoe. Elula is quick to help whenever Zoe is in charge.
"Now spread the tablecloth out neatly." Zoe can be very bossy at times because she is so much older.
"What pretty hearts,'' cooed Elula.
"This rose smells soooo sweet too! cried Elula.
"What a silly goose you are Elula; don't knock the vase over. It's too close to the edge of the table."
Zoe loves to playfully chastise her cute little sister.
"Perhaps we need to put a doily under that pitcher, just in case there is a small spill later Elula," says Zoe.
"Here is the basket of silverware," says Elula. "I think this spoon needs washing."
"My tummy is starting to ache! When can we cut this sheet cake?" cries Elula.
"Don't forget the cups, Zoe." says her little sister.
"The cupcakes and sheet cakes look scrumptious!" remarks Zoe.
 "Won't they be wonderful to eat, Elula?
"Humm, I think we're missing something, don't you little one?"
"I think it's the napkins that are missing! cried Elula.
"Oh dear," said Zoe, "Mother will need to make another quick trip to the store!"
See more Valentine Parties for Dolls:

Saturday, February 9, 2019

DIY Doll Cupcakes for Valentine's Day

Above you can see the finished cupcakes and the liners that I cut apart to trim and finish the 18 inch doll deserts.
       Each one of these doll cupcakes will serve two 18 inch appetites if your dolls are not too hungry! Shape their tops to look like your favorite treats. I decorated some of these cake sweets with cherubim, hearts, strawberries, cherries, doves and even a little rose! I also added a little red or white glitter glue to make them extra tempting!
Top, paper tubes. Bottom, sculpted clay cupcakes
before they have been painted.

Supply List:
  • narrow cardboard tube
  • cardboard
  • tacky white glue
  • Sculpey
  • acrylic paints: red, pink, brown, white etc...
  • Valentine cupcake liners
  • mini cookie cutters
  • mini candy molds
  • glitter glue
  • Mod Podge
  • hot glue gun and hot glue
  • Xacto knife
 Step-by-Step Directions:
  1.  Cut the narrow cardboard tube into 1inch sections.
  2. Glue these down to a piece of scrap cardboard with white tacky glue. Let them dry.
  3. Cut the tubes apart from the cardboard and trim them so that each segment has a closed end.
  4. I hand-shaped my cupcake tops on top of the closed end of the tub in order to give the clay support. 
  5. Use long snake shapes from the clay to wrap around the top of the cupcake making the icing.
  6. Roll out tiny spheres for the cherries and poke a hole into the top of each to insert their stems.
  7. I molded the tiny doves and cherubim from candy molds and baked these ahead of time to stick into the cupcake icing. (see pictures of the clay shapes here.)
  8. Again, I did the same with the hearts only I used tiny mini cookie cutters to cut out the tiny Valentines. These may be baked ahead of time. They will adhere to the icing once baked together in the oven at 275 degrees. You should not need to remove the sculpted clay tops from the cardboard tubes once these have been baked together in the oven. The oven temperature is too low for the paper tubes to burn.
  9. Paint your cupcakes however you would like! I used traditional Valentine colors: red, pink, white. 
  10. I also painted on the glitter glue to add some sparkle.
  11. After the painting dries, cut the ribbed edges of the cupcake liners apart from the bottoms of the cupcake liner.
  12. Carefully reattach the ribbed liners around the lower half of the paper tubes.
  13. Now you can re-cut the bottoms of the liners to the size of the miniature cupcake bottoms and glue them in place.
  14. Coat the clay parts of the cupcakes with Mod Podge when you have finished to help keep the Valentine party treats looking new.
Left and Right, close up photos of the doll sized cupcakes for Valentine's Day.
See how I displayed them on a crafted cupcake stand here.

Decoupage A Frame For Your Doll's Picture

Left, the front side of my decoupaged frame with a clipping of my small friend's favorite doll, 
Cécile by American Girl Doll. Right the back side of the paper frame left undecorated.

       I decoupaged this paper frame for a young friend. It will make a sweet little Valentine's gift for her to display on her nightstand or on top of her dresser. These paper frames are very easy to acquire from dollar stores or hobby shops where I live and they usually do not cost much. 
       If you want to make one similar to mine, you will need to acquire the following supplies: Mod Podge, ribbon, a hot glue gun, paper clay, tiny angel press mold, silver cord, and Victorian scraps. 
       The Victorian scraps may be downloaded and printed on a home computer or these can be purchased already printed from a paper supply shop or cut from scrapbook papers.
       I also included tiny angels made from a paper clay press mold. Molds similar to the one I used can be purchased in a hobby shop like Hobby Lobby or Michaels.

Spruce Up A Heart Shaped Rocker for A Doll!

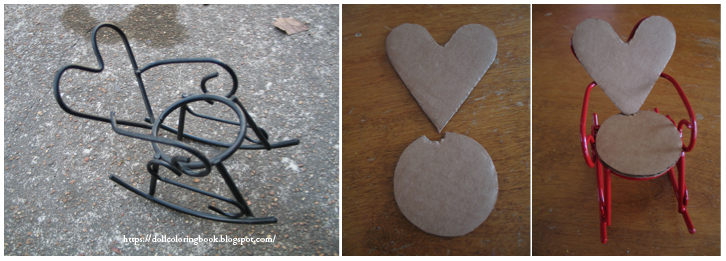
Left, the backside of my heart shaped rocker. Center, the front side of the rocker. Right, Disney Moana
doll holds a Valentine chocolate box and relaxes in the doll rocking chair; the chair is a perfect for her size.
        I discovered this unwanted iron work rocker at resale. I don't know whether is was designed to hold a miniature potted plant or if the manufacture intended it for a doll? I have seen similar chairs with pin cushions as seats. Whatever the original use, I decided to add it to our growing collection of furniture for the doll house. 
       I painted the frame a bright red using some leftover spray paint from previous projects and cut some heavy cardboard for a back and seat to cover with decorative scrap paper.
       Then I simply hot glued these finished pieces through the iron work on the backside of the frame and from underneath as well. Now I have a sturdy little heart shaped rocker that fits our 11 to 12 inch dolls.
Left, the rocker is it looked when I first purchased it. Center, I've cut a cardboard back and seat for the rocker.
Right, this is how the seat will look on the iron frame. I need to cover it with paper or fabric.

Thursday, February 7, 2019

DIY Candy Filled Heart Box for 18 Inch Dolls

Valentine messages for candy boxes and cards in lavender.

"True as strong and strong as true
Is my earnest love for you."

Our 18 inch doll's "parents" have been working over-time making doll sized, candy filled
Valentine containers.  Our Chavonne doll holds the pink candy box and our Zoe doll
holds a purple version.


My own versions of fabric heart box covers.

"Tis the day the love birds mate;
Smile on me, and bless my fate."

"Here's my heart as good as gold
Bringing to you love untold."

       Although this craft is not difficult, it is time consuming to create. You can either make your Valentine shaped candy box using decorative fabrics or paper. What makes this Valentine craft truly unique are the tiny hand-made clay candies glued inside!

Supply List:
  • cardboard
  • masking tape
  • tacky white glue
  • hot glue and hot glue gun
  • notions, trims, beads, lace (if you intend to make the fabric versions)
  • fabrics
  • Sculpey or paper clay
  • acrylic paints: chocolate browns
  • puff paints: white, pink, red 
  • recycle an old heart shaped container (optional) 
  • a variety of Valentine cupcake liners 
  • matching tissue paper
Step-by-Step Directions:
  1. If you do not have a recycled heart shaped box, you can make one similar to my own by hand. You will need to cut two hearts from cardboard. One of those hearts will need to be slightly smaller than the other, approximately 1/8 to 1/4 inch smaller. The larger heart will become the lid and the smaller one the bottom.
  2. Both hearts will need to have 1/2" to 3/4" side walls in order to comfortably hold your doll's miniature clay candy creations. Cut these strips from cardboard and attach them along the edges of your cardboard hearts using hot glue. Ask a parent for help when using hot glue.
  3. Decorate both the top and bottom of your box. You may even wish to cover the sides of your box with ribbon or lace. Make sure the box lid fits neatly over the bottom before proceeding with the craft.
  4. I also lined the interior of my two boxes with tissue paper.
  5. Shape, or cut with a miniature cookie cutter or use tiny candy molds to make the doll candy from the clay of your choice. I used oven bake Sculpey for our doll's Valentine candy creations.
  6. After baking the clay candy in the oven at 275 degrees, I let them cool completely before painting with brown acrylic paints.
  7. I also covered a few candies with tacky white glue and aluminum foil paper.
  8. Next, you may squeeze a bit of puff paint onto the top of your faux chocolates to identify what is supposedly inside each sweet treat; just as you would find on actual chocolate candies!
  9. Let the candies dry and then cut long, narrow strips from a few cupcake liners to glue around the candy edges. Now you can choose to glue the faux candies inside your Valentine boxes or keep them loose. I chose to glue ours inside the bottom half of each box so that these would not be lost over time.
Left, Valentine clay candy cut with a miniature cookie cutter. Center, miniature Valentine clay
candy shaped by hand. Right, miniature clay Valentine candy shaped inside a tiny mold.


"When Cupid's dart
Shall strike your heart,
Oh, may his arrow be
This Valentine from me!"


Any doll would be pleased as punch to receive a box of chocolates like the two shown above and
below. Above is our purple version. The box top is decorated with satin, rick rack and a tiny
wire butterfly.


Here's a message, just a line,
Will you be my valentine?


Above you can see our buff pink version of this Valentine candy box craft. This candy box is
trimmed with pink silk embroidered flowers and green petals made from shaped ribbon.


"I send to you this heart of mine, 
For I'm your own true Valentine.


More candy filled container crafts:

Craft Doll Sized Cookie Sheets And Sugar Cookies

Left, finished doll cookies in Valentine colors: red and purple.
Right, sugar cookies painted to look as though they have been baked.
Photo of steps used to make sugar
 cookies for our American Girl dolls
to play with.

       This cute and simple doll craft may be adapted for any sized doll. I chose to make this cookie sheet for the 18 inch dolls in our collection. If your dolls have an oven and you would like to make this craft to fit inside it. Be sure to measure the length and width of that oven so that you may cut your own cookie sheets to fit inside of it. You can also may these tiny cookies using air dry clay, paper clay or even salt dough clay. I used Sculpey for the sample project you see here.

Supply List:
  • aluminum foil
  • tacky white glue
  • oven bake clay
  • tiny doll sized cookie cutters
  • cardboard
  • acrylic paints: black, yellow, white, brown
  • puff paints: red or pink
  • glitter: purple
  • Mod Podge (optional)
  • hot glue and hot glue gun (optional)
Step-By-Step Instructions:
  1. First roll out your oven bake clay into a 1/4 inch slab to cut out tiny shapes for doll sized cookies.
  2. Bake the cookies in the oven at 275 degrees for approximately 15 minutes if you use Sculpey clay like mine.
  3. While the cookies cool, cut 2 rectangles from cardboard measuring 3"x4"inches. 
  4. Cut and glue thin stripes of cardboard to paste around the edges of the cardboard and let these dry.
  5. Cut and paste aluminum foil to both sides of each cookie sheet. Press the foil around the edges of your cardboard gently as you go.
  6. Take a dry brush and dip it into black acrylic paint. Then rub the brush over a paper towel. You only want a very small amount of black paint on the tips of the brush. 
  7. Rub the loaded brush across the surface of the foil to give it an aged appearance. You can also take a dry paper towel and rub it across the cookie sheet to lift the black paint where you don't want it. Let the cookie sheets dry.
  8. Now glue the clay shaped cookies onto one of the cookie sheets for display purposes. Leave the other sheet blank so that your dolls will have the option to put some of the cookies onto the sheet during play.
  9. Use a very tiny brush to paint the finished cookies with a bit of yellow and brown. Let them dry and then use puff paints to add icing.
  10. Before the puff paint dries, sprinkle on some glitter to look like decorative sugar.
  11. Mod Podge your finished cookies and sheets to give them some durability.
More Cookie Crafts:

Craft a Cupcake Stand Using Wooden Spools

Left, Here is the finished two tiered cake stand craft that I made for our 18 inch dolls to display
these sugary sweet treats for Valentines Day. Right, I used a series of wooden spools, beads
 and a decorative metal hook to construct the small stan
d.

        This craft is very easy to make if you can find the right materials. I used wooden spools for my own cupcake stand but this idea could be just as easily made using recycled jar lids or cardboard if you prefer.

Left, wooden spools, old-fashioned decorative, wall mount hook
and glue gun. Center, the 18 inch doll sized cupcake stand glued
 together. Right, I used small wooden beads for feet at the bottom
 of the cake stand.
Supply List:
  • large wooden spool 
  • one smaller wooden spool
  • a finial or old decorative hook 
  • Valentine scrapbook paper
  • white enamel paint
  • four wooden beads
  • hot glue and hot glue gun
  • white typing paper

       Above you can see the supplies collected on my old kitchen table. First you will need to glue the items together. If you use a hot glue gun and are a child, you should have an adult present to make sure that you don't burn yourself. Wooden parts can be glued together using many other types of glue if you have them on hand. It just takes longer for your cupcake stand to dry using them. 

Left, the cupcake stand painted white and you can see that I have cut my white typing paper
 to make a template for the liners. Center, the Valentine themed paper liners now fit the
bottom of each cake stand tier. I can remove these after Valentines Day is over and replace
 them with something else for our dolls to celebrate. Right, our hand-crafted, Valentine cup
 cakes are stacked and ready for our American Girl Dolls to play with. 
If you would like to make some like mine read this post!

       After my cupcake stand had time to dry, I then painted it with white enamel paint. I gave it three good coats of paint and let the paint dry between applications for approximately 20 minutes. Then I used a pencil to draw around the outside edge of the stand on white typing paper. Cut out the template and then cut a hole in the center of the pattern. I fit this to my cake stand before cutting out the decorative paper liners. You could Mod Podge these to your own Valentines Day Cup Cake stand in the end. However, I chose not to do this so that I could change the liners out with other holiday themed papers in the future.

More Valentine Cupcake Crafts from Our Family Blogs:
Color Sweet Treats from The "Le Petite Pâtisserie Coloring Index"

Tuesday, January 22, 2019

Custom Character Doll: Clara Anderson

Clara smiles for the camera
in the sanctuary.
Custom Characteristics
Name: Clairissa Olive Anderson
Living On Campus? yes
School and Grade: Trinity Christian Academy for Girls, 4th grade
Interests and Hobbies: sewing for her dolls, loves math, reading and art, loves to  journal in her Bible, Clara also loves to daydream, work jigsaw puzzles and bake with her aunts on the weekends for fun. Clara has a large doll collection.
Brief Family History: Clara lives with her two aunts during her summer months and vacation days. She was orphaned before the age of seven. She attends the Trinity Christian Academy which isn't far from her aunt's home.
Siblings: Clara has much younger siblings that were adopted by extended family members after her parent's death.
Religion: Lutheran
Pet(s): She has a cat named Nova and a parrot named Pretty Pete. Both of her pets live with her aunts permanently. Clara sees them on the weekends, during vacation and over the summer.

About Me: Clara. I am 11 years old. My favorite color is pale yellow. My favorite
food is bread. My favorite author is Gene Stratton-Porter. I would like to be a
nurse when I grow up.
This Alexander Doll is An Original Character Doll
Name: unidentified
Height: 18 inches
Physical Features: long dark brown hair, brilliant blue sleep eyes, Caucasian doll, pale skin, dimples
Designer/Company: Madam Alexander Doll Company
Year(s): 2009
Additional Information: purchased through donations made to the Kidney Foundation

Friday, January 18, 2019

Custom Character Doll: Chavonne Richards

Chavonne picture from her first
day of school at Trinity Church
Sanctuary.
Custom Characteristics
Name: Chavonne Monique Richards
Living On Campus? no 
School and Grade: Trinity Church School for Girls, 4th grade 
Interests and Hobbies: Chavonne is very artistic. She is always interested in learning about new methods in the arts and crafts. She loves to paint and sculpt in her free time. Chavonne has a lovely voice and sings in the Sunday morning children's choir on weekends. 
Brief Family History: Creole Descent. Chavonne lives with her grandmother, mother and stepfather, and younger sister in a large three story home. Chavonne's stepfather is an ATC for the Army Corps. Her mother is a fund-raiser for the local hospital. 
Siblings: younger half sister, Tiana Beth Reed 
Religion: Pentecostal 
Pet(s): not yet!
About Me: Chavonne Richards. I am 10 years old. I love all colors, especially
red! I love to eat pasta, pizza and French toast! I love all Roald Dahl books so
much!!! I want to be an artist like my aunt when I grow up. And also my
grandmother is a quilt artist.

Chavonne is an Original Character Doll from Journey Doll 
Name: Chavonne or Taryn 
Height: 18 inches 
Physical Features: medium brown colored skin, hazel eyes, dark curly locks 
Designer/Company: Journey Doll 
Year(s): 2015 
Additional Information: I acquired this doll from Goodwill.

Tuesday, January 15, 2019

The About Me Name Game

       Now you can play the name game on your doll's first day of school. Just download the About Me name tag below. Print as many as you have dolls to give them to. Fill out their personal likes and dislikes. Mix the tags up to see if your friends or family can tell which doll each name tag belongs to before you reveal her name. Write her name at the top of the name tag so everyone will know your doll's information. 
        I've included the questions our pretend teachers wrote on the classroom chalkboard for every doll to read and respond to on their first day of school. Our doll's responses along with their photo under each of their custom character descriptions will appear this month.
  • What is your age?
  • What is your favorite color?
  • What is your favorite food?
  • What is your favorite book to read?
  • What do you want to be when you grow up?
All doll students are asked to fill out the "About Me" name tag on the first day of school.

A Lovely Church Interior for Doll Photography

Our doll Sophie stands in front of a terrific
background for our doll church school.
       This lovely church interior is by photographer Simon Bowen. It is of St. Andrews in Lincolnshire. If you would like to print a copy and use it for your doll's background you may do so. It is in the International Creative Commons and may be used for children's personal photography backgrounds. Parents may visit the official web site for the International Creative Commons to insure that their little ones are using it correctly. Thank you again Mr. Bowen for such a nice contribution!
Photo by Simon Bowen 2016, Interior of St. Andrews Church,
 Attribution-Share Alike 4.0 International cc