Sunday, September 30, 2018

Craft Doll Tennis Rackets

Left, two finished tennis rackets for our fashion dolls. Center, one of our dolls (a curvy Fashionista)
 is dressed and ready to play. I've included a pattern of her tank T-shirt below.
 Right, tennis racket covers made from felt will protect the racket from wear and tear.

       A tennis match between doll friends may be something you will need to craft on your own. So I have included here the first part of this DIY crafty sport, the rackets. Soon there will be an additional post showing how I made the tennis court and net.

Supply List:
  • black tape (color preference)
  • wire
  • masking tape
  • green acrylic paint (or a different color of your own choosing)
  • fine mesh netting (plastic, may be purchased from a hardware store)
  • tacky craft glue
  • white felt (a small amount)
Step-by-Step Instructions:
  1. Download and print out the tennis racket pattern below.
  2. Shape wires into tennis rackets up against the pattern for twisting the wire. 
  3. Wrap the racket in masking tape until it is stiff.
  4. Paint the upper half of the rackets, see picture below.
  5. Cut out the center of the racket's pattern and hold this on top of the netting while cutting out the shapes for the inside of your tennis rackets. Cut these a little larger than you need so that they can be slightly adjusted with scissors as you fit them to your doll rackets.
  6. Glue the mesh netting shapes in place with a tacky craft glue.
  7. Let the glue dry and harden before proceeding with the next step.
  8. Cut long thin strips of black tape to wrap the racket handles.
  9. Wrap these handles overlapping the tape just a little as you work your way up the handles.
  10. Now you can trace around the rackets including 1/4 an inch felt for a better fit for the tennis racket covers. You will need four pieces like this for two rackets.
  11. The cover should not cover the racket entirely see pattern below and picture above.
  12. Sew a straight seam around each set of felt covers.
  13. Turn them inside out and fit them to the rackets when they are in storage.
Left, Shape wires into tennis rackets up against the pattern for twisting the wire. Center, Paint the upper half
 of the rackets. Right, Glue the mesh netting shapes in place with a tacky craft glue.
Free guide for doll tennis racket and a free pattern for a doll tank T-shirt.

Saturday, September 29, 2018

Once upon a time... coloring page

Description of Coloring Page: a little girl reads a bedtime story to her teddy bear, stuffed animal, night time, text "Once upon a time...", patchwork quilt, bare feet, flannel night gown, book

Don't forget to drag the png. or jpg into a Word Document and enlarge the image as much as possible before printing it folks. If you have a question about this coloring page, just type into the comment box located directly below this post and I'll try to get back to you as soon as I can.

Sew Bean Bag Chairs for Your Doll

Rachel and her twin sister, Rosie, are lounging
on their bedroom bean bag chairs.
       These bean bag chairs are sewn using fleece so that the material will not unravel while a young crafter is working with it. I used solid, bright colors that will blend into the colors of the twin's bedroom. However, these chairs can look very different depending upon the material you select for them. 
       In the past, I have seen people stuff them with perishable products like beans and rice. I would not recommend that you do this because these food stuffings will attract pets, mice or insects to your doll collections. If you do not have the pocket change to purchase plastic pellets, the best alternative is cotton batting.
Cut pieces for the bean bag chair are marquise shapes.

Supply List:
  • matching threads and needle
  • plastic pellets to stuff the bean bag chairs with
  • felt or fleece scraps
  • pattern (below)
Step-by-Step Instructions:
  1. Download and print the free pattern below.
  2. Cut out the marquise shape and pin it directly to the fabric of your choice. Repeat this step 6 times.
  3. If you are using a no-fray fabric like felt or fleece, you don't need to include a seam allowance.
  4. Sew two sides together from tip top tip until you have sewn all of six marquise shapes together leaving an opening of inch so that the bean bag may be turned right-side-out.
  5. Stuff the bean bag chair with plastic pellets and then sew shut the small opening with a invisible stitch.
  6. Sew on the flower shapes using either a whip stitch or a blanket stitch on each end of the soft chairs.
Left, the twins are enjoying their new bean bag chairs. Center, the cat likes them too. Right, time for hide and seek!

Free pattern for a flower bean bag chair.

Friday, September 28, 2018

DIY Conical Hats for Fashionable Princesses

Learn to craft colorful, fancy cone shaped hats for each of your fashion dolls.
Trim them with silks, ribbons, embroidery etc...
The conical hats are called hennin;
 read more about them at Wikipedia.
Above, Hans Memling's painting of
a young woman with a black velvet
lappets and a conical shaped hat.
       The headdress in the shape of a cone or "steeple", or truncated cone were worn in the late Middle Ages by European princesses and women of the nobility. Various writers on costume history use hennin to cover a variety of different styles. Almost all agree that the steeple-cone style was the original hennin. You can make these theatrical looking princess hats for all of your Barbie dolls!

Supply List:
  • cardboard
  • masking tape
  • hot glue gun and hot glue
  • needle and matching threads
  • silk scraps, scarfs, transparent fabric scraps
  • ribbons to match
  • cotton balls
  • tacky craft glue 
  • one large paper clip
  • decorative thin silk ribbons (8 inches per hat)
 Step-by-Step Instructions:
  1. Download and print out my pattern below. Cut the pattern out.
  2. Trace around the hat pattern onto a stiff piece of cardboard and cut this out.
  3. Roll and shape the cardboard into a pointed cone and glue it with the tacky craft glue
  4. Use a paper clip to hold the cone together while it dries.
  5. Cover the entire cone with masking tape. This will hold the steeple shaped hat into place should it get wet during play.
  6. Stuff the inside tip of the cone with a cotton ball to help the cardboard keep it's peeked shape.
  7. Cut a piece of silk fabric slightly larger than the pattern provided, approximately 1/4 inch around.
  8. Roll this around the cone with it's right side facing the cone. Pin the edges together.
  9. Sew a straight seam up the side of the fabric to a point.
  10. Remove the silk cover and turn it inside out so that the straight seam is now on the inside of the fabric cover. 
  11. Now insert the cardboard form and hot glue the lower edge of the fabric to the inside of the cone neatly all the way around the edge of the hennin.
  12. Cut two squares of veil fabric to attach to the top of the hennin with a needle and thread. These square may be as long as you like. 
  13. Pull the threaded needle through the centers of each square to neatly layer these together while attaching them to the tip top of each covered hennin.
  14. Hot glue a ribbon on each side of the conical hat so that you can tie it onto the doll's head securely. The ribbon should measure approximately four inches in length on each side of the doll's head.
Barbie wears a gold lamé hennin with a sparkly star veil to compliment her pale pink dress trimmed with gold and white accents.
Each of our fashion dolls have hennins to match their princess gowns.
There are three versions photographed here in hot pink, purple and gold lamé.
This lovely princess wears a steeple headdress trimmed with embroidery.
Above is a free pattern for the body of the hennin.
 Measurements for the veil are included in the instructions above.

Thursday, September 27, 2018

Spaghetti String, Summer Top for A Curvy Fashionista

This sweet little summer top is finished off with tiny blue embroidered flowers. I cut and attached these
 from a repurposed kerchief. This baby sock fits my curvy Barbie perfectly.
       This summer top with spaghetti string shoulder straps was made from a recycled baby sock and a bit of embroidery transfer. The cuff of the sock is used here as the waist edging on the doll. The toe of the sock was cut away and the raw edges were finished with a tacky white glue. As soon as the edges were dry, I finished these with blanket stitching all along the top of the garment. Then I attached some yarn at either shoulder to act as my spaghetti string straps.

Sew Sock Slacks for Fashion Dolls

Each pair of sock slacks have cute little belts made from
embroidery floss and beads.
       Make cool weather slacks for your fashion dolls from recycled long ribbed socks. Our versions may be made either by hand or on a sewing machine if you prefer.

Supply List:
  • ribbed socks: grey or charcoal
  • white embroidery thread
  • regular thread
  • tacky craft glue or no-fray 
  • beads
  • long paper tube
Step-by-Step Instructions:
  1. Measure the length of your doll's legs and add two additional inches to approximate the length between it's belly button and it's crotch.
  2. Cut this measurement from the top of a ribbed sock down.
  3. Turn the sock clipping upside down so that the finished edge becomes the bottom edge of the slacks.
  4. Insert a long paper tube inside the cut sock so that you can apply tacky or no-fray along the clipped edge without the glue coming in contact with any other surface. Let it dry.
  5. Remove the tube.
  6. Now measure approximately two inches down from the waist edge and mark this point with a stick pin.
  7. You need to then sew two straight seams down the center of your sock approximately 1/4 inch apart. You can do this by hand or on a machine. Sew over these seams again to insure that these are tight.
  8. Take a sharp pair of scissors and cut between the two rows of straight stitching to form the right and left sides of your doll's slacks.
  9. Hand-stitch the two rows of straight seams together just above the crotch.
  10. Turn the slacks inside out and finish the top waist edge with a blanket stitch using embroidery floss.
  11. Fit the sock slacks to your doll by sewing a long piece of embroidery floss around the waistline with a large straight stitch.
  12. Tie off each end with a bead so that the slacks tie won't slip out of place.
  13. Tie the floss belt in an attractive bow.
Left,
sew two straight seams down the center of your sock approximately 1/4 inch apart. You can do this by hand or on a machine. Sew over these seams again to insure that these are tight. Center, Take a sharp pair of scissors and cut between the two rows of straight stitching to form the right and left sides of your doll's slacks. Right, Hand-stitch the two rows of straight seams together just above the crotch.

Wednesday, September 26, 2018

Make Rainbow Hair Extensions for Fashion Dolls

This little fashion doll is ready to go to a party. She
 wears a green and yellow, rainbow colored hair ex-
tension that took only minutes to snip, tie and clip
into place.
       Rainbow colored wigs are much easier to purchase during October and February because  these are the months that Christians celebrate All Hallows Eve and Mardi Gras in costume.
       The wig you see pictured below was purchased for $1.00 in it's original package and has never been worn previously. 
       You will also need to buy some very tiny hair clips to attach your doll's hair extensions. These may be found in dollar stores and grocery stores in hair care supply.

Supply List:
  • colorful rainbow wig
  • thread to match hair colors
  • tacky craft glue
  • sharp scissors
  • mini hair clamps
Step-by-Step Instructions:
  1. Cut a length of wig approximately 3 to 4 inches.
  2. Squeeze craft glue onto the tips of the fibers.
  3. Wrap the thread matching the natural hair color of your doll around the tips to hold the strands together.
  4. Let the glue harden and trim off the excess tips so that these look similar to those pictured below.
  5. Tuck the extension into place in your doll's hair using a colorful mini hair clip.
Left, a synthetic colored costume wig. Center, the rainbow hair extensions.
Right, colorful mini hair clips, small enough for a doll.

Thursday, September 20, 2018

Sew a Jersey/Sweater for Ken or Barbie

This striped sock sweater/jersey includes a turtleneck collar and ribbing on both the sleeves and around the waist.
This sock sweater requires two socks in order to include the stripes and ribbing on the sleeves.
 This jersey (above) is sewn from a pair of socks. Sewing with sock can be tricky but the results are very pleasing. Some tips to remember:
  • Sew with very small stitches and sew over your stitches several times to prevent unraveling.
  • The clothes only look as good as the socks, so, use either new or like-new socks to begin with.
  • Choose interesting patterns and colors that suite the age your doll represents.
  • Try to avoid stretching the socks while you work with them. This will prevent oddly shaped garments.
  • Use very strong thread for sock crafts such as these. Sometimes I will even use dental floss to sew with knit materials for dolls.
  • Use a sticky craft glue or no-fray fabric glue when working with the knit socks to prevent unraveling. 
  • Whether you use one sock or two to sew a doll's sweater will depend upon the pattern, design or size of your doll. Continuing the design of the sweater across the chest and onto the sleeve is a matter of design preference.
The candy stripped sock sweater above includes ribbing
around the waist only; plus a tiny knit belt. See directions
for her sweater skirt here.

       For this particular version of a doll sock sweater, (right) the cuff of the sock becomes the finished edge of the doll's sweater waist. The cuff provides a natural elasticity for the sweater so that the garment possess some durability when a child dresses and undresses her doll.
      There is also a tiny knit belt, cut from the former sweater. If your recycled sweater does not have a detail like this one, simply cut a bit of knit twine or decorative yarn to tie about the doll's waist instead.

Supply List:
  • a pair of clean larger socks for Ken's sweater, one child's sock for Barbie's sweater version
  • needle and strong thread (Use dental floss, unwaxed if you have it.)
  • matching pale pink, cotton thread
  • tiny sharp scissors
  • a doll to measure by (I used a ken doll, made by Mattel and a lovely dark skinned Barbie.)

Step-by-Step Directions:
       Cut the child's sock into three separate pieces, two identical sleeves for the arms (from the foot of the sock) and one continuous piece for the torso of the doll, cut from the leg of the sock. (see photo below) Then thread your needle with the dental floss and sew both a straight seam and then a blanket stitch up the sides of each sleeve leaving a opening for the shoulder at the top of each sleeve and an opening at the bottom of each sleeve for the doll's hands to stick through. Sew a straight seam and a blanket stitch across the top of the neck line leaving a hole for the doll's head to fit through. The cuff of the former sock becomes the waistline opening and it is left open all the way across.
 
       Observe in the pictures below how the heal part of the sock (gusset) is left to shape the shoulders of the sweater. It is easy to notice this here because the heal of the sock is solid pink along with the waistline area. You can also observe from the close up shots that I have turned the collar back and stitched a tiny blanket seam around the neck opening.  This stitch prevents fraying, allows for elasticity, and makes an attractive, finished edge.

       To sew on the sleeves you must take a tiny pair of sharp scissors and cut out a small arm whole on either side of the sweater just below the shoulders. Be careful not to cut these openings too wide. As you sew the arm seams these openings may be stretched a bit.


       Turn the sleeves right-side-out so that the front sides are facing together as you sew around the arm whole seams. See the photo below on the far right. In the Center photo, you can see that the sweater when turned inside out, it should have all muted colors and when the sweater is turned outside in, the colors are all brilliant.
       I finished the bottoms of each sleeve on this pattern by gently rolling them up and tacking them down with a bit of cotton thread and a blanket stitch.

How To Sew a Straight Knit Skirt for a Fashion Doll

Barbie Doll dressed in knit top, skirt and faux leather boots.
Click here to see how to sew the sweater.
       Knit doll clothes cut from recycled sweaters and socks can be finished in such a way as to prevent future unraveling to some extent. However, you must treat the clipped ends of the knitted stitches with a fabric glue or tacky glue!
       These clipped ends must also be sewed securely, making sure to pass a fine needle back through each row of the knit and firmly sewing shut any stitched seams with several tight lines of straight stitches.

Supply List:
  • sleeve from a knit sweater (recycled clothing)
  • needle and thread to match
  • tacky, white craft glue or no-sew fabric glue
Step-by-Step Directions:
  1. Cut a clean, laundered sleeve from a knit garment. You can cut two knit skirts from an adult woman's size sweater for one 11 1/2 inch doll.
  2. Lay the sleeve out on a clean flat surface to cut. Lay your fashion doll on top of the sleeve to measure the length you would like to cut for her skirt. This measurement will vary given the size of your doll.
  3. I cut the top of the skirt from the finished bottom of my sweater's sleeve. That way, the doll's waist will be finished and less likely to unravel over time.
  4. Sew a straight stitch down the side seam of the skirt. Repeat this again, layering several seams on top of each other.
  5. For the unfinished, clipped end of the skirt, insert a tube or a group of pens to hold the tube of knit open temporarily while tipping the edge of the garment with glue. Let the glue dry this way and then pull the pens or tube out.
  6. I used a blanket finishing stitch around the bottom of the skirt on top of the glued edges to ensure the skirt would not unravel for some time.
Left, the sleeve of a knit sweater is cut off the main body of the garment in order to make the measuring and cutting
of my doll's skirt easier. Center, here is a photo of pens inserted inside the raw end of a cut sock. This is how I hold
open the clipped edges of a knit garment in order to apply a fabric glue to each end. You don't want the fabric to sit
on top of anything that it might adhere to during the drying time of the glue. Pull these pens out after the glue
has dried. Right, the bottom finished edge of the skirt has an additional seam sewn through its edge on top of the glue. 
Left, here you can see the top edge of the doll skirt is actually the finished portion of the former knit sleeve that
it was cut from. Center, the bottom edge of the skirt is hand-stitched over with a tiny, tight blanket stitch using
 matching thread. Right, this knit skirt will last considerably longer than most, given the attention paid to finishing
 it's edges.

Friday, September 14, 2018

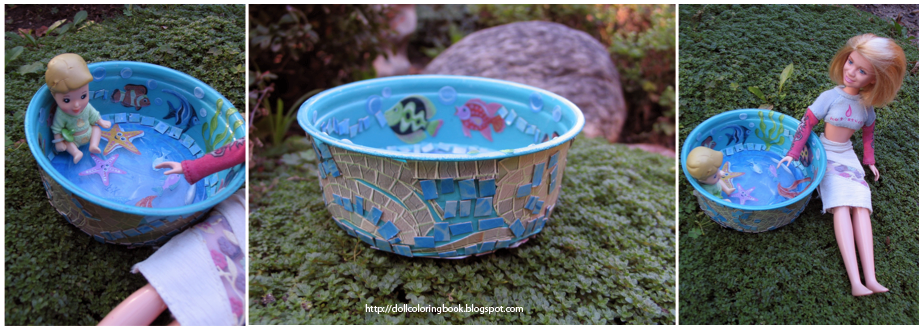
Collage a Baby Swimming Pool for Your Dolls

First, apply the stickers to the inside walls of
the transparent container.
       It's fun to make this simple craft with containers you can recycle from your own kitchen. Cover it with fishy stickers and just a bit of paint and your ready to have a splashing good time with your dolls.

Supply List:
  • a recycled food dish (plastic)
  • fish stickers
  • blue paint
  • Mod Podge
  • decorative paper (mine had printed tiles)
Step-by-Step Instructions:
  1. Clean the discarded, transparent food container with warm soap and water. Let it dry.
  2. Adhere stickers on the inside of the container.
  3. Apply Mod Podge to the inside of the container over the stickers. Let the glue dry between several applications.
  4. Paint the outside of the container with blue paint and let this dry.
  5. Decoupage clippings from a decorative sheet of paper on the exterior of the container if you want even more detail on the baby doll pool.
  6. Layer Mod Podge on top of the outside walls as well.
Both Above and Below, you can see our Mary Kate doll baby sitting and having fun with the baby doll pool.

Craft a Sunny Little Ball Pit

The tiny doll inside our homemade doll pit seen from three angles.

One cherry tomato container clean and ready to use.
        You can make a sunny little ball pit from a cherry tomato container for your doll's nursery.         
       I chose to use this recycled container because of it's transparent walls and dome shape. Doll mamas can keep a close watch on their little ones through it's walls while they play!

Supply List:
  • cherry tomato container
  • Styrofoam balls
  • one yellow felt square 
  • hot glue gun and hot glue
  • masking tape 
  • light weight cardboard
Step-by-Step Directions:
  1. Clean the container with warm soap and water after the tomatoes have been eaten.
  2. Remove the top part of the container to work on the bottom first.
  3. With a small pair of sharp scissors, cut out the large bulbous dome from the bottom half of the container. This is very easy to remove and has a tacky lip on it that will stick easily to the top of the transparent lid. Just add a bit more glue to the lip and position this firmly onto the top of the container.
  4. Now cut a round piece of cardboard to fill the space at the bottom of the container neatly with glue. Don't forget to cover this surface completely with masking tape.
  5. Cut circle felt pieces to cover both inside and outside of the lower half of the container. the felt pieces should be slightly larger than the cardboard bottom.
  6. Cut a long piece of felt to also cover the sides of the lower part of the container.
  7. Hot glue on this long narrow, felt strip first. 
  8. Clip the excess felt and turn this under the bottom of the container gluing it neatly as you work your way around the bottom.
  9. Glue on one of the felt circles to cover this edge.
  10. Glue the other felt circle to the inside of the container to cover the masked cardboard bottom.
  11. Now cut an entry into one side of the transparent tomato top. 
  12. Cut a thin strip of felt to line the edge of your opening.
  13. Use the hot glue to firmly attach this felt to the outside opening of the doll's ball pit.
  14. Fill the container with a doll and Styrofoam balls.
Left, You can see the masked cardboard bottom of the cherry tomato container here.
Right, Clip the excess felt and turn this under the bottom of the container
gluing it neatly as you work your way around the bottom.

Thursday, September 13, 2018

Mid-Century Faux Fiberglass Chairs for Barbie

Fashion dolls ranging from eleven inches to fourteen can sit comfortably in these faux Mid-Century Modern chairs.
On the far left are two Bratz dolls and on the far right is a 14 inch Mattel Barbie and a Lisa Frank doll seated together
in the same set of Mid-Century modern, doll chairs.
       These faux fiberglass chairs are made from paper mache of course! I painted them bright orange and covered their lower halves in faux wood grain shelf paper that I purchased from a local dollar store.
       This project was indeed made simpler because of the shoe forms. Some shoes are sold with these cardboard inserts included in their box. These paper mache forms keep the shoes looking new and prevent the crushing of shoe tops in transportation and storage.
       In this post I will demonstrate how I transformed the orange, faux fiberglass, chair designs. I used the bottom halves of each shoe form for these designs.   
Photo by Schlaier, Read more about the Eames Fiberglass Armchair
Visit the Eames Office at YouTube and watch films.

Supply List:
  • spray paint
  • faux wood grain shelf paper
  • cardboard shoe forms
  • wood putty
  • sandpaper
  • light weight cardboard
  • Gorilla wood glue 
  • masking tape
Step-by-Step Instructions:
  1. I cut each shoe form in half to make four separate chairs for our fashion dolls.
  2. Next I shaped the bottoms of each chair to their unique curves separately, because not a single one of my faux fiberglass chairs is identical to the others. Place the chair, seated side up, on top of a piece of cardboard and trace around it with a pencil. Now I had a template to work the bottom half of the chair with.
  3. I then taped and glued a piece of three inch wide cardboard around the circumference of the cardboard template, overlapping one end onto the other approx. 1/2 ". Then I glued this in place.
  4. Tracing a template around the extended template on top of an additional piece of cardboard, I cut a closed end for the chair's bottom side. After gluing this chair piece on the bottom, I let it dry overnight. 
  5. Using the Gorilla wood glue, I firmly glued the top half of the chair to the lower and let the entire chair dry again overnight.
  6. I smoothed on the first coat of wood putty on the upper half of the doll chairs and also used masking tape to cover the lower half of the chairs, keeping these clean and free from paint. It is necessary to keep cardboard clean and free of paint so that shelf paper will adhere to surfaces properly.
  7. At last I sanded the tops of each chair smooth and spray painted these surfaces with a bright orange color. I had to repeat these steps several times before achieving the smooth faux fiberglass surface I wanted.
  8. Then I removed the masking tape and cut the faux wood grain shelf papers to cover each chair's bottom halves.
Left, paper mache shoe forms come with some shoe purchases in the U. S.
Center, the lower cut chairs with attached bottoms.
Right, the tops of each chair are covered with wood putty. and then sanded.
Left, the first spray paint layer. Center, I have smoothed more putty over the painted surfaces to repeat
 the sanding and painting. Not only does this give the surfaces a more finished, glass-like look,
 it also strengthens each chair. Right, all kinds of dolls may sit comfortably in my Mid-Century
furniture: Bratz dolls, Barbie dolls, Lisa Franks dolls etc...
Multiple angles showing the shapes of these plascale Mid-Century Modern chairs.