The many little Mother Goose rhymes, of which "Tom, the Piper's Son" is one, were not written by Mother Goose at all originally. They were composed by a Frenchman named Charles Perrault, who lived in the latter part of the Seventeenth Century. He had children of his own, and they delighted in getting him to tell them stories. After a while, when he was an old man it occurred to him that other children might like to hear his stories too, so he write them down and dedicated the book to the royal children of France. In order to make them interesting to these children he pretended that his own youngsters had written the tales.
"Here is Tom, the Piper's son, with a bit of string you can make him run.
And unless he runs away too soon, he'll dance if you play a little tune."
Directions:
Click directly on the image to download the largest possible file.
Print the image out in a program like WORD, extending the boarders out so that it may be printed as large as possible.
Print then cut out the pieces of Tom and his pig.
Mount the parts of the figure onto cardboard.
Color the hat and buckles yellow and the checks of the suit blue.
Make the trimming, tie a orange ribbon on the hat.
Stripe the stocking with bright colors.
With a strong thread fasten the arms to the body and with another the legs to the body.
Tie a piece of elastic to use as a string to run through the figure at the point marked "x"
Fasten the end of the elastic to a chair or something solid and by holding the end of the string you can make the figure run or dance.
I have here treated the whole realm of childish fancy as one of play, as one in which happy childhood finds its own sunny world. Yet it is clear that this is after all only one side of children's dreamworld. Like our own world it has its climates, and if fancy is often frolicsome and games deliciously sweet, they sometimes become serious to the point of a quite dreadful solemnity.
That children's imagination is wont to hover, with something of the fascination of the moth, on the confines of the fearful, is known to us all. Some children, no doubt, have much more of the passion for the gruesome and blood-curdling than others, since temperament counts for much here; yet it is pretty safe to say that most know something of this horrible fascination. Dreams, whether of the night or of the day, are not always of beautiful fairies and the like. Weird, awful-looking figures have a way of pushing themselves into the front of the scene. Especially when the "tone" of the frail young nerves runs down from poor health do these alarming shapes appear, and acquire a mighty hold on the child's imagination. Of the timidity of the early years of life I shall have more to say by-and-by. Here I want to bring out how the very vividness of children's images exposes them to what is sometimes at least their worst form of suffering.
A child, at once sensitive and imaginative, frequently passes into a state of half hallucination in which the products of fancy take on visible reality. George Sand, in her delightful reminiscences of childhood, relates more than one of these terrible prostrating hallucinations of the early years.
We see the same gloomy turn of the young imagination in the readiness with which children accept superstitions about ghosts, witches, and so forth. Those who are brought up in the country in contact with the superstitious beliefs of the peasant appear to imbibe them with great energy. This is true of George Sand, who gives us an interesting account of the legends of the French peasants, with whom when a little girl she was allowed to associate. Even in England and among well-to-do people children will show an alarming facility in adopting the superstitious ideas of the servants.
Much the same thing shows itself in children's romancings and in their preferences in the matter of stories. So far from these being always bright and amusing, they frequently show a very decided tinge of blackness. The young imagination seems to be especially plastic under the touch of the gruesome. It loves to be roused to its highest pitch of activity by the presentation of something fearsome, something which sends a wild tremor through the nerves. And even when the story is free from this touch of the dreadful it takes on seriousness by reason of the earnestness which the child's mind brings to it.
Coming now to active play, we find here, too, in the region which seems to owe its very existence to the childish instinct of enjoyment, traces of the same seriousness. For most children, one suspects, play would become a tame thing were there not the fearful to conjure with. The favorite play-haunts, the dark corners under the table, behind the curtains, and so forth, show what a vital element of play is supplied by the excitement of the state of half-dread. It is in the games which set the young nerves gently shaking, when a robber has to be met or a giant attacked in his cave, that one sees best, I think, how terribly earnest children's play may become.
Even where play has in it nothing alarming it is apt to take on a serious aspect. This has been illustrated in what has been said about the doll and other play-illusions. Most of children's play is imitative of the serious actions of grown-up folk. In nursing her doll the little girl is taking to her domestic duties in the most serious of moods; similarly when the little boy assumes the responsibilities of coachman or other useful functionary. The imitative impulse of childhood is wont in these cases to follow out the correct and prescribed order with punctilious exactness. The doll must be dressed, fed, put to bed, and so forth, with the regularity that obtains in the child's own life; the coachman must hold the whip, urge on the horses, or stop them in the proper orthodox manner. And the same fidelity to model and prescription shows itself in those games which reproduce the page of fiction. Here again Tom Sawyer is an excellent example. The way in which that leader of boys lays down the law to Huckleberry Finn when they play at pirates or at Robin Hood and his merry men illustrates forcibly this serious aspect of play.
"Alike" by Daniel Martinez Lara and Rafa Cano Méndez
One of three bags containing doll clothes and random adult
sized garments.
Recently I purchased three bags of doll clothing for $3.99 each from the Kidney Foundation. I didn't really know what to expect. In the past, these kinds of purchases have been unfortunate investments for me; bags filled with tattered things not worthy of the pocket change spent on them. However, I happened to glance at a few of the labels inside the bags and saw American Girl printed on them, so I purchased them at once.
After opening the bags at home, I was quite surprised with the contents! There were the odds and ends included as predicted. A random glove, old fur collar, and a night cap etc..., all of these items adult size. But twisted between the Velcro tentacles and bits of knotted yarn were doll clothes. So I got to work washing/ironing the lot!
Afterwards, I decided that my purchases this time were worthy of the cash spent. There were a total of ten outfits in perfect condition. Two are not pictured below but I will link to these when they are posted.
There are were also a variety of Build A Bear workshop clothing items; these I will take apart and resew them into more doll clothing for my 18" dolls later and post them as they are completed.
Pictured above are two dolls from my collection, the first on the left is a porcelain googly eyed doll that I painted 28 years ago.
I just love her silly expression. The doll on the right was saved from resale. She is by the Alexander Doll Company.
The dress on the left, in buff pink with a smocked collar is from an Spanish manufacture called Rosalina?
Smocked and embroidered nighties from Charleston South Carolina were among the discarded doll clothes. Although there were coffee stains on the garments, I was able to successfully remove them with only a bit of stain remover and detergent. The smocking details are extraordinary and the buff pink colors are by far my favorites!
I've included a links below to the doll website and also to a lady who makes lovely smocking for dolls and their children here in the United States.
Above are my children's Oh So Beautiful 14" toddler dolls from 1995. I redressed them
in these classic velvet Bitty Baby dresses from Pleasant Company, now owned by Mattel. (American Girl Dolls)
Velvet Bitty Baby dresses from the 1990s where also in the bag, although the hat for the purple dress was not included. Both dresses fit our family Oh So Beautiful dolls. I love the eyes on these dolls; they are so realistic!
There were also dresses by the new American Girl Doll company, Small Small World Beatrice collection and Dollie & Me.
Left, my red head, 18inch, Heidi Ott doll, Center my blond Best Friends Club Inc, 18inch doll.
Right, my brunette, 18inch Madame Alexander Doll. All of them wearing doll clothes from my local resale shop.
As for the random additions to my bags that were not intended for dressing dolls? I've decided to take up a personal challenge to sew them into something useful. I can't stand to waste small change on what I do not want, even though I know that the doll clothing I purchased was well worth the few dollars it took for me to buy wanted items. But, such are the marketing tactics of merchants in our area.
Left, a lavender floral dress for Spring. Center, the blue and green striped rugby dress made for Lanie Holland
by American Girl Doll company. Right, a polka-dot summer frock by Dollie and Me.
Our "Cheyenne Rose" Magic Attic Doll
models with the roses.
"A rose by any other name would smell as sweet"
William Shakespeare's Romeo and Juliet
Every little doll loves to receive roses for Valentine's Day, especially if these flowers are made from felt! Felt roses are not only soft, but they also have a very long shelf life!
Here you can see that I chose to craft roses from white, red and hot pink felt for our Doll's Valentine Party. But you could choose to make your own pretend roses from any color of felt you like such as: peach, coral, buff pink, ivory, yellow or maybe even lavender.
You will also need a selection of green felts for the petals of your roses. I chose to use three variations of green.
Clip chenille stems in advance to three or four inches in length. I used both fuzzy chenille stems and sparkly metallic green stems because this is what I already had on hand.
You may need to purchase a new, sharper pair of scissors in order to the complete the craft. Felt has a tendency to quickly dull scissor blades. Duller scissors could make this craft seem somewhat tedious.
Step-by-Step Instructions:
Cut petal shapes from your felt. You can see that my petals are arched at one end and flat on the opposite end. Cut many of these shapes in advance prior to the gluing process for whatever color of flower you prefer. For an 18inch doll you will need to make the petals approximately 3/4 to 1inch in diameter. Center the tip of your chenille stem on the felt petal with a small amount of hot glue beneath it.
Press together the sides of the petal around the chenille tip and hold it in place until the glue dries. This is a quicker process with hot glue but not a safe one for very young children. If you are too young to use a hot glue gun, you may use tacky white glue and hold the petals a little longer as you go.
Next you will need to squeeze a bit of glue on either side of the first petal in order to stick the next petal around the edges of the first. Hold the two in place until the glue dries.
Now proceed to add more petals around the circumference of the growing blossom.
You can add as many petals as you like, depending on the size you would like your rose to become. Rosebuds are obviously smaller with fewer petals.
When you have finished making your felt rose, you can then decide if you would like to glue on a few green felt leaves as seen in the photos below. If you are using tacky white glue to make the rose, wrap a tiny rubber band around the thickest part of the flower to hold all of the drying petals in place until they are dry.
Left, cut rose petals from hot pink and red felt. Center, Clipping the fuzzy edges of the felt rose stem and adding the
leaves of the rose. Right, the white felt roses as seen from the top.
Above are the felt roses from a variety of angles.
Left, a green vase of felt roses. Center and Right, Our lovely Magic Attic, Rosa doll holds a bouquet of felt roses.
Our dolls are setting up a dining area for their Valentine's Day Party! There are so many things to get done before the sister's guests arrive.
You can play a game with the photographs once you print them out. Try to remember the order they appear in under this post. Once you can remember that information, try to remember the order of the things each doll sister says to one another, while they are busy working at preparing their party buffet table. Memory games such as these, help develop pre-reading skills in the very young.
"It is time to set up the buffet table for our Valentines Day Party! First let me straighten the wreath," said Zoe.
"Help me get the table in place, Elula," said Zoe. Elula is quick to help whenever Zoe is in charge.
"What a silly goose you are Elula; don't knock the vase over. It's too close to the edge of the table."
Zoe loves to playfully chastise her cute little sister.
"Perhaps we need to put a doily under that pitcher, just in case there is a small spill later Elula," says Zoe.
"Here is the basket of silverware," says Elula. "I think this spoon needs washing."
"My tummy is starting to ache! When can we cut this sheet cake?" cries Elula.
"Don't forget the cups, Zoe." says her little sister.
"The cupcakes and sheet cakes look scrumptious!" remarks Zoe.
"Won't they be wonderful to eat, Elula?
"Humm, I think we're missing something, don't you little one?"
"I think it's the napkins that are missing! cried Elula.
"Oh dear," said Zoe, "Mother will need to make another quick trip to the store!"
Above you can see the finished cupcakes and the liners that I cut apart to trim and finish the 18 inch doll deserts.
Each one of these doll cupcakes will serve two 18 inch appetites if your dolls are not too hungry! Shape their tops to look like your favorite treats. I decorated some of these cake sweets with cherubim, hearts, strawberries, cherries, doves and even a little rose! I also added a little red or white glitter glue to make them extra tempting!
Top, paper tubes. Bottom, sculpted clay cupcakes
before they have been painted.
Supply List:
narrow cardboard tube
cardboard
tacky white glue
Sculpey
acrylic paints: red, pink, brown, white etc...
Valentine cupcake liners
mini cookie cutters
mini candy molds
glitter glue
Mod Podge
hot glue gun and hot glue
Xacto knife
Step-by-Step Directions:
Cut the narrow cardboard tube into 1inch sections.
Glue these down to a piece of scrap cardboard with white tacky glue. Let them dry.
Cut the tubes apart from the cardboard and trim them so that each segment has a closed end.
I hand-shaped my cupcake tops on top of the closed end of the tub in order to give the clay support.
Use long snake shapes from the clay to wrap around the top of the cupcake making the icing.
Roll out tiny spheres for the cherries and poke a hole into the top of each to insert their stems.
I molded the tiny doves and cherubim from candy molds and baked these ahead of time to stick into the cupcake icing. (see pictures of the clay shapes here.)
Again, I did the same with the hearts only I used tiny mini cookie cutters to cut out the tiny Valentines. These may be baked ahead of time. They will adhere to the icing once baked together in the oven at 275 degrees. You should not need to remove the sculpted clay tops from the cardboard tubes once these have been baked together in the oven. The oven temperature is too low for the paper tubes to burn.
Paint your cupcakes however you would like! I used traditional Valentine colors: red, pink, white.
I also painted on the glitter glue to add some sparkle.
After the painting dries, cut the ribbed edges of the cupcake liners apart from the bottoms of the cupcake liner.
Carefully reattach the ribbed liners around the lower half of the paper tubes.
Now you can re-cut the bottoms of the liners to the size of the miniature cupcake bottoms and glue them in place.
Coat the clay parts of the cupcakes with Mod Podge when you have finished to help keep the Valentine party treats looking new.
Left, the front side of my decoupaged frame with a clipping of my small friend's favorite doll, Cécile by American Girl Doll. Right the back side of the paper frame left undecorated.
I decoupaged this paper frame for a young friend. It will make a sweet little Valentine's gift for her to display on her nightstand or on top of her dresser. These paper frames are very easy to acquire from dollar stores or hobby shops where I live and they usually do not cost much.
If you want to make one similar to mine, you will need to acquire the following supplies: Mod Podge, ribbon, a hot glue gun, paper clay, tiny angel press mold, silver cord, and Victorian scraps.
The Victorian scraps may be downloaded and printed on a home computer or these can be purchased already printed from a paper supply shop or cut from scrapbook papers.
I also included tiny angels made from a paper clay press mold. Molds similar to the one I used can be purchased in a hobby shop like Hobby Lobby or Michaels.
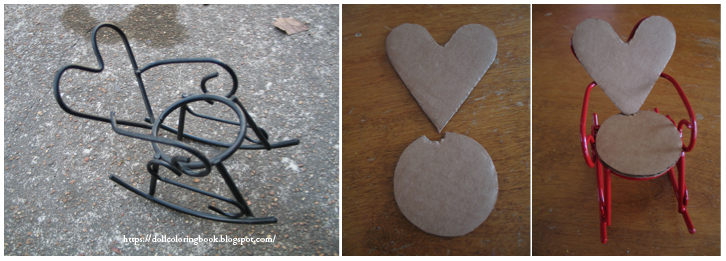
Left, the backside of my heart shaped rocker. Center, the front side of the rocker. Right, Disney Moana
doll holds a Valentine chocolate box and relaxes in the doll rocking chair; the chair is a perfect for her size.
I discovered this unwanted iron work rocker at resale. I don't know whether is was designed to hold a miniature potted plant or if the manufacture intended it for a doll? I have seen similar chairs with pin cushions as seats. Whatever the original use, I decided to add it to our growing collection of furniture for the doll house.
I painted the frame a bright red using some leftover spray paint from previous projects and cut some heavy cardboard for a back and seat to cover with decorative scrap paper.
Then I simply hot glued these finished pieces through the iron work on the backside of the frame and from underneath as well. Now I have a sturdy little heart shaped rocker that fits our 11 to 12 inch dolls.
Left, the rocker is it looked when I first purchased it. Center, I've cut a cardboard back and seat for the rocker.
Right, this is how the seat will look on the iron frame. I need to cover it with paper or fabric.
Valentine messages for candy boxes and cards in lavender.
"True as strong and strong as true
Is my earnest love for you."
Our 18 inch doll's "parents" have been working over-time making doll sized, candy filled Valentine containers. Our Chavonne doll holds the pink candy box and our Zoe doll holds a purple version.
My own versions of fabric heart box covers.
"Tis the day the love birds mate; Smile on me, and bless my fate."
"Here's my heart as good as gold Bringing to you love untold."
Although this craft is not difficult, it is time consuming to create. You can either make your Valentine shaped candy box using decorative fabrics or paper. What makes this Valentine craft truly unique are the tiny hand-made clay candies glued inside!
Supply List:
cardboard
masking tape
tacky white glue
hot glue and hot glue gun
notions, trims, beads, lace (if you intend to make the fabric versions)
fabrics
Sculpey or paper clay
acrylic paints: chocolate browns
puff paints: white, pink, red
recycle an old heart shaped container (optional)
a variety of Valentine cupcake liners
matching tissue paper
Step-by-Step Directions:
If you do not have a recycled heart shaped box, you can make one similar to my own by hand. You will need to cut two hearts from cardboard. One of those hearts will need to be slightly smaller than the other, approximately 1/8 to 1/4 inch smaller. The larger heart will become the lid and the smaller one the bottom.
Both hearts will need to have 1/2" to 3/4" side walls in order to comfortably hold your doll's miniature clay candy creations. Cut these strips from cardboard and attach them along the edges of your cardboard hearts using hot glue. Ask a parent for help when using hot glue.
Decorate both the top and bottom of your box. You may even wish to cover the sides of your box with ribbon or lace. Make sure the box lid fits neatly over the bottom before proceeding with the craft.
I also lined the interior of my two boxes with tissue paper.
Shape, or cut with a miniature cookie cutter or use tiny candy molds to make the doll candy from the clay of your choice. I used oven bake Sculpey for our doll's Valentine candy creations.
After baking the clay candy in the oven at 275 degrees, I let them cool completely before painting with brown acrylic paints.
I also covered a few candies with tacky white glue and aluminum foil paper.
Next, you may squeeze a bit of puff paint onto the top of your faux chocolates to identify what is supposedly inside each sweet treat; just as you would find on actual chocolate candies!
Let the candies dry and then cut long, narrow strips from a few cupcake liners to glue around the candy edges. Now you can choose to glue the faux candies inside your Valentine boxes or keep them loose. I chose to glue ours inside the bottom half of each box so that these would not be lost over time.
Left, Valentine clay candy cut with a miniature cookie cutter. Center, miniature Valentine clay candy shaped by hand. Right, miniature clay Valentine candy shaped inside a tiny mold. "When Cupid's dart Shall strike your heart, Oh, may his arrow be This Valentine from me!"
Any doll would be pleased as punch to receive a box of chocolates like the two shown above and below. Above is our purple version. The box top is decorated with satin, rick rack and a tiny wire butterfly.
Here's a message, just a line, Will you be my valentine?
Above you can see our buff pink version of this Valentine candy box craft. This candy box is trimmed with pink silk embroidered flowers and green petals made from shaped ribbon.
"I send to you this heart of mine, For I'm your own true Valentine.
Left, finished doll cookies in Valentine colors: red and purple.
Right, sugar cookies painted to look as though they have been baked.
Photo of steps used to make sugar
cookies for our American Girl dolls
to play with.
This cute and simple doll craft may be adapted for any sized doll.I chose to make this cookie sheet for the 18 inch dolls in our collection. If your dolls have an oven and you would like to make this craft to fit inside it. Be sure to measure the length and width of that oven so that you may cut your own cookie sheets to fit inside of it. You can also may these tiny cookies using air dry clay, paper clay or even salt dough clay. I used Sculpey for the sample project you see here.
Supply List:
aluminum foil
tacky white glue
oven bake clay
tiny doll sized cookie cutters
cardboard
acrylic paints: black, yellow, white, brown
puff paints: red or pink
glitter: purple
Mod Podge (optional)
hot glue and hot glue gun (optional)
Step-By-Step Instructions:
First roll out your oven bake clay into a 1/4 inch slab to cut out tiny shapes for doll sized cookies.
Bake the cookies in the oven at 275 degrees for approximately 15 minutes if you use Sculpey clay like mine.
While the cookies cool, cut 2 rectangles from cardboard measuring 3"x4"inches.
Cut and glue thin stripes of cardboard to paste around the edges of the cardboard and let these dry.
Cut and paste aluminum foil to both sides of each cookie sheet. Press the foil around the edges of your cardboard gently as you go.
Take a dry brush and dip it into black acrylic paint. Then rub the brush over a paper towel. You only want a very small amount of black paint on the tips of the brush.
Rub the loaded brush across the surface of the foil to give it an aged appearance. You can also take a dry paper towel and rub it across the cookie sheet to lift the black paint where you don't want it. Let the cookie sheets dry.
Now glue the clay shaped cookies onto one of the cookie sheets for display purposes. Leave the other sheet blank so that your dolls will have the option to put some of the cookies onto the sheet during play.
Use a very tiny brush to paint the finished cookies with a bit of yellow and brown. Let them dry and then use puff paints to add icing.
Before the puff paint dries, sprinkle on some glitter to look like decorative sugar.
Mod Podge your finished cookies and sheets to give them some durability.
Left, Here is the finished two tiered cake stand craft that I made for our 18 inch dolls to display these sugary sweet treats for Valentines Day. Right, I used a series of wooden spools, beads and a decorative metal hook to construct the small stand.
This craft is very easy to make if you can find the right materials. I used wooden spools for my own cupcake stand but this idea could be just as easily made using recycled jar lids or cardboard if you prefer.
Left, wooden spools, old-fashioned decorative, wall mount hook and glue gun. Center, the 18 inch doll sized cupcake stand glued together. Right, I used small wooden beads for feet at the bottom of the cake stand.
Supply List:
large wooden spool
one smaller wooden spool
a finial or old decorative hook
Valentine scrapbook paper
white enamel paint
four wooden beads
hot glue and hot glue gun
white typing paper
Above you can see the supplies collected on my old kitchen table. First you will need to glue the items together. If you use a hot glue gun and are a child, you should have an adult present to make sure that you don't burn yourself. Wooden parts can be glued together using many other types of glue if you have them on hand. It just takes longer for your cupcake stand to dry using them.
Left, the cupcake stand painted white and you can see that I have cut my white typing paper to make a template for the liners. Center, the Valentine themed paper liners now fit the bottom of each cake stand tier. I can remove these after Valentines Day is over and replace them with something else for our dolls to celebrate. Right, our hand-crafted, Valentine cup cakes are stacked and ready for our American Girl Dolls to play with. If you would like to make some like mine read this post!
After my cupcake stand had time to dry, I then painted it with white enamel paint. I gave it three good coats of paint and let the paint dry between applications for approximately 20 minutes. Then I used a pencil to draw around the outside edge of the stand on white typing paper. Cut out the template and then cut a hole in the center of the pattern. I fit this to my cake stand before cutting out the decorative paper liners. You could Mod Podge these to your own Valentines Day Cup Cake stand in the end. However, I chose not to do this so that I could change the liners out with other holiday themed papers in the future.
More Valentine Cupcake Crafts from Our Family Blogs:
School and Grade: Trinity Christian Academyfor Girls, 4th grade
Interests and Hobbies: sewing for her dolls, loves math, reading and art, loves to journal in her Bible, Clara also loves to daydream, work jigsaw puzzles and bake with her aunts on the weekends for fun.Clara has a large doll collection.
Brief Family History: Clara lives with her two auntsduring her summer months and vacation days. She was orphaned before the age of seven. She attends the Trinity Christian Academy which isn't far from her aunt's home.
Siblings: Clara has much younger siblings that were adopted by extended family members after her parent's death.
Religion: Lutheran
Pet(s): She has a cat named Nova and a parrot named Pretty Pete. Both of her pets live with her aunts permanently. Clara sees them on the weekends, during vacation and over the summer.
About Me: Clara. I am 11 years old. My favorite color is pale yellow. My favorite
food is bread. My favorite author is Gene Stratton-Porter. I would like to be a
nurse when I grow up.
This Alexander Doll is An Original Character Doll
Name: unidentified
Height: 18 inches
Physical Features: long dark brown hair, brilliant blue sleep eyes, Caucasian doll, pale skin, dimples
Designer/Company: Madam Alexander Doll Company
Year(s): 2009
Additional Information: purchased through donations made to the Kidney Foundation