Tuesday, June 11, 2024

How to sew a baby doll carrier seat cover...

Finished baby carrier liner is sewn
for a Cabbage Patch doll carrier,
approximately 12-14 inch doll size.

       I'm including these instructions for a 12 to 14 inch doll carrier made for Cabbage Patch Babies. But visitors may use procedures here to line any kind of baby doll carrier seat they acquire.  
       These little plastic carriers are commonplace in resale markets where I live but seldom do they have clean cushions or any cushions at all for that matter. Most doll carriers may be recovered easily without a pattern, if you know the process. And more often than not, these doll items can be made to look better with the cushion makeover!
       Read all of the instructions first before you begin the project. You may wish to make this project using a machine instead of by hand as I did.

Supply List:

  • approximately one yard of felt or knit, If you are a beginner sewer I would purchase a knit because it has a bit more 'stretch' than the felt. I used felt in my carrier cushion.
  • needle and thread to match
  • about 15 inches of 3/4'' elastic, this will be more or less depending upon the size of carrier you are covering.
  • baby doll carriers seat for 14inch doll
  • newsprint
  • safety pin for the elastic insert process
  • a washable ink pen to make marks on the fabric
  • tiny nail scissors or seam ripper.

Step-by-Step Instructions: 

  1. Remove the front belt that holds the baby doll in it's carrier before making the newsprint pattern. You can rip out the stitching of this belt to make a more accurate copy of it for the new one that will replace it. However, I just spread the old one on top of my new fabric and cut out a copy adding a 1/4 inch seam allowance around it as I cut. (Don't forget to add more length to it's ends if these are folding over like the ones you see in the photos below.) Make two identical copies, right sides together and sew a narrow hem of 1/4 inch all around. Leave a two inch opening, turn the belt right sides out and whip stitch the opening together. Set this piece aside for the chair's new assembly.
  2. To make the pattern, press the newsprint into the seat and use masking tape to shape a pattern, include the sides of the carrier while doing this. Remove the pattern gently and be careful not to tear the pattern.
  3. Cut the newsprint at the lowest corners to the very back of the seat imprint. See the photo below. Once you make these two cuts, your pattern will look as though it has wings. 
  4. Smooth out the pattern on top of your felt to cut out the carrier cover adding a one inch seam allowance as you cut. The one inch seam allowance will insure that there is plenty of fabric to stretch around the outer lip of the carrier after inserting the elastic. The fabric under the wings needs only a 1/4 seam allowance.
  5. You will need to cut both a front and a back piece from this pattern from your material.
  6. Next you will need to sew with right sides together, the seams that were made to look like wings. This creates the fitted 'cup' shape that matches that of your baby carrier's seat. Repeat this for both the top and the bottom sides separately before sewing the two pieces together. 
  7. Sew the identical top and bottom or front and backs of the cushion with right sides together. This seam should be 1/4 and inch all the way around, leaving a one to two inch opening. 
  8. Turn the seat cushion inside-out with right sides facing out.
  9. Now sew a straight stitch around the out side edge approximately 1/2 inch in width. This will create a long narrow pocket around the cushion.
  10. Poke the safety pin through the end of your elastic and feed it through the opening in the outer edge where you turned the two sides of the carrier cover inside-out.
  11. Once this elastic has been inserted through the outside pocket back to it's other end, sew the two ends of elastic together tightly. 
  12. Whip stitch the opening shut and stretch the seat cover over the front of the carrier.
  13. Turn the plastic covered carrier over and take you washable in pen to make marks through the three holes of the carrier where the belt was once inserted. This will indicate where you must make one inch cuts through both the top and bottom fabrics for button holes. The cuts are best made judiciously with a small pair of nail clipping scissors. Some folks use a tiny seam ripper but I prefer the nail scissors because these are easier to control.
  14. You will need to make three button holes, two on the sides and one at the bottom after removing the cover again and clipping the openings for the belt. Once these are made properly with finished edges, readjust the cushion back on to the carrier. (You will not need to use fusible webbing suggested here but the stitching technique is good for my purposes.)
  15. Insert the ends of the belt back through the button holes as these were once attached in the very beginning of the project. 
  16. To keep the belt from slipping out, turn over the ends and stitch a seam approximately one inch. This should hold the belt in the carrier loosely. After inserting a doll into the seat, you should be able to pull the belt snug from underneath the carrier.
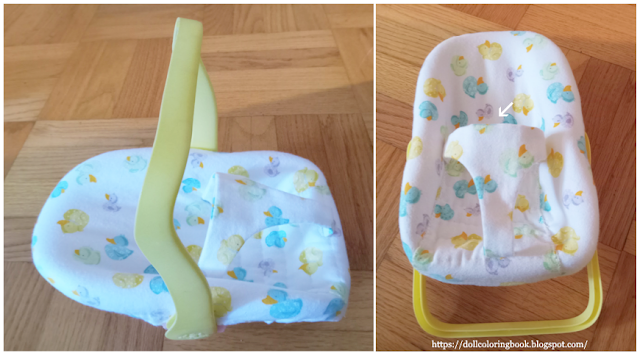
Above are photos of the plastic baby doll carrier without a liner for the seat and also with the
fabric belt that remained with this seat removed. You are going to make two identical copies
 of this belt on the right with an added 1/4 inch seam allowance.

See left and right, how the pattern was made by sculpting newsprint inside it's interior and around
 it's edges using masking tape. In the center photograph, you can see how I lifted the pattern off
the carrier and cut the side panels apart from the pattern. Now the pattern looks as though it has
wings. These two cuts will be sewn back together to shape the 'cup' of the cover into a seat. There
 is a one inch seam allowance around the outside of the pattern and a 1/4 inch seam allowance
on the inside of the wings.

Left the arrows show where I have made button holes to fit the belt through the carrier cover/
cushion. You may also be able to see the quilting in this photo; this is optional and I did not mention
 this step in the instructions above for fear that it may over complicate the pattern for new
sewers. Center see the belt attached. Right, see arrows pointing to where the button holes were
 marked through the openings in the back of the carrier with a washable ink pen.


Left and right, the belt reattached is kept on at all times. The baby doll just slips down through the
 top of the belt (arrow shows), with each leg dangling through the left and right sides of the belt.
 Because the ends of the belt are sewn over a half inch at the back of the carrier, the belt cannot
 disengage easily from the doll seat. This step must be done in the end after the carrier cover is
 stretched over the plastic seat.

More handmade patterns for doll furniture and accessories:

Sunday, June 9, 2024

The Soda Straw Doll for Students

        Below is a printable diagram of how to make little soda straw dolls at our doll/puppet makers camp. You will need the following art supplies to make one doll: tacky white glue or paste, three soda straws, one yard of yarn, a plastic embroidery needle, a square of light weight cardboard approximately 5x5 inches, scissors and felt tip pens to draw the face of your doll.

The Directions:

  1. From two straws cut the segments for the doll's arms, legs and vertebrae. The illustration below shows you how many you will need and the lengths of the cut units.
  2. Cut the yard of yarn into one length of two feet, and you will have a second clipping of yarn that measures twelve inches in length.
  3. Fold the two foot length in half and string on the torso and lower legs as seen in the diagram below. Knot the ends of the yarn where the feet of the doll would be to prevent the straw beads from falling off.
  4. Cut a head of your doll from the cardboard. Do this twice and paste the yarn loop at the top of your doll between the front and back pieces of the doll's head. Let the paste or glue dry.
  5. Draw a face on the cardboard head.
  6. Now fold the second shorter length of yarn in half and knot it at your doll's neck.
  7. String on the cut arms and knot these at the hands. Now your doll is ready for play!

String a soda straw doll for fun...

The Doll Camp Frame

        The doll camp sign printable below is for any of our visitors who would love to host a doll camp this summer. Send it out as a flier and fill in the necessary information needed to inform all young campers and their dolls of the why, what, when and where of your doll camp. You may either fill in the blank signs using a software program on your desktop or use it the old-fashioned way by printing it out and writing in the information by hand. 
       If you are hosting a doll camp at a Parks and Recreational Center, you are welcome to use our sign and follow along with our doll camps in your curriculum. The materials here are for teachers, parents and young folk everywhere.

Four campy signs hang from a sturdy wooden pole to advertise your own
doll camp this summer.
 

Saturday, June 8, 2024

How to craft pineapples using pinecones

Pineapples crafted from pine cones, using green paper for the crown and toothpicks for the
prickly skin.


       Our 18 inch dolls will be visiting a Hawaiian marketplace soon and in that market they will need to purchase all kinds of tropical fruits. Pineapples are some of their favorites!

Supply List:
Detailed drawing of a pineapple plant.
  • small pinecones approx. 1 -2 inches
  • green paper
  • acrylic paints - yellow and green
  • white tacky glue
  • hot glue and hot glue gun
  • toothpicks
Step-by-Step Instructions:
  1. Remove and clean all debris from the pinecones.
  2. Paint the bottom half of the cones with the yellow acrylic gradually adding in green color until the pinecone is completely green at it's top most area. As pineapples ripen they are more green at the top near their crown.
  3. Snip off the tips of a handful of toothpicks and then glue these using tacky white glue to the outer painted surface of the faux 'pineapple'. This will represent the prickly outer skin of the pineapple.
  4. To cut the crown from green paper make long narrow strips with one end pointed. 
  5. Hot glue these green spiked leaves to the top of each pinecone pineapple.

        ''The pineapple is a native of tropical America. It is now one of the most important of tropical fruits and is grown in many warm parts of the world. Botanically it belongs to an exclusively American family of plants consisting chiefly of air plants. The pineapple produces a basal rosette of long, stiff, usually spiny leaves and a leafy stalk bearing an oblong head of flowers. On maturation the central axis, individual flowerstalks and fruits fuse into one mass, sweet and juicy and of large size in cultivated varieties. Bromelia family.'' Dahlgren

Make a doll's camp lantern that really lights up!

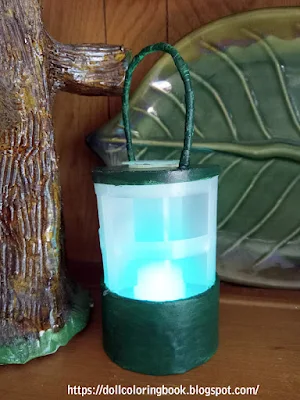
The finished doll sized lantern turns
blue, green, yellow, red, and then
purple!

       Crafting a working camp lantern for twelve to eighteen inch dolls is not a new idea. It is what I would refer to as a 'traditional doll camp craft.' There have been variations on this craft by many people on the web ever since small inexpensive 'tea lights' have been made available in dollar stores. I will link to some of their versions below. My version of this doll sized lantern utilizes a recycled, large ribbon spool. 

Supply List:

  • scrap cardboard
  • toilet tissue paper rolls
  • masking tape
  • white school glue
  • purchased tea light (the one above changes color)
  • plastic, recycled ribbon spool
  • wire for the handle
  • tacky white craft glue

Step-by-Step Instructions: 

  1. Originally, the plastic ribbon spool had a cardboard disk at each end in order to keep the ribbon from slipping off of it. I took both ends of these cardboard disks off and cut them down to fit the exact size of the ribbon spool and then reattached these in order to make the spool look more like a lantern. If you are working with one of these spools to recycle you can see that the attachment is held in place with a small plastic disk at both the top and bottom. (see photo below)
  2. To get the correct size of the cardboard top and bottom simply position the plastic spool on top of the cardboard and draw around it's parameter with a pen or pencil and cut this down.
  3. While you are making this readjustment, poke holes opposite each other using the tip of a pair of scissors to thread a wire through. Twist the ends and glue this handle in place. Then attach the lid back in place.
  4. Using a cardboard toilet roll, adjust it's size both width and height, to fit around the lower end of the ribbon spool using tacky craft glue and masking tape to hold it in place. You may find a better cardboard tube to make this adjustment with if you prefer.
  5. Cut and adjust a second tube for the interior of the tube extension on the bottom. Glue this tube in place so that a battery operated tea light may be fitted securely inside of the larger tube. 
  6. Crush newsprint to fill the narrow space between these two tubes inside the lantern. Do not seal off the bottom; leave it open so that you may replace the tea light when the battery runs down. (see photo below) The battery operated light shines through the interior plastic spool and casts an eerie glow.
  7. Paint the cardboard surfaces only using a color of your own liking. I chose to paint mine green.
Left, draw around it's parameter with a pen or pencil and cut this down. Center, poke holes
opposite each other using the tip of a pair of scissors to thread a wire through. Twist
the ends and glue this handle in place. Right, paint the cardboard surfaces only using
a color of your own liking. I chose to paint mine green.

Crush newsprint to fill the narrow space
between these two tubes inside the lantern.
Do not seal off the bottom; leave it open
so that you may replace the tea light once
the battery runs down.

Friday, June 7, 2024

How to craft a doll sized chocolate fountain...

       Our 18 inch doll family's festive, chocolate fountain was a bit frustrating to make. This is definitely not a craft for little kids to undertake for several reasons. The first being that working with hot glue by these methods is very dangerous. The child will likely get burned during the process and the process, however interesting to look at, is haphazard at best. Don't get me wrong, I think the outcome to be as cool as most people . . .  but the making of it gets even hotter than you might expect. 
       One way to eliminate some of the burn 'potential' would be to work with plastic caps and containers only. I used metal ones. So my project became increasingly hot as I progressed through it. Originally, I tried making this fountain with plastic lids and I didn't like the look of them. However, a young person would probably not be as picky as I am!
       Also, the dry time for this abundance of glue is quite long and the longer one needs to wait for 'hot' glue to dry, the more likely they are to get burned.
       Layering hot glue to look the way you want it to is also a very fussy prospect. However, because I wanted this piece for our collection, I persevered and repeated the craft until I was satisfied with the results.

 Supply List:

  • 3 can lids
  • hot glue gun and hot glue
  • 1 small recycled fruit cocktail can
  • two buttons, fit inside each other
  • red spray paint
  • brown enamel paint
  • 2 empty spools

Step-by-Step Instructions: 

  1. In advance of gluing the stacked lids and spools, try different formations to decide 'how' you want your chocolate fountain to look. You could have more or fewer levels for this faux appliance tower than what you see here. Chocolate fountains are certainly intended to be showy on a buffet during a party and like wedding cakes, these may look very different depending upon the tastes of the host.
  2. Hot glue the lids and spools alternating them. Then glue these platforms on top of a recycled fruit cocktail can. 
  3. Spray paint the entire appliance one color. I chose red because our dolls will use it during holidays and red is the most common color used in America for a variety of holiday traditions.
  4. Hot glue the buttons on next in the center of the bottom fruit cocktail can.
  5. Next, is the tricky part, hot glue the chocolate flow along the edges of the lids so that it drips down into the lid below it. 
  6. I chose not to fill my lids using the hot glue after doing this once before in a sample fountain that I tossed out. Instead I decided to try and fill the lids with the brown enamel paint and found this to be more aesthetically pleasing.
  7. After the paint in the lids has dried, and it will take several days, paint the glue 'drips' with the same chocolatey paint. Let dry.

Above are details of our doll's chocolate fountain under construction. I stacked empty spools and
can lids to make this configuration. I have yet to paint the glue to
look like chocolate in these photos...


Above Left, detail of on/off switch for heating hot chocolate fountain. Center, the glue now
painted to look like a rich, dark brown confection. Right, the fountain seen from above.


       Good news for those of you who get frustrated with this craft, Our Generation toy company has one of these chocolate fountains in their own Birthday party set for sale. It is pink and adorable but, I haven't a picture here for you to see it. Just look it up folks...

Thursday, June 6, 2024

Bird Migrations

Directions of Bird Migrations.
      Where do birds go during the cold northern winters? You have noticed that a bout the same time early every autumn you miss their cheerful songs, and soon after the first of October only a very few are to be seen. The junco, or snowbird, the tree sparrow, the brown creeper and a very few others are bold enough to stay with us all winter. Do you throw crumbs to them when the ground is covered in snow? If you do, they will be regular visitors to your door. All others disappear. They do not leave us merely on account of cold weather, for we know some birds sty north all winter; they migrate largely for the reason that they must go where food is plentiful. Most of them would starve to death during the cold months in the north. When they return from their southern winger homes you will notice they are strong and fresh from abundant feeding in the tropics.
       Many of the birds are with us all summer, and you are acquainted with the commonest of these. There are others which pass us by every spring and go far north into Canada to spend the summer around Hudson Bay and near the Arctic Ocean. All of the local birds and those from the far north take wing in the fall and fly straight to a warm climate. Many stop around the Gulf of Mexico, others stay in Mexico, but the great majority fly into the northern part of South America, many species even crossing the equator and wintering south of the Amazon River. One bird, the yellowleg, is among the greatest travelers of them all. During summer he enjoys the climate of Northern Canada; when he is warned away by the approach of frost he flies 8,000 miles, to spend the winter down in Argentina, in the southern part of the South American continent. In the spring he starts back on the return trip of 8,000 miles; so this little fellow travels 16,000 miles a year on his migration. Snipe and plover breed near the Arctic Circle and in the fall they, too, go the southern end of South America. 
       On their trips south in the fall most birds are not noticed in their flight; some fly very high, and others go in small groups--even singly; some species are night-fliers. You can, however, note the flight of the ducks and their peculiar formation as they fly -- in the shape of a great wedge, with the leader in front. Very few birds fly continually in their migration. They often stop for days or weeks on the way, feeding wherever they find anything inviting. For instance, the bobolinks stay for weeks in the ricefields of South Carolina, where they are disliked and are called ricebirds. Hoever, some birds, like the golden plover, start on a flight from Nova Scotia over the Atlantic Ocean and for many hundreds of miles remain on the wing, resting only on the West Indies islands before reaching the shores of Brazil.
       When they return north in the spring, birds will repay watching. If you will keep a record you will find that some species will be seen in the trees in your yard during the same week year after year, and that some of them may fly straight back thousands of miles to the same nests they occupied the year before. White

Lighting a fire under the old dollhouse mantle...

The matching china dogs are attached with
museum wax.
       The trick to updating an antique fireplace mantle like this one is to make the fire look as though it has always been a part of the toy miniature mantle. This lit fire may be easily removed. I did not paint or shape it directly onto the open hearth.

Supply List

  • thin scrap cardboard 
  • masking tape
  • tissue paper
  • Mod Podge
  • acrylic paints: red, orange, yellow and black
  • china dogs (came with the dollhouse furnishings)
  • museum wax
  • white school glue

Step-by-Step Instructions:

  1. Cut a piece of thin scrap cardboard to fit neat and tight into the open space under the mantle. If this cardboard is cut right, you should be able to remove it with a dull edged butter knife. There should be no need to insert it permanently.
  2. Remove the cardboard to make the fire on top of it without running the risk of touching the antique mantle with paint or glue.
  3. Now crush a bit of tissue to look like logs and fire flames. Glue these bumpy textures to the cardboard.
  4. Use masking tape to cover the tissue layers.
  5. Decoupage a layer or two of white typing paper on top of the tissue and masking tape layers. 
  6. Now you are ready to paint. Using acrylics, carefully matched the edges around your fauve fire to look the same as the overall mantle piece. 
  7. Then layer, with a dry brush, a bit of black looking soot color. Let this dry completely.
  8. Next, you can layer in fire colors: orange, red, yellow... around the logs.
  9. Seal the fireplace insert with Mod Podge. 
  10. Push the fireplace insert into place under the mantle.
  11. Our china dogs were then attached using museum grade wax. This prevents them from being 'knocked about' during play and insures that they won't be lost over time.
Left, the antique fireplace mantle for one of our doll houses. It is kind-of a strange purple color.
Center, the backside of the mantle is painted black. Right, here you can see how I updated it's
appearance, keeping it true to the original design, but adding a lit fire and twin china dogs to
 it's mantle piece, just in front of the mirror.

Monday, June 3, 2024

Remco Dolls and Toys

       Remco Industries, Inc. was a toy company in the United States founded in the 1940s. It was best known for toys marketed and sold in the late 1950s and early 1960s, like the 'Johnny Reb Cannon', 'Mighty Matilda Atomic Aircraft Carrier', 'Remco Voice Control Kennedy Airport' (which featured model airplanes of American, TWA and United Airlines, a record player and an album which played a voice giving landing and take-off instructions) and the tethered 'Electronic Falcon Plane' that "flies itself". The company's slogan was "Every Boy Wants a Remco Toy...And So Do Girls!"
       Remco was founded by two cousins, Isaac "Ike" Heller and Saul Robbins. Armand Daddis soon joined the two as the company gradually moved from simple 'walkie-talkies' to a variety of sophisticated remote control toys. The name Remco comes from the two words "Remote Control". Originally located in Newark, NJ, the company later moved to nearby Harrison, New Jersey. 
       The boxes and toys were printed with just the company name and the city on them, but there were a few more clues as to the company's physical location on packaging. A street address listed on the back of the 1960 light bulldog tank box is "113 North 13th Street, Newark 7, NJ." The address on the instruction sheet for factory service return of the 1966 Lost in Space Robot is "Cape May St., Harrison, NJ." The Harrison location is now occupied by the Red Bull Arena, while the Newark location is now occupied by a furniture outlet. 
       In the mid-1960s, Remco acquired several licenses for popular culture groups and TV shows and proceeded to make a variety of toys. Some of these were the Beatles, the Monkees, Lost In Space, The Munsters, Batman and Star Trek. However, the company often paid little heed to faithfulness to the property: Star Trek for instance, the merchandise Remco released for that series was usually generic toys from previous unrelated lines and had decals of the series simply placed on them, which is a technique called "label slapping." The most derided of Remco's licensed toys for Star Trek is a white helmet with a red rotating light and siren with either Kirk or Spock's name on it. One popular toy in the early 1960s was the 24 inch long functioning scuba diver with mask, knife, utility belt, rifle, walkie-talkie, air tanks, and floating location buoy. 
       From the 1980s through the 1990s, Remco made a variety of generic diecast and plastic trucks and other vehicles, usually uniformly made about four inches long. Vehicles were attractive and sturdy, though not uniform in scale, and included a tanker truck, fire truck, delivery van, cherry picker truck, skid steer, Jeep, and many more. A few vehicles were larger, like the seven inch long "Tuff Ones" "Recyclable Waste Management Corp." truck with opening side doors for "cans", "glass", and "paper". 
       The company was known by toy collectors for their many Universal Monsters figures produced during the 1980s. These figures were a continuation of the license and figures first produced by AHI during the 1970s. Steel Tec was distributed by Remco Toys, Inc. of New York, New York, from 1992 to 1997 and was a division of parent company Azrak Hamway International. In 1997, Jakks Pacific acquired Remco from Azrak-Hamway.


The Remco Dune Buggy Baby: seen here in the ALDENS Christmas
Catalogue, 1972 edition from Berrien Springs, Michigan.
Our family's version of this doll came with a yellow dune buggy.


Tiny Tears and many more by Remco, 
commercials and interview.

Sew antiquated smilies twittering all the way...

        Well, looky looky, it's Harvey Peake bound to resurrect at some point! I guess he was the artist that so many internet gurus thought none of us would ever remember! But here he is and I'm sure he would have preferred for young students to enjoy his work just for fun's sake.

Harvey Peake was an illustrator for the New York Sun. He was from Indiana, 1866-1958.
His work was popular in the newspapers; his illustrations the likely source of modern
Smilies and Twitter branding may have been based upon his poem about Movie fans
as seen above...

In Every Motion Play Audience by Harvey Peake

One open-eyed orphan, ogling operator
occasionally;
Two tireless twitterers, talking tête-à-tête
Three tiny toddlers, treating themselves to 
thrills;
Four fussy females, feverishly fidgeting
forward;
Five facetious fans, finding films funny;
Six scenario students, studying screen sagely;
Seven stupid strangers, seeking sleep slyly;
Eight ecstatic enthusiasts, eying every-
thing eagerly;
Nine near-sighted nobodies, nettling near-
by neighbors;
Ten toe-treaders, trampling the throngs.

Students may print, color and cut-out Peake's smilies to decorate
 a doll's room. Decorate a dolls notebook, make a cute banner or
 patch and old pair of blue jeans for your doll's wardrobe if you like!

Sunday, June 2, 2024

The "Little Companion" from 1865

The ''Little Companion'' from 1865

       This pretty Little Companion is thus composed: - A wooden doll with china head and legs; a wooden stand and support; a few odd pieces of merino, calico, ribbon, etc., with which to dress the doll; two papers of needles; a thimble; a pair of scissors, and a ball of cotton. 
       Cut a piece of wool round, measuring three inches and a quarter in diameter, and make a small hole in the center for the piece of stick which supports the doll. The doll measures eight inches from head to foot. Tack on the body a pleated muslin chemisette with long sleeves, and over this fasten the petticoat (which should be made of stiff glazed lining) and the skirt of the dress. The latter consists of scarlet French merino, trimmed at the bottom with three rows of narrow braid, put on with steel beads at regular intervals. Two square pieces of merino, laid on in front, and button-holed round, form the pockets for the needles. The thimble-case is made of merino, edged round with bugles and beads, and suspended from the waist by a piece of blue ribbon. Another piece of blue ribbon, with a ball of cotton threaded on, is tied on the right shoulder, and the scissors are slipped through a piece of toile ciree cut in the shape of a slipper, with two openings in the toe to hold the scissors securely. The head-dress, which serves the purpose of a pin-cushion, is made of silk, wadded and edged round with lace. A bow of ribbon is placed in front, and strings tie under the chin. To secure the cushion properly, it is necessary to glue it to the head. Now, to fasten the doll to the wooden support, sew the top of the stick firmly to the doll's body, and then glue the other end in the center of the round piece of wood. This done, you have finished this pretty affair, which would be particularly suitable for a Christmas or New-Year's gift.

More pretty little companions to collect or make:

The Lost Doll

        There was once upon a time a little girl who had a china doll named Jennie Bluebell. Jennie Bluebell had black hair, and blue eyes, and rosy cheeks, and a smiling mouth; and on her feet were painted gilt slippers that shone like gold.
       The little girl loved her more than she had ever loved any other doll and wherever she went she wanted Jennie Bluebell to go too. She took her to walk in the lane, and to ride in the carriage, and one day she carried her to a meadow where she and her little brother went to pick golden-rod. She held her in her arms all the way just as Mother held the baby and when she got to the meadow she laid her down to rest in the long meadow grass while she picked the flowers. Meadow grass makes a beautiful soft bed for a doll.
       "I will come back for you by and by," she said as she left her there; but when it was time to go home all the green grass looked alike to the little girl and she could not tell where the dear doll lay.
       "I put her right here, or at least I think I did. Oh, where can she be?" she cried, as she hurried from place to place parting the grasses with her hands and peeping anxiously in. Her little brother searched, too, but though they both looked till their mother called to ask why they were staying so long, they had to go home at last without the doll.
       "Perhaps the fairies have taken her away," said the little girl, who was almost crying.
       "Or a rabbit," said the little boy; "Father saw one in the field yesterday."
       But neither fairies nor rabbits had touched Jennie Bluebell. The tall grasses had swayed in the breezes this way and that way till she was hidden from sight but she had not moved from the spot where the little girl had put her. All through the sunny afternoon she lay there hoping that some one would find her, and when it began to grow dark and nobody had come she felt very lonely indeed.
       "I shall not close my eyes all night," she said; and she did not. When the rooster over in the barnyard crowed for morning, her eyes were as wide open as they had been when the first star shone the evening before.
       Almost as soon as it was light again she heard a noise in the meadow. Swish, swash! Swish, swash! it sounded. The children's father was cutting his grass with a sharp-bladed scythe, but the doll did not know this and when the grass around her fell down in a heap upon her she thought that the end of everything had come.
       "What in the world has happened?" she asked a grasshopper who had been caught in the fall.
       "That is just what I should like to know myself,'' he answered; and he struggled up to the sunshine and never came back.
       The children did not come to look again for the doll that day, or the next, and she gave up all hope of being found.
       "They have gone to visit their grandparents," she said. "I heard them talking about it. They have forgotten me, and I shall never see them again."
       That very afternoon, however, they came to the meadow to help their father rake the grass, which the sun by that time had dried into sweet-smelling hay. They had been on a visit, sure enough, and as they worked they talked of the things they had done while they were away from home. The doll could hear every word they said.
       "I rode Grandpa's horse to water two times by myself," said the little boy.
       "I fed Grandma's chickens every day with corn," said the little girl.
       "Grandpa plants corn in his fields," said the little boy. "You don't have to rake corn."
       "I like to rake hay," said the little girl; "and Mamma says that I may find Jennie Bluebell when the field is cleared."
       Oh! how the china doll's heart leaped for joy when she heard that; and ''do you believe it?'' the very next minute the hay that covered her was raked aside and there she lay right before the little girl's eyes!
       "Oh, oh, oh!" the little girl cried; "here she is, my precious doll. I was never so glad in all my life."
And Jennie Bluebell was glad too, though she did not say a word. She only smiled. By Maud Lindsay

Thursday, May 30, 2024

How to sew pillow dolls for 'sweeter than ever' dolly dreams . . .

Finished decorative pillow shaped dolls. A Frankenstein's
monster pillow
and an owl for Halloween here.
       Make charming little pillows with personalities. All you need are a few notions and a bit of imagination...

Supply List:

  • fabric scraps in flesh tones
  • felt scraps for eyes
  • embroidery floss: pink or red
  • laces and ribbons 
  • needle and threads to match
  • stuffing/cotton balls

Step-by-Step Instructions:

  1. Cut two each of identical rectangles from flesh colored fabric in any size you think looks good on your doll's bed.
  2. Sew around all of the edges, right sides together, leaving an inch size opening. 
  3. Turn the empty pillow inside out and stuff it using cotton batting. 
  4. Sew the hole shut.
  5. Use ribbons and lace to trim the pillow with unique hair and clothing.
  6. Cut felt circles for the eyes.
  7. embroider the eye-lashes, eye-brows and lips.
  8. Toss among other pillows on your doll's bed to decorate their bedroom.
More Decorative Dollhouse Pillows:

Make a Bead Doll Necklace

Above left, the doll closeup. Right, the doll added to
the necklace. I used crystal like buttons and beads to 
shape our version of this bead doll craft.
       Bead and Button doll necklaces may be strung in many different ways using all sizes of beads. The possibilities are endless. Just right, is our version to give you a bit of inspiration.

Supply List:

  • small needle-nose pliers
  • fine wire
  • bugle beads, seed beads, buttons and larger round beads
  • clasps for closure of necklace or elastic
  • fabric tape measure

Step-by-Step Instructions:

  1. Twist a small loop twice around the tip of your needle-nose pliers to keep beads from sliding of the end of the wire. 
  2. String on one round bead for the doll's shoe and then four bugle beds for her left leg. 
  3. Then push this wire up through several stacked buttons to shape the doll's skirt.
  4. Loop the wire through adjacent button holes down again and string on the remaining four bugle beads and round bead shoe. 
  5. Twist a second small loop twice around the top of your needle-nose pliers to keep beads and buttons secured together.
  6. Next cut a second 4 inch length of wire.
  7. Thread this through the wire at the top of the doll's button skirt, fold it in half and thread both wire ends together through a single, larger waist bead.
  8. For the doll's collar I used a tri-bead. For her head a colorful bead that has a skin color and for her hat a simple white button. String the double wire up through all of these layers.
  9. Twist a small loop twice around the tip of your needle-nose pliers to keep beads and buttons from sliding of the end of the wire. 
  10. Slip a small steel jump ring through the hole of the double looped wire tip so that the doll may be attached to a necklace later.
  11. Twist a small loop twice around the tip of your needle-nose pliers to keep beads from sliding of the end of the wire for the third beaded wire. This should measure approximately four inches long; this will be the arms wire for the doll.
  12. String on a tiny seed bead the same color as the doll's larger head bead.
  13. Then add five slightly larger beads for the doll's puffy sleeves. 
  14. Twist this length of wire between the collar and torso beads several times and repeat the pattern for the other arm. Twist a small loop twice around the tip of your needle-nose pliers to keep beads from sliding of the end of the wire.
  15. Measure the length of elastic that your child will need to make a necklace that will be easily stretched about their neck. Use a fabric tape to do this. Give enough elastic so that it may be knotted easily.
  16. Then students may be given additional beads to string onto elastic to make a necklace. String the doll through it's jump-ring onto the necklace before tying the ends together.
  17. Older students may alternatively string a beaded wire the correct length and then add a closure of some kind at each end, string on the doll prior to closing the last end about the last ring.

The Doll Crafters and Young Puppet Masters Art Camp

Sample photos of novelty dolls and puppets from this craft camp for summer fun.

        Our doll/puppet crafter's camp is full of unique and interesting dolls/puppets that young students will enjoy making over the summer break. However, it will take a little time to upload all that I have for this summer camp folks, so please be patient . . .everything is on it's way!

Crafting Novelty Dolls for Summer Fun:

  1. How to make egg-carton mermaids - made from recycled materials and patterned scrapbook papers
  2. String a soda straw doll - this little doll is made using very simple art supplies
  3. Assemble accordion fanfold paper dolls - use origami papers and simple fan-folding technique
  4. Craft my envelope babies for fun! - These babies come with templates and also utilize simple envelope folding process.
  5. How to make ballerina clothespin dolls - One of many clothespin doll costume designs; if you love making these dancers there are many more thematic clothespin doll designs on our blog to try!
  6. Cut a paper-doll-chain to hang in your room - Learn two different folding techniques for this old-fashioned paper doll craft.
  7. Make a bead doll necklace - this project combines both beads and buttons...
  8. How to make an enchanted fairy doll... - These dolls are for outdoor play in the garden of course!
  9. DIY a Bead Bottle Lupita - to store your favorite beads for jewelry crafts and to also display small bouquets of flowers...
  10. How to craft adorable folk art spoon dolls - These folk dolls have been crafted by children and their parents for over 100 years...
  11. Sculpt a clay doll from a pinch pot - using traditional classroom sculpting techniques...
  12. Learn to sew an Edith Flack Ackley cloth doll - text and here are the materials you can use to stuff a doll body - This doll is more difficult and requires adult help.
  13. Craft your own vintage kerchief dolls... - printable, vintage 1950s ladies
  14. DIY a toy soldier candy container - from Thrifty Scissors blog, Fill him with your favorite candies!
  15. Learn to sculpt a newsprint African folk doll... - My version of this novelty craft includes a baby in a sling too!
  16. Paper dolls for the sewing basket - A great way to organize laces and ribbons in your trim collections.
  17. Braid and tie a modern yarn doll... - pom-pom doll head
    Cute And Tiny Dolls to Craft or Collect for Your 18'' Dolls:
    1. How to sew pillow dolls for 'sweeter than ever' dolly dreams - pillows with personality
    2. Make a princess doll themed birthday cake - for your American Girl dolls, My Generation dolls etc... 
    3. How to make a Raggedy Ann Doll - free 6'' pattern -
    4. How to make a tiny sock monkey for your larger dolls to play with - Traditional sock themed monkeys look so cute hanging from a doll's four-poster bed or rocking in a chair in her bedroom's corner. 
    5. Twist and wrap a chenille stem doll - These dolls are only slightly larger than traditional worry dolls. But, they are perfect for your 18'' dolls to dress and play with...
    6. Picking tiny baby dolls from resale... - mini doll collections 
    How to Sew Traditional Rag Dolls:
    Craft Miniature Dollhouses: coming soon.

    Make Miniature Puppets and Puppet Theaters for 18'' Dolls:
    Puppet Crafts and Collections for Drama/Theater:

    Recommended Books for Kids:

    Stanley cover, first edition.
    The Complete Adventures of the Borrowers by Mary Norton
    Mary Norton, was an English writer of children's books. She is best known for The Borrowers series of low fantasy novels (1952 to 1982), which is named after its first book and, in turn, the tiny people who live secretly in the midst of contemporary human civilization. Read more about her 'Borrower books'...

    The Borrower Films at YouTube:
    1. The Original Borrows Film from 1973 - Watch for free from The Film Detective here
    2. The Remastered Series ''The Borrowers from 1992 - All episodes here 
    3. The Borrowers Film starring John Goodman, 1997 - trailer and behind the scenes here
    4. The Borrowers staring Eccleston and Wood, 2011 - Pod's Adventure on British T.V. and behind the scenes here

    Wednesday, May 29, 2024

    Make A Bead-Bottle Lupita Doll

    Left, see the interior of the bottle doll holds small beads for stringing. There is also twine for this 
    jewelry kit craft wrapped around the bottle neck. Center, the stopper when inserted in the bootle 
    neck makes the container look like a Lupita market doll. Right, the head of the doll among the 
    flower bouquets displayed in her arms. Our flowers are vintage corsages once worn by family
    members for Mother's Day.


            This little doll holds beads to string and also floral bouquets to sell in the market place; she is a novelty craft doll made after the fashions and methods of Lupita dolls. Her head acts as a stopper for the bottle, her neck a place to store twine for beading jewelry and her interior a place to collect and store those beads. A craft like this one makes a charming gift for a child's birthday or for any occasion.

    This bottle stopper is made to look like a doll's
    head. Her painted features are acrylic, her hair
    yarn and the flowers in her hair tiny silk roses.
    Supply List:

    • an attractive plastic bottle
    • one large wooden bead for the dolls head
    • scrap cardboard
    • masking tape
    • beads for stringing
    • twine for stringing the beads
    • decorative papers and/or tissue papers for the decoupage process 
    • Mod Podge for sealing the layers of tissue paper
    • acrylic for painting the face
    • silk or velvet flowers for the Lupita flower seller to hold
    • chenille stems (2)
    • yarn for hair
    • hot glue gun and hot glue
    • rosebuds for the doll's hair

    Left and left center, the bottle filled with beads, a simple stopper with a wooden bead on top. This
    will become the head of the doll. Right and right center, the doll is given arms to hold artificial
    flowers. These arms are bent chenille stems taped onto the bottle and then decoupaged in place.

    Step-by-Step Instructions:

    1. Clean the acrylic bottle thoroughly before use. Toss the lid. The more interesting the bottle, the more interesting the doll's dress. The larger the bottle the larger the collection of beads. The acrylic bottle is best for this craft because it will not shatter during play.
    2. Select a wooden bead for the doll's head that is large enough to 'stop' up the hole in the top of the bottle.
    3. Roll cardboard into a solid tube, tape it shut, then hot glue to it one end of the wooden 'head' bead. This will be the neck piece to fit the head of the doll into the bottle of beads. The neck piece should be several inches long.
    4. The cap end piece of the bottle should be left alone and used for the place to wrap twine about. This twine will be used to string the beads for necklaces and bracelets. 
    5. Twist a simple yarn 'wig' about the back of the doll head using white school glue. Let the glue set and dry.
    6. Hot glue silk flowers into the doll's yarn hair.
    7. Apply the facial features using acrylic paints. Seal the face with Mod Podge.
    8. Cover the plastic bottle on the outside surface with masking tape.
    9. Shape and twist the arms of the doll into a holding position using several chenille stems, taping them into place just below the doll's neck and shoulders.
    10. Cut and paste decorative papers on the bottle to decorate the doll's gown. Seal every layer with Mod Podge. 
    11. Cover the doll's arms with paper sleeves also and Mod Podge the surface. 
    12. Cut, shape and glue on a apron if you wish.
     
    Our bead bottle doll seen from five different angles. Her flowers are made from silk and velvet.

    More About Lupita Dolls: