Sunday, January 13, 2019

Trinity Church School for Dolls


Left, Historic Trinity Church School for Dolls, founded in 1903.
 Right, A view from the West during a school picnic

       This historic doll school was founded that there might be a place, easily accessible to the dolls of any child's collection where they will have a thorough education and a happy home life. Here dolls are surrounded by refining influences and they can be physically, intellectually and spiritually trained if their child owners so choose.
       As the cost of living in Dollville is less than in most places, it has been possible to make the fees more moderate than those of real child schools, and there are, comparatively speaking, no outside expenses.
       Miss Carroll, the Lady Principal Doll, has had much experience in work of this kind, having been for many years Senior Mistress at Trinity Church School for Dolls.
       The place chosen could not be more appropriate, a handsome and well-built building, situated upon the prettiest street in Dollville, and surrounded by beautiful grounds two and a half acres in extent.
       To the original building a large three-story addition has been made, which contains the chapel, art-room, dining-room, room for domestic science, infirmary, and sleeping apartments.
       The rooms are large and well-ventilated, the class-rooms bright and airy. 
      The recreation grounds are extensive: tennis, basket-ball, croquet, swings, all have their place, and out-door exercise is encouraged as much as possible.
       There is a picturesque artificial lake in the grounds, shown in the picture below, left.
       There is also a fine orchard, a vegetable garden, and a poultry yard, thus combining the advantages of country with city life.
       The work done during the school year is always very satisfactory, and a decided improvement in our doll pupils is exceptionally noticeable. Universal satisfaction has often been expressed by their young owners.
       It is our wish to create in dolls a love for their work, and to arouse an interest in learning which will not pass away with their school days.
       A series of recitals will been given by the dolls of both musical and dance talent. In the past and they have been enjoyable as well as most helpful in overcoming the nervousness and self-consciousness of our doll students.
       An excellent course of University Extension Lectures was held at our school during the winter break, and more recently a most interesting and instructive course upon Practical Home Nursing. Courses similar to these will be offered again during the next semester. 

Left, Historic View From The South During Spring Semester.
 Right, Historic Winter View From The North.

Our Dolls & Their Young Parents Learn About: 
Crafts features from our school index include a graduation cap, an art supply cabinet,
 cheerleader pom-poms and a restored school desk for doll play.
 
 
In 2023 our private school students will
replace the school uniforms with street
attire! See what our dolls are wearing...
Back To School Doll Crafts & Artifacts:
  1. Printable Student IDs for Your Doll and You! - Now your dolls can have student doll IDs for Trinity Church School and so can you!
  2. Trinity Church School: Doll Enrollment - custom and original doll characters at Trinity Christian Academy for dolls
  3. School Uniforms for Dolls - The required school uniform for our dolls at their school...
  4. School Supplies for Dolls Entering 4th-7th Grade
  5. Church Interior for Doll Photography -  This lovely church interior is by photographer Simon Bowen.
  6. Play the About Me Name Game on your doll's first day of school - a printable About Me name tag for doll and her friends
  7. Make Doll School Cafeteria Lunch Trays - DIY lunch tray for the pretend school cafeteria
  8. A Doll Art Supply Cabinet With Drawers - All the supplies your dolls will need to become a student artist...
  9. An Old-Fashioned School Desk for A Doll - A school desk made by our next-door-neighbor.
  10. Doll Sized Spelling Printables - 1841 - How dolls and school children learned their ABCs 150 years ago.
  11. Doll Gingerbread Horn Book Craft - Make a delicious edible horn book craft for your historic American Girl Dolls. Edible horn books were rewards for kids who learned their alphabet successfully during the Colonial Era.
  12. The Horn Book in America - Education for children in Early America.
  13. Restoring An 18 inch Doll's Desk - Restore a desk, make new drawers and writing accessories.
  14. DIY Clamshell Laptop for Your Favorite Doll - Every doll needs a laptop for school and homework! This version is made using cardboard and clipart.
  15. Printable Food Group Posters for The Doll Classroom - free posters for your doll's health class.
  16. Restoring An 18 inch Doll's Desk - replacing missing drawers, crafting a few decorative and useful desk top supplies
  17. Print Out and Color In An AG Doll Sized, Doll Coloring Book - doll coloring for doll's to color!
  18. 18" Doll Sized Pencil Case Craft - A beginner sewing project for young students; now your doll can carry her toothpick pencils neatly without loosing them inside her backpack!
  19. DIY a Doll's Megaphone - for school spirit, cheerleaders, and pep rallies...
  20. DIY Simple Doll Cheerleader Pom-poms - in our church school colors but you can make them any color you like!
  21. Craft a travel pillow for your doll - just in case she falls asleep in the car while going to school!
  22. Craft a graduation cap for your doll student - Every doll loves to celebrate her academic progress and you can make paper graduation caps for all of them!
  23. DIY a doll size, freestanding water cooler... - made using recycled materials only!
  24. DIY Office Supply for A Doll's Desk - Crafts for pencils, pink erasers, journals, paper weights and tape dispenser!
  25. The Annual Valentine Mailbox Competition - Every year participating students enter a mailbox contest with award ribbons, party games, and Valentines of course!
  26. Vintage Classroom Clipart - decorate a doll classroom, yearbook, supply cabinet etc...
  27. Craft Cute Clip Boards for Doll School! - Decorate these with your favorite stickers too.
  28. Currier & Ives Prints for The Dollhouse - "God Bless Our School" antique print from late 1800s, for an old-fashioned classroom!
  29. School Desks for 18" Dolls - all kinds
school days silhouette

Doll Fan Video About School Days:
Free enrollment printable for Girls who wish to sign up their dolls for
Trinity Church School for Dolls. For personal home use only.

Saturday, January 5, 2019

Two Techniques to Restore One Doll's Chair

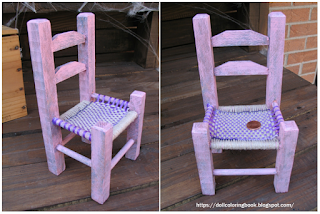
Left, this chair was originally painted peach. Center, I layered both blue and pink using a dry brush technique.
Right, the finish is done.
       I chose to repaint this dollar find from the local flee market and then to hand weave a new seat using twine and ribbon found in my craft supply at home.
I wove a seat cushion using twine for the warp
 and ribbon for the weft.

Supply List:
  • acrylic paints (your choice, 2 to 3 colors)
  • stipple brush (optional), or soft camel hair brush
  • twin or natural colored yarn for the warp components
  • purple embroidery floss and needle
  • purple ribbon for the weft components
  • clean paper towels 
  • clear acrylic sealer
Step-by-Step Instructions for The Dry Brush Technique:
  1. Dust and clean off the chair that you have on hand. I discovered the one above at resale for $1.49; it fits a 14" doll perfectly.
  2. I also removed the damaged seat.
  3. Lightly load up your brush with paint. Dab it on the paper towel to insure that it does not have too much paint on it. Because this is a dry brush technique, you need very little paint to accomplish this wood finish.
  4. Now lightly brush the surface of the chair. Let it dry and repeat with another color. Layer the colors randomly as you go. Stop when you are satisfied with the brushed color surface.
  5. Some of the colors will show in places more than others.
  6. Seal with a clear acrylic spray or wash.

Step-by-Step Instructions for The Woven Seat:
       First you will need to decide the direction of your warp wrap. I chose to wrap my seat running the warp twine up and down instead of the traditional method of wrapping from left to right. This is because I wanted the ribbon weft to show on the left and right sides of my seat.
       Tie the warp twine onto the chair stretcher directly under the lowest rail of the seat. (below left) Now wrap the warp threads under, up and over the front stretcher directly opposite to its back stretcher. Do this over and over until the seat has been filled from one side of the support to the other. Do not pull the warp tight; this will distort the chair frame! The weaving will eventually tighten the seat properly as you go.

Left, I am reading to wrap the warp first. Center, I chose to sew together the warp threads at each
 end of the seat weave with purple embroidery floss. Because I wrapped the warp all the way around
 the front and back rungs of my chair seat. It was necessary for me to tie both the top and bottom
of corresponding warp threads together. The embroidery floss helped me to secure warp threads
before proceeding with the weave.
Left, penny shows size of woven seat on top of the seat cushion.
Right, the weave as seen from beneath the seat cushion.

Saturday, December 15, 2018

Make a Miniature Printable Doll Coloring Book

       Here is a whole sheet of tiny dolls for your American Girl doll, Barbie or baby doll etc... to color with a bit of help from you! 
       You can print out the following sixteen miniature doll coloring pages with your home computer. Then cut on the solid black lines to make the pages of your doll's coloring book the same size. Staple or paste the pages together within the grey bar on the left hand side of the printed pages. 

Our 18 inch Madame Alexander and American Girl Dolls are eager to share their new doll coloring book.
 I made the coloring book for our larger dolls but you can make one smaller for Barbie's family if you'd like.
       To make the cover of your coloring book, simply cut a rectangle from decorative scrapbook paper. Fold it in half and sandwich the coloring pages between the top and bottom of the rectangle and then staple the cover in place.
       Decorate the cover with stickers or drawings of your own or cut one of the dolls from the sheet and color it before pasting it on to the front cover. 
       A tiny doll coloring book would be an excellent gift to give your doll on her birthday or stuffed inside a tiny Christmas stocking or even included with Easter treats inside a basket!
       Don't forget that if you drag the png. or jpg into a Word Document the miniature coloring pages may be enlarged or shrunk as small as you wish before printing it. If you have a question about this coloring page, just type into the comment box located directly below this post and I'll try to get back to you as soon as I can.

Above are miniature doll coloring pages included here as a collection.
 Larger versions are available from my free doll coloring book here.
This sheet may be scaled for miniature dolls or even 18 inch dolls,
inside of a Word Document software program.

Thursday, December 13, 2018

Miniature Dining Room Furniture Plans

       Below are plans for a formal, round dining table and a formal sideboard that you can include in a miniature doll's dining room by Klenke.
"Dolly will be very proud of her fine dining room set with
table, side and arm chairs and side board." Klenke
Dining Room Table Plans, Instructions included by Klenke.
Sideboard Plans, Instructions included by Klenke.
A contemporary round dining table by Kat.

Wednesday, December 12, 2018

"Miniature Chest of Drawers and Kitchen Table and Cabinet

Kitchen Cabinet Plans, Instructions included by Klenke.
       A kitchen is a room or part of a room used for cooking and food preparation in a dwelling or in a commercial establishment. A modern middle-class residential kitchen is typically equipped with a stove, a sink with hot and cold running water, a refrigerator, and worktops and kitchen cabinets arranged according to a modular design. Many households have a microwave oven, a dishwasher, and other electric appliances. The main functions of a kitchen are to store, prepare and cook food (and to complete related tasks such as dishwashing). The room or area may also be used for dining (or small meals such as breakfast), entertaining and laundry. The design and construction of kitchens is a huge market all over the world. The United States are expected to generate $47,730m in the kitchen furniture industry for 2018 alone. Read more...
"The kitchen is equipped with a roomy cabinet and a good work table." Klenke
The cabinet plans are featured just on the right.
"This furniture is much the same as real furniture only it is
simplified and made in miniature." Klenke  Below are the
plans of the chest of drawers featured in this photo.
Chest of Drawers and Kitchen Table Plans, Instructions included by Klenke.

Saturday, December 8, 2018

A Doll Dressed in Ruffles, Bows and Pansies


Description of Coloring Page:
frilly dress, long curly locks, fancy china doll, big bows, Victorian porcelain doll, Childlike Dolls, porcelain or china dolls

Don't forget to drag the png. or jpg into a Word Document and enlarge the image as much as possible before printing it folks. If you have a question about this coloring page, just type into the comment box located directly below this post and I'll try to get back to you as soon as I can.

Thursday, December 6, 2018

The highway to happiness for every two year old...

Close ups of the boats/ships that I included inside a tube with the quilt. My recipient already had many cars for the road.
       There is absolutely no two year old known to mankind that would not love his or her very own car playmat! And these, are sew easy for mom or dad to put together in approximately five minutes, as long as they have access to a sewing machine and two yards of fun, printed fabric!
       Just turn the right sides together and sew a straight stitch around the outside edges leaving a three inch opening. Turn the mat inside out so that the right sides (finished printed sides) are showing and sew the three inch opening shut with an invisible stitch.
       Iron the mat flat and then sew a few lines of quilting all the way across the top of the mat from one end to it's opposite side in order to add strength to the mat.
       Roll up the finished car mat with a tube of tiny ships and cars for play, using a wide satin ribbon to hold the package together. Give it to your favorite two-four year old!
I created a grid with a few quilted top stitches across the surface of my mat to give it strength.
 One side of my mat is for roads, the other for boats. I used 2 yards of fabric for the project.

Wednesday, November 28, 2018

Miniature Davenport, Console and End Table Plans With Instructions

       Davenport was the name of a series of sofas made by the Massachusetts furniture manufacturer A. H. Davenport and Company, now defunct. Due to the popularity of the furniture at the time, the name davenport became a genericized trademark. Read more...
"The overstuffed sofa, davenport and end tables compose nicely
 in a group with the Priscilla sewing cabinet (plans here) near the fire-place." Klenke
Davenport, Console and End Table Plans, Instructions included by Klenke.
For the hall - The Console Table.
Chippendale Mirror and Two Side Chairs.
  How to make more side tables for doll sofas:

Craft a Miniature Cradle, Sewing Cabinet and Piano Bench

       A bassinet, bassinette, or cradle is a bed specifically for babies from birth to about four months. Bassinets are generally designed to work with fixed legs or casters, while cradles are generally designed to provide a rocking or gliding motion. Bassinets and cradles are distinguished from Moses baskets and carry cots, which are designed to be carried and sit directly on the floor or furniture. After four months, babies are often transferred to a crib (North American usage) or cot (UK usage). In the United States, however, the bedside sleeper is the prevalent option, since they are generally bigger, recommended up to 6 months, and often used up to a year. Read more...
"Baby can be rocked in a real cradle, as Mother sits in her rocker.
Yes, the dresser has a real mirror and drawers that open." Klenke
Cradle, Sewing Cabinet and Piano Bench Plans, Instructions included by Klenke.
See the Priscilla Sewing Cabinet in a photo by Klenke.
More for Miniature Baby Dolls:

Miniature Governor Winthrop Secretary Plans and Instructions

       In some places the slant top desk is known as a "bureau" desk, and in others it goes under the name of slope-front desk. In the United States, the slant top desk is sometimes called a Governor Winthrop desk, in memory of John Winthrop, the 17th century governor of the Massachusetts Bay Colony. As Winthrop died in 1647, he had no actual connection to this style of desk, which originated in the 18th century and is especially associated with Chippendale. The name "Winthrop" was attached to this kind of desk by the Winthrop Furniture Co. of Boston, Massachusetts, who offered their "Gov. Winthrop" desk in 1924, during the colonial revival period. Read more...
"This Governor Winthrop secretary has books on it's shelves,
drawers, doors and a cover that can open." Klenke
Governor Winthrop Secretary Plans, Instructions included by Klenke.
More About the Winthrop Secretary:

How to Craft Doll Furniture by Klenke


Dedication
"I dedicate this book to all Children--may it bring to them many hours of happiness in their world of play."

"No this is not real furniture, nor a real room. It looks inviting for
dolly, does it not?" Klenke
Foreword
       Although this book is intended primarily for use in the grammar grades of schools, it is hoped that many older children and parents too, will find much interest and pleasure in making these models and that much valuable information will be found within its covers.
       Designs of furniture for the living room, hall, dining room, bedrooms and kitchen are included in this complete set of doll house furniture. The entire group has been drawn to scale, giving to each article the correct proportions and the correct relation to the other articles shown. Many of these pieces are simplified models, made to a smaller scale of furniture the author has designed and constructed in full size.
       The simplest type of construction has been shown in each instance and only a few of the commonly used and inexpensive tools, equipment and lumber are required to carry on this work.
       To make sure that each article is practical and substantially constructed and to enable him to bring out in the directions any and all special points that should be emphasized, the author has himself made each of the articles shown in this book.
       By making these pieces the child will not only have the opportunity of acquiring manual skill but he will become familiar with the correct proportions, graceful lines and good designs found in better furniture.
       The finished pieces were photographed by the author in miniature rooms especially constructed for this purpose, in order to give to this Doll's Furniture, the realistic feeling and at the same time, to show pleasing grouping of furniture as used in our American homes of today. A careful study of these pictures will help the child to more fully understand what the completed article is to look like.
       In most instances full size patterns have been included, to simplify matters, and the numbers needed of each piece are clearly indicated.
                                                                                                                                    William W. Klenke

List of Plates and Plans:
  1. Chairs - Side, Arm and Rocker, Over-Stuffed Side Chair and Sofa
  2. Dining Room Table and Sideboard
  3. Davenport Table; Console Table; End Table
  4. Governor Winthrop Secretary
  5. Baby Grand Piano
  6. Chest of Drawers; Kitchen Table and Cabinet
  7. Grandfather's Clock; Standing Book Shelves; Chippendale Mirror
  8. Dresser
  9. Cradle; Priscilla Sewing Cabinet; Piano Bench
  10. Double Bed; Bedside Table; Foot Stool
How to Proceed:
       Since it takes so little wood to make any of the pieces shown in this book, it will be advisable to use only 3 ply laminated bass wood of about the thicknesses shown on the drawings, in order to give the added and much needed strength to some of the delicate outlines. This material cuts very easily, holds glue well (on any edges) and does not split under ordinary conditions when being nailed. Being laminated, little or no attentions need be given to the directions of the grain when transferring the patterns to the wood (except when extra strength is required). Laminated bass wood panels can be purchased from many local hardware and lumber dealers ad by mail from leading plywood and veneer firms throughout the country, at nominal cost. There is no waste when using this material--I strongly recommend it for the work.

How to make a drawer and assemble it.
Laying Out the Work:
       In most instances, full size patterns have been given. Make tracings from these on transparent paper such as draftsmen use; cut these patterns out with scissors, then transfer them to a thin cardboard (the thickness of a recycled cereal box) and again cut them out so as to make permanent patterns. If you can obtain a very heavy tracing paper, this last pattern can be eliminated. Transfer this patterns to the wood by drawing around the edges with a sharp soft lead pencil, about a No. 2 or B grade. To avoid slipping of the pattern, hold it in place with a few pins or thumb tacks.
       The thickness of material and the number of pieces required of each kind, are carefully marked on the drawing. In a few instances, where the pieces to be cut are of simple outline (such as a rectangle), no pattern will be given. Use the ordinary common woodworking tools for cutting our the making this miniature furniture. Many of the pieces can be cut out with a little hand fret saw. All cutting should be done from the top surface. Where tow or more pieces of one kind are desired, this can easily and quickly be accomplished by nailing the pieces together with small brads and cutting them at one time. When two pieces of the same pattern are to be cut, be sure to make a right and left piece; in other words, make certain to turn the pattern over when laying out one of the pieces.

Sawing Out:
       The thin pieces can easily and quickly be cut to shape with a hand fret saw or better still, by using an electric power driven jig saw. These little machines are very efficient, inexpensive and are as easy to operate as an ordinary sewing machine. There is very little danger of a child injuring himself, since these little machines are built with every improvement and safety device. Simple complete directions on how to operate the jig saw come with each machine.
       When the hand saw is used, the saw table should be securely fastened in a vise or screwed to a table or bench. The height of the table should be such as to permit the child to work conveniently in a standing position, with the top of the table about six inches below the child's chin.
       Hold the saw perpendicular--that is, square to the table; the teeth of the saw must face downward, handle at the bottom. Now start  to saw, working the frame up and down and never stop working up and down when making a turn, otherwise, the blade will stick and break. To cut inside designs, first bore a small hole; take the blade partly from the frame and then insert the blade through the wood and fasten it in the frame again. Do not use a blade that is too coarse as it will then be difficult to cut sharp corners. On the other hand, too fine a blade will cut too slowly and break easily. The sawing is done in the open part of the saw table; move the wood to that place.
       A simple way to remove the blade, is to take the frame in the left hand and hold the blade with the right; now gently press the frame against a bench or table and the blade can easily be taken out or a new one inserted.

Assembly:
       Glue and nail the various pieces together, using a prepared liquid glue or better still, a hot glue. Care must be exercised not to split the thin pieces when nailing. Wherever the drawing calls for gluing a thin piece to a heavier piece, it will be best to first glue a piece somewhat thicker than required to the other pieces wand when the glue has set, plant the top piece to the desired thickness. It will be well to hold such pieces together under pressure. In many instances, it will be advisable to do all gluing first; then when the glue has set, drive in a few brads where needed, for extra strength. However, if laminated wood is used and good tight fitting joints are made, this nailing will not be necessary in most cases, as a good glued joint will hold stronger then the wood itself.
       After all parts have been put together, clean off the excess glue; when when the glue has set, sandpaper smooth with a No. 0 or No. 00 sandpaper. Small smooth cutting files will help to trim up many of the intricate curved parts.

Finishing:
       Stain the furniture with an oil stain in the color you desire, to imitate mahogany or it can be painted or finished with lacquer or colored shellac. The staining operation can be simplified by dipping the entire piece in a can containing the stain; then wipe off all surplus stain with a rag. After staining apply a coat or two of then shellac to the job, rubbing down each coat lightly when dry, with No. 00 sandpaper or steel wool.

Miscellaneous: 
       A few of the chairs are covered with upholstery; this can easily be done by cutting out a piece of cardboard to the proper shape, use cotton for padding to obtain the correct form and any light weight material for covering. Glue it in place on the under side of the cardboard which has been covered with the material. Ask a parent to aid you when making the cushions, mattress, etc., so that you may have a neat job.
       When making chests of drawers, it will be well to follow the method shown on plate page 8, that is using blocks of scrap wood as fillers to keep the partitions dividing the drawers parallel, while gluing.
       The drawers are constructed of thin cardboard or heavy detail drawing paper as shown.
       Use a very then glass or heavy plastic when needed.
       In place of real metal hinges, you can use a canvas or heavy cloth, which is glued in position 1/4 inch No. 1 Round head screws, either brass or blued are used for door and drawer knobs.

How to choose and use the right jig saw.

Tuesday, November 27, 2018

Craft a Grandfather Clock, Standing Book Shelves and a Chippendale Mirror

       Thomas Chippendale was the first designer to so impress his personality on his work that the particular style that he helped develop has borne his name ever since. He was a carver by trade, but later started in business in St. Martins Lane, London. His book, the "Gentleman's and Cabinetmakers' Directory," was published in 1754 and a later edition in 1762. Read more...
"Isn't this cozy for dolly? The comfortable overstuffed chair, end table
 with books to read, the footstool, Chippendale mirror and
Grandfather's clock make is most inviting." Klenke
Grandfather Clock, Standing Book Shelves and a Chippendale
 Mirror Plans, Instructions included by Klenke.
More About Chippendale Miniature Furnishings:

Monday, November 26, 2018

Katy and K.O. Fashionable Paper Dolls

These colorful comic book paper dolls were originally designed by Bill Woggon.
Katy and K.O. in Bermuda shorts, penny loafers, plaid vests, and sailor themed outfits.
Katy and K.O. in Kitchen Kut-outs. Black and white paper dolls for coloring in.

Craft a Yule Log Cake Candy Container

This chocolate Yule log cake isn't really a cake! It's a candy container made to order for our family's play room.
Above you can see that the painted, plastic lid is on the tray and the peppermint candies are falling out from the
inside of my candy container on the right.
        When my children were little, we often baked a special Christmas birthday cake for Jesus. Sometimes it would be fashioned into a tree or a yule log. One year, the birthday cake even resembled an entire forest of pines, dusted with powdered sugar.
       Parents and/or Teachers can help their young ones shape a candy container made to look like a chocolate yule log cake with the following supplies. Stuff it with candy treats and scriptures from the Nativity story if you'd like to start a new family tradition similar to our own.
       Natalie, my eldest, will be posting a lesson plan and contest giving away a lovely set of Christmas books about Jesus' birthday celebration, for little ones, in a few days. I will link to her here as soon as she publishes it. Below is the first of the two books she is giving away, read aloud at YouTube.
Yule Log Candy Container Supply List:
Run your fingertips across the ends of a toothbrush dipped in
white paint to create a snowy mist of powdered sugar on the
surface of your faux, chocolate yule log cake. 
  • recycled cylindrical oatmeal can and potato chip can
  • masking tape
  • paper mache pulp
  • plastic fork, scissors
  • nail for poking holes and hammer
  • acrylic paints in brown and white
  • transparent glitter
  • white school glue
  • paint brushes
  • old, clean toothbrush (no longer in use)
  • wooden tooth picks
  • markers to color the printable pictures 
  • dollar store silver cake platter
Step-by-Step Instructions:
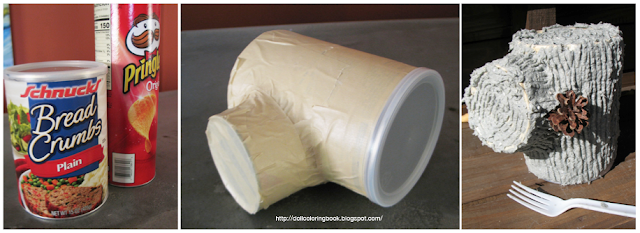
  1. Select a large recycled oatmeal can to be the primary yule log shape. Cut a second smaller potato chip can or juice can to cut down and tape to the larger part of the faux log as a cut branch. 
  2. Glue and tape the cut branches into place.
  3. Cover the entire outside of the faux yule log with masking tape. 
  4. Leave the opening and plastic lid for the larger oatmeal can in tact so that the yule log may be used as a box for surprise presents/candy.
  5. Mix together the paper mache pulp according to the directions on the package.
  6. Apply the paper pulp to every outside surface approximately 1/2 inch in thickness.
  7. Drag the prongs of a plastic fork through the covered surface to create a ''ribbed'' rough looking chocolate icing.
  8. Let the paper pulp application dry. Depending on the weather this could take two days or a week.
  9. Cover the entire outside surface of the dried yule log candy container with brown paint and let it dry.
  10. Mix a bit of white into the brown paint and brush another layer on the raised surfaces only. Let the log dry.
  11. Add the inside swirl of white vanilla cream to the ends of the log where it would normally show after someone would cut the jelly role cake in half. (see photos)
  12. Now water down a bit of white paint in a separate dish. 
  13. Dip the toothbrush into thick white paint and thin dip it into the watery white paint.
  14. Face the tips of the toothbrush away from yourself, pointing to the areas of the faux Yule log cake where you wish to lightly apply white sprinkles of paint. Move your fingers up and down the bristles of the toothbrush in order to wisp on a white mist of light paint. This should look just like the powdered sugar that is normally applied through a sifter onto the surface of a chocolate yule cake to mimic snow. Let the paint dry.
  15. Apply a bit of white school glue to the areas of the faux cake that you want to sprinkle the transparent glitter.
  16. Let the cake dry completely before gently pressing a nail or the sharp end tip of a pair of scissors through the top of the yule log. These tiny holes will be where you can insert the decorative picks after you have colored them.
  17. I've included a sheet of tiny pictures below for children to color, cut out, and glue toothpicks to the backside of in order to decorate the top of their yule log cake, candy container. (see photos)
  18. Don't forget to paint the lid of the candy container as well. Paint it to match the other ends of the yule log, with a vanilla swirl in the middle.
Left, select a large recycled oatmeal can to be the primary yule log shape. Center, cover the
 entire outside of the faux yule log with masking tape. Right, drag the prongs of a plastic fork through the
covered surface to create a ''ribbed'' rough looking chocolate icing.
Left, cover the entire outside surface of the dried yule log candy container with brown paint
and let it dry. Center, Add the inside swirl of white vanilla cream to the ends of the log where
 it would normally show after someone would cut the jelly role cake in half.  I also glued on
a real pine cone for detail. Right, the paper mache pulp texture looks like chocolate icing to me!
Left, Move your fingers up and down the bristles of the toothbrush in order to wisp on a
white mist of light paint. This should look just like the powdered sugar. Center, I also painted
 white snow on my faux chocolate pine cone. Right, the glitter gives the log even
more snowy appeal.
left, let the cake dry completely before gently pressing a nail or the sharp end tip of a pair of
scissors through the top of the yule log. These tiny holes will be where you can insert the
decorative picks after you have colored them. Center, The decorative picks are made from
 the printable below and toothpicks. Right, now it's time to fill the Yule log candy container
 up with Christmas candy!
Don't forget to paint the lid of the candy container as well. Paint it to match the other ends of the
yule log, with a vanilla swirl in the middle.
Above is a sheet of Christmas Clip Art for you to decorate a Yule Log Cake with.
Mount the pictures to the tips of wooden toothpicks with school glue. Poke them
through either a faux cake like ours or a real cake top to decorate for the holidays.
More Yule Logs and Christmas Cake Crafts: