Showing posts sorted by relevance for query pool. Sort by date Show all posts

Thursday, August 28, 2025

DIY a Cool Pool for Summer Fun!

        This cool little pool is constructed with: blue painter's tape, blue photo paper of water, three large plastic rings, scrap cardboard, Mode Podge, masking tape and white school glue. Your doll's pets may pretend to swim in it whenever they wish without any fear of getting wet. Think of all the mess you'll never need clean up while the puppy softies pounce about causing all kinds of mischief!

Left, one of our doll's many pet poodles enjoys their cool pool. Right, see the three rings covered in
blue painters tape; it makes the pool look like inflated plastic.

Step-by-Step Instructions:

  1. Cover the three plastic rings with masking tape, smoothing down edges and creases as you go.
  2. Using white school glue, squeeze out enough from the bottle to stick the bottom sides together once all three rings are stacked on top of each other. Let dry.
  3. Cut out a bottom from cardboard and glue the rings on top of it.
  4. Cut out water photo paper and paste it into the interior of the pool so that it will look as though it is filled with water.
  5. Now mask the remaining areas not yet blue with painter's tape.
  6. Brush on Mod Podge to seal the entire surface area one last time.

Left, the rings are both taped and glued together using masking tape. Center, a bottom cut from 
cardboard is taped to the bottom of the three rings. Right, blue water printed paper is glued 
inside of the pool and then Mod Podge is brushed on last to seal the finish.

 See Additional Pool Posts:

Friday, August 3, 2018

DIY Pool Floats for Your Doll

This inflatable, Barbie pool with solid colored pool floats dates from the mid seventies.
It is in excellent condition. The straw float craft is an easy one, but like most of the
crafts included here, children need adult supervision to complete it.

        Now is the time for having some fun in the sun with your dolls! Above is an inflatable pool and blue floats from my childhood collection. The straw floats with alternating colors are easy to make at home. But you will need adult supervision because these are melted together using a hot iron.

Supply List:
  • drinking straws
  • parchment paper (to protect the iron and other surfaces from melted plastic)
  • iron and ironing board
  • scissors
  • clear plastic bags (this will act as a layer of glue)
Step-by-Step Instructions:
  1. Choose a pattern you would like for the pool floats. I alternated purple and green straws for one pool float and teal and red straws for the other.
  2. Heat up your iron to it's highest temperature, and ask your parent to watch and help you in your progress.
  3. Lay a sheet of parchment paper on the ironing board. The parchment will separate the straws from the hot iron and keep the appliance clean from melted plastic. The parchment is very necessary for this craft.
  4. Lay the straws side by side and then layer a sheet of plastic bag on top of the straws and fold the parchment paper over the straws before pressing them with the hot iron.
  5. Press down on top of the parchment with the hot iron. It only take a few seconds to melt the straws together.
  6. Now lift the parchment and remove the melted straws carefully.
  7. Turn off the iron.
  8. Trim the excess plastic around the edges of the straws. Turn the straws over; the front side of your melted straws should not appear melted.
  9. You can trim the edges of the straws with scissors if these are uneven.
  10. Now your 12" dolls have new floats for the pool to play with!
Left, fold the parchment paper over the straws before pressing them with the hot iron. Center, Trim the excess plastic
 around the edges of the straws. Turn the straws over; the front side of your melted straws should not appear melted.
Right, Now your 12" dolls have new floats for the pool to play with!

Saturday, October 3, 2020

The Silent Pool

 THE SILENT POOL

Away in the wood where it's dark,
There's a pool that is purplish green,
With whispering rushes around,
That murmur of things they have seen.

I once lay and listened all night,
And heard why the pool lies alone;
Not even a fairy goes near
And only the sad rushes moan.

I heard how there once lived a witch,
Who weaved wicked spells night and day,
And used the pool's purplish deeps
For things which I wouldn't dare say.

Then one day she vanished and went,
And never was seen any more,
But silent and still lay the pool,
And darker than ever before.

No fairy knows what the pool holds,
And none guesses what secrets lie
Hid safely away in its deeps.
But shuddering, all pass it by.

Take heed when you go through the wood,
And pass where the pool lies alone -
Not even a fairy goes near,
And only the sad rushes moan! 

by Enid Blyton

Friday, May 27, 2022

How to sew doll swimsuits using socks...

This Wellie Wisher doll, Kendall, wears a
cute purple and pink striped swimsuit made
from a sock. There are straps for the suit 
that tie around the neck to hold it in place.

       Young girls can design cut and fashion small socks into swim wear. Pictured here is one of our Wellie Wishers and a Best Friends Club Doll, Addison, modeling different variations of this simple sewing craft.
       The swimsuits when made of socks need to have their raw edges sewn down tightly or these will unravel. Sewers may also use a glue made especially to prevent this called No Fray, Dritz Fray or Sit n Sew as an alternative.
       I chose pastel striped socks for our dolls to wear but socks come in so many different, colorful designs these days, it's difficult to choose which print to try for this simple craft.
       I cut the sock straight across where the leg and heal come together. Then I slip this tube onto the doll's body to measure where the leg openings should be and the top of the bathing suit should end.
       Next I sew a small seam between the legs and finish all of the openings with seams both at the bottom and top of the sock tube.
       Finally, I sew on ribbon or straps to hold the swimsuits on the dolls body.

More Ideas for Crafting Doll Swimwear:

Day At The Pool for Dolls:

Our Addison doll wears a bathing suit made from a green and white striped sock. It is trimmed 
at the top with calico print, cotton ribbon and has a snap in the back to tighten and close the 
swimming suit snug against her body.

Sunday, June 16, 2019

Learn About Environmental Activism With Kailey Hopkins

American Girl Doll, Kailey Hopkins,
came with only one book, simply titled
"Kailey" by Amy Goldman Koss.
       Kailey Hopkins lives near tide pools in California and is an avid swimmer and surfer. When development threatens to destroy the tide pools she loves and surfs in, she and her best friend engineer a protest to make a difference. Kailey's collection included various beach outfits and accessories. She was the second girl of the year, released in 2003, retired in 2004.
Our Artifacts for the Kailey Hopkins Doll:
Themes Associated With Kailey's Story:
Saving Our Shorelines:
Learn About Tide Pools:
Research How Women Can Make A Difference Through Environmental Activism:
  1. Learn About Dana Miller director of Grow Local Colorado.
  2. Sylvia Earle pioneered a movement called Mission Blue for ocean exploration.
  3. Winona LaDuke is the Executive Director of Honor the Earth and White Earth Land Recovery Project at the White Earth Reservation, Minnesota. A Fight for the People's Land.
  4. Climate activist Anna Jane Joyner working with the Western North Carolina Alliance and co-founder of creation care alliance and videos from The YEARS Project.
  5. Dr. Bhatt works with many women through the Navdanya Project ("nine seeds") in order to save seeds for biodiversity conservation. This foundation from Dehradun, India.
  6. Read about One Plastic Bag, a recycling movement that began with Isatou Ceesay.
  7. Theo Colborn, was the Founder and President of The Endocrine Disruption Exchange (TEDX), in Eckert, Colorado. "Our mission is to reduce the production and use of chemicals that interfere with healthy hormone function." TEDX website.
  8. Professor Wangari Maathai founded the Green Belt Movement (GBM) in Nyeri, Kenya. 
  9. May Boeve helped start a website called 350.org.
  10. Katherine Hayhoe, a climate scientist has an interesting website for her research here.
  11. Joelle Novey (interviewed) is the executive director of Greater Washington Interfaith Power and Light.
  12. Maggie Fox is the President and CEO, Climate Protection Action Fund or ACE. Their mission, "We educate young people on the science of climate change and empower them to take action."
  13. Majora Carter is an American urban revitalization strategist and public radio host from the South Bronx area of New York City. Carter founded and led the non-profit environmental justice solutions corporation Sustainable South Bronx from 2001 onward, before entering the private sector in 2008.  Visit the Majora Carter Group.
  14. Read Jessica Posner's Story and visit Shining Hope for Communities, Kenya  
  15. See film by Bata Bhurji and visit Barefoot College in Rajasthan, India
Crafts for Kailey Hopkins Doll:

    Friday, September 14, 2018

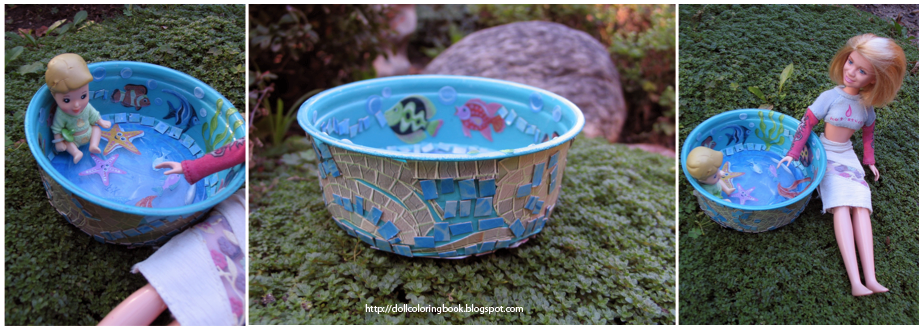
    Collage a Baby Swimming Pool for Your Dolls

    First, apply the stickers to the inside walls of
    the transparent container.
           It's fun to make this simple craft with containers you can recycle from your own kitchen. Cover it with fishy stickers and just a bit of paint and your ready to have a splashing good time with your dolls.

    Supply List:
    • a recycled food dish (plastic)
    • fish stickers
    • blue paint
    • Mod Podge
    • decorative paper (mine had printed tiles)
    Step-by-Step Instructions:
    1. Clean the discarded, transparent food container with warm soap and water. Let it dry.
    2. Adhere stickers on the inside of the container.
    3. Apply Mod Podge to the inside of the container over the stickers. Let the glue dry between several applications.
    4. Paint the outside of the container with blue paint and let this dry.
    5. Decoupage clippings from a decorative sheet of paper on the exterior of the container if you want even more detail on the baby doll pool.
    6. Layer Mod Podge on top of the outside walls as well.
    Both Above and Below, you can see our Mary Kate doll baby sitting and having fun with the baby doll pool.

    Thursday, July 11, 2024

    Make Fun, Easy Beach Balls!

    Our Mesha doll waiting to swim.
           I made two decorative versions of this beach or pool craft. One ball is red with white polka-dots and the other with large color blocking in: yellow, green, pink and lavender colors. The polka-dots where cut from typing paper and glued to the surface after the ball was layered in red tissue. The color blocking on the second beach ball was made by marking the masking tape surface in advance with a pencil and then filling in the four areas with different colors of tissue.
            To make a beach ball for a doll in any size or in any color you will need the following supplies: masking tape, colorful tissue paper, a Stryrofoam ball, white school glue and Mod Podge. You can purchase water resistant Mod Podge if you believe that this pretend beach ball will come in contact with water during playtime. I used ordinary Mod Podge because our 18'' doll pool is a dry playset.
           Cover the surface of the Styrofoam ball entirely with a layer or two of masking tape. Do so gently but with some small pressure of your fingertips. If you press too firmly, you could end up denting the surface unnecessarily. Judiciously squeeze small amounts of white school glue directly on top of the layered masking tape and press colorful tissue paper on top of the glue. Cover the entire surface one section at a time, allowing areas to dry entirely before covering other parts of the foam ball. 
           Drying times between each application are not lengthy, but you do need to be patient and methodical during the process. After the ball is covered with tissue and glue, brush on several layers of Mod Podge to seal it's outer surface completely before play. The Mod Podge will harden and take on a vinyl appearance after it dries.
     
    Left, Styrafoam balls. Right, decorated to look like beach balls.

    Wednesday, June 24, 2020

    12 Fascinating Creatures Of The Surf

    Sea anemones, Anthopleura sola engaged in a battle for territory
           Millions of tiny plants and animals that live in the sea are brought to shore by the tide. They make up the food supply of the animals that live near the beach. Shore-dwelling animals must be prepared to grasp this food and must also be able to live through the time when the tide is out. Consequently, the animals of the surf have developed very interesting forms and habits to meet these conditions. Some float in the water and are washed about by the waves; others cling to the rocks; some have hard coverings that prevent evaporation and give protection, while others have no coverings and therefore burrow down into the sand or mud along the beach.
    1. The Sea Anemone has a soft body and can slide along the rocks, but usually it holds fast to the rocky ledge and looks more like a flower than an animal. It's long tentacles may be white or blue or red and look like flower petals as they wave about. They sting and grasp tiny animals for food.
    2. Jellyfish, that float in the sea, may be as much as two feet in width. From the opened, umbrella-like top hang numerous tentacles with cells that sting their prey until it is numb. 
    3. The Portuguese Man-of-War is one of the most beautiful of the larger jellyfish. His bright red top is very noticeable.
    4. Barnacles, protected by conical shells, cling to rocks or any hard object partially covered by the sea. Through a hole in the top of the shell, the barnacle gets its food as the water washes over it. The hole can be closed during the time when the barnacle is exposed to the air. 
    5. Among the barnacles, as well as on the sandy beach, are thousands of pointed periwinkles. Like the true snail, the periwinkle carries its house on its back and moves very slowly by putting its one foot forward and drawing its body up to the foot.
    6. The shore snail has eyes and it can look out and up to see what is going on as it slowly “one-foots” along over the sand. The traveler keeps an eye out for danger, for at any moment a crab may come along, and then—woe unto the snail.
    7. The Hermit Crab has no shell over the soft, hind part of its body, and if it does not provide protection, it may be eaten by some hungry creature. Therefore it fits itself into a snail shell.
    8. The Fiddler Crab has an oversized claw on one of its front feet. This is its weapon of defense and with this claw it also protects the female. A large company of Fiddler Crabs is a funny sight. They walk along together until something frightens them, and then, as one body, they move from one side of the road to the other until they get close to their homes. Then they suddenly break rank and scoot for cover into their burrows.
    9. Some bits of broken shell, sand and seaweed cemented together may be a chimney that leads to the underground home of a sand-burrowing worm. One of these worms is a beautiful creature clad in steel-blue armor with red plumes on the upper part of its body. With long, tapering tentacles it reaches out for the tiny creatures in the sand that make up its food supply.
    10. The five-rayed starfish is common along the shore. There are starfish with as many as forty rays but such starfish are rare on the beach. When a starfish comes into a neighborhood, all the clams close their shells or hurriedly dig into the sand, for they are well aware that they may become its victims if it is hungry. With its long rays it can pull their shells open, and with its mouthlike stomach it can draw the soft bodies of its victims from their coverings.
    11. Sea Urchins, of which Sand Dollars are a flat form, are cousins of the starfish, but they eat plants instead of animals. They draw in mud from the floor of the shallow water where they stay, and from the mud they get the plants. The Sea Urchin is globe-shaped with long, stiff spines, and the Sand Dollar is a flattened disk with short, soft spines. Both walk more by means of their spines than by their tube feet. 
    12. Another cousin of the starfish is the Sea Cucumber, a long, cylinder-like creature with a fringe of tentacles around its head. When it moves it stretches forward, then pulls its body up to its head, much as a worm crawls. If an enemy approaches, the Sea Cucumber throws away some of its' body parts to scare off the intruder—a very effective defense. Later it can grow new parts to take the place of those thrown out. Thomas.
    More About Animals Of The Surf:
    The site of a tide pool in Santa Cruz, California showing sea starssea anemones, and sea sponges.

    Monday, August 14, 2023

    The Fairy School

    The Fairy School by Marjorie Barrows

    At goldenrod and aster time
    The fairies near our pool
    Put on some freshly laundered wings
    And flutter off to school.

    They sit at little toadstool desks
    And do their fairy sums,
    And learn to color autumn leaves
    Before the frost king comes.

    And then they study very hard
    So they can spin cocoons
    And sing the flowers all to sleep
    With little bedtime tunes.

    They'd fluttered home for tea today
    When I went past the pool,
    But I almost saw the fairy dunce
    Staying after school!

    Monday, February 12, 2018

    Make a Waterfall from Papier-mâché...

    Children can make some very charming toys from papier-
    mâché. I must warn you, however, once they get started on
     projects like this one, their enthusiasm has no boundaries!
           Do your little ones collect dinosaurs to play with? Most American children love plastic dolls like these and what better craft activity for busy little hands than one that helps them to explore and shape a world where their toys can come to life?
           Gather the following supplies from your craft supply to begin shaping a similar "waterfall" for your plastic toy dinosaurs, jungle animals or action figures:

    Supply List:
    • a tall, empty circular can (like a oatmeal box)
    • masking tape
    • white school glue
    • green tissue paper
    • brown paper bags
    • brown paper that reminds you of rock textures
    • fabric that looks like printed water
    • newsprint
    • Mod Podge (optional)
    • a small paint brush
    Step-by-Step Directions:
    1. Start by forming the shape of a papier-mâché cliff from crushed newsprint, masking tape and an empty oatmeal carton. Crushing and mashing newspapers into round rock shapes is easy to do.
    2. Wrap your rock shapes with masking tape as you go and attach these to the empty oatmeal can in a random placement. Don't worry about the tape so very much until you've got a cliff that you like. This is a messy project!
    3. When you have finished with something acceptable, neatly apply small pieces of masking tape to the entire structure. Overlap some of the masking tape as you go.
    4. Now cover the entire form with generous smears of white glue and shredded brown paper bags. You are essentially layering the paper in order to strengthen your form. Let this dry overnight.
    5. After everything has dried, you are going to decorate the structure by alternating green tissue paper and the brown or grey looking paper that has texture. Use white glue or Mod Podge to attach the paper to the papier-mâché surface. 
    6. Attach the fabric that looks like water to an area of the papier-mâché cliff where you think it might be running between the rocks. I shaped a little pool at the bottom of my cliff where my dinosaurs could drink.
    7. Apply a generous amount of glue to the entire surface of your finished waterfall to give the overall project strength. After the surface has dried, store your papier-mâché in a large plastic tub along with your dinosaurs and play mats. Special storage not only keeps your toys picked up, but helps to preserve them for future play as well.
    Above, you can see the stages of application for my papier-mâché water fall. I used a bit of artist's gel to apply the fabric water because I was worried about it adhering well. However, I found that after many applications the Mod Podge  and white Elmer's glue worked just as well. Don't be afraid to experiment with different glues, you'll find that there is a big difference in the cost of this project depending upon which glue you choose.
    A toy stegosaurus followed by his euoplocephalus companion drink from the papier-mâché pool below. 
    A tapejara balances at the top of the cliff waterfall.
    Craft projects like these are excellent ways for older siblings to make a special gift for a
    younger brother or sister's birthday or other holiday celebration like Christmas.
    Close up of the textures used in the papier-mâché water fall.

    How to make a more advanced waterfall model...

    Monday, February 13, 2023

    DIY Noah's Ark Valentine Mail Box

    Mini Noah's Ark Valentine Mailbox

           I've include a Noah's ark Valentine mailbox for those of you who are nostalgic about Sunday toys.

     Supply List:

    • faux printed wood grain paper
    • white school glue
    • masking tape
    • cardboard
    • faux water printed paper
    • black acrylic paints
    • tiny bit of oven-bake clay to shape a small dove
    • a bit of wire and green paper to make an olive branch

    Step-by-Step Instructions:

    • First you will need to cut and shape a simple boat shaped box. I made my version of Noah's ark to look like a capital letter "A" with a closed end. 
    • Then I cut an arched doorway from the side and took that cut door, bent it down and pasted it to a second piece of cardboard cut to look like a large pool of water. This pool serves as a stand for the ark.
    • Next, you will need to shape a simple 'house' with four sides and a ''V'' shaped roof. 
    • Decoupage the entire boat with faux ''wood'' printed paper.
    • Paint the interior of the ark shaped mailbox black.
    • Cut small portal "heart" shaped windows for the boat and paste them across the center of the ark's boat shaped walls.
    • Use a permanent ink marker to draw and color in the tiny details that are too difficult to cut from paper.

    Left, the front of the ark mailbox in progress. Right, the backside of the ark.
     
    Left details of the ark shape. Right, the masking tape holds everything together until the mini
    Valentine mailbox can be decoupaged.

    A side view of the Noah's ark shows a door and heart shaped portals on the ark. The water acts
    as the stand for this Valentine mailbox craft.

    More Noah's Ark Crafts:

    You can cast a vote for this Valentine mailbox entry in the Comments Box Below, if you'd like. It would be interesting to see if people/kids on the internet judge our doll's Valentine mailbox competition in the same way as the children judging them in our home.

    Thursday, February 17, 2022

    DIY A Rainbow Candy Surprise Cake for Dolls!

    This rainbow sponge cake has been sliced open to reveal doll sized candies at it's center!

           This rainbow sponge cake stuffed with doll sized candies would make an awesome cake for an A G doll Birthday or maybe even an excellent desert accessory for a doll's St. Patrick's Day party! However, I didn't use actual sponges to craft the layers with; I made it with cardboard instead. It is definitely not the easiest doll cake that I have ever made. I suggest this DIY to an older sibling or parent to make.

    Supply List:
    • two cardboard tubes, one larger than the other
    • Styro foam beads, multi-colored
    • cotton balls (maybe two)
    • white school glue
    • masking tape
    • corrugated scrap cardboard
    • acrylic paints in all the colors of the rainbow
    • decorative paper
    • lid for the cake plate stand
    • large rubber bands
    • white lace for the cake's top icing 
    Step-by-Step Instructions:
    1. To construct this unique rainbow colored cake you will first need to acquire two cardboard tubes. I made this cake using a bread crumb container and a toilet role tube. Cut down the bread crumb tube to approximately 3 1/2" in height. 
    2. I used a circle measuring 4" across for the lid to this outer tube. I cut away, approximately two inches wide, a pie shaped opening from this lid, so that my cake would look as though two pieces had been cut from it already. Of course the excess sides of the outer cake needed to be trimmed off so that the outside edges would reflect a corresponding opening to the lid.
    3. Then I glued and taped this outter tube to a masked and decoupaged lid representing the cake stand in this case.
    4. The next step was to insert a narrower tube of the same height inside the opening. I crushed newsprint to fill the open space around the inner and outer gap between the two shapes and then masked the opening between the two to form flat walls on either side. These walls became the cake layers.
    5. The inner tube should have glue applied to it's upper and lower walls where the top and bottom of the insides meet between the tube and the lid and cake stand. Let this dry.
    6. I unraveled a cotton ball and layered it onto the walls to with white school glue to give the cake layers some added texture. 
    7. I cut another wall from corrugated cardboard to glue onto the outside of my cake. Corrugated cardboard having three separate pieces may be dismantled to reveal an interesting linear texture if you carefully remove one half of the wall. You can see from the photo below that I had to wrap two large rubber bands around the cake to hold this corrugated cardboard against the sides of the larger outside tube while it dried. I wanted this unique texture on my cake, but if you feel it is two complex to attempt, smoother walls will look nice too.
    8. Next, you will need to pool the white glue and add plenty of the Styro-foam beads to the interior of this faux cake. These tiny beads may be purchased from a family dollar store.
    9. I painted the layers of this doll cake with rainbow colors: green, pink, purple, blue and orange. Be careful to separate your layers with white icing between!
    10. Then I also painted the outside of my cake with those same colors.
    11. I used a hot glue gun and stick to attach rows upon rows of lace to the lid of the cake top and then used white glue to paste on a few Styro-foam beads for the finish.

    Left, here you can see that I used rubber bands to hold layers of the cake form together while it dried
     hard enough for me to proceed further. Right, the backside of the cake will have rainbow stripes
    with texture as well. This cardboard siding comes from the interior of a corrugated cardboard piece.

    Left, the cake seen from above. I have yet to paint the layers of the sponge. Right I glued on the white
    lace icing before painting the cake actually, but this should be done last for cleaner results, if you are
    not an experienced painter. I glued on the tiny Styrofoam balls with white school glue. You do not want
    to glue these using hot glue, they will melt! Pool the white glue in the inner tube, add the fake candy
    and lay the faux cake on it's side to dry overnight. When it is done drying, the cake should look like
    it's just been sliced and the candy has tumbled out.

    Above are three views of the rainbow cake taken at different angles.

    Cynthia Vera made this real awesome rainbow surprise cake! 

    Visit her YouTube channel to see even more recipes 

    Monday, July 31, 2023

    Soap Root

    Soap Root pollinated by moths.

    Unspotted blossom,
    A-sway in the heat,
    Thanks for the Castile
    That lies at your feet.

           The flowers we have been studying open their hearts to the sun in the morning. Most flowers do that. They love the early sunshine. However, there are some flowers that seem to hate to get up in the morning, just as some little boys and girls do. 
           Do you all know the California Soap Root? If you have camped out in your summer vacation, perhaps you have used the root to clean the grime off your hands. You like it because it makes those soft suds that make your hands feel nice. Perhaps that is just why the plant does not like moisture. Perhaps it is afraid that if it touches much water it will melt into soapsuds and float away in rainbow bubbles for the Fairies.
           At any rate, you do not find its flowers in the Spring when the air may be damp. The long green leaves are out, spread on warm rocky hillsides. They have little earth to draw moisture from, but they grow longer all the time. The flower does not bloom until summer. Even in that warm season, it does not open until in the afternoon. Then the air is sure to be well heated.
           The Soap Root has six regular floral parts like Fritillaria but they are different from hers in shape and in color. Botanists say they are ''tongue shaped.'' Does not that describe them well? They are long and narrow. They end in a roundish point. Their sides curve in. 
           Because she comes out in warm weather, Soap Root does not need an overcoat on her flower buds, as Iris does. She sends up many buds along the main stem and along branch stems. They spread out wide into six white waxy parts, with a purple line down the middle. While the sides of the floral parts curve inward, the tips curve backward from the center.
           The six stamens rise up tall and then bend toward the outside. The dark anthers swing loosely on their tops.
           The pistil comes up in the center of the stamen ring. The little stigma knob at its top divides into three lobes.
           Just as some flowers open in the late afternoon, some insects come out then to feed. Mrs. White Moth sleeps in the early half of the day and comes out late looking for a meal. She becomes almost discouraged. Flower after flower she finds closed. Can she find no meal? And she so hungry? Her wings begin to droop.
           Suddenly up she tosses her head. What are those white waxy stars waving in the lower air. Stars should be higher up. She fairly flings herself through the air to reach them. Aha! Food! And a very good food at that. She gains new strength and courage. She goes from blossom to blossom, and you know what happens?
           When the Soap Root seed-case ripens, she does not cast off her sepals and petals. She dries them into purple and twists them over the seed-case. The seed-case is shaped something like a top. See if it spins to send its little round seeds out.
           We can easily see what gives Soap Root its common name. The root has been used by all the peoples who have lived in California. The native people washed themselves with suds made from it. They also used it in a way that our Law to-day will not let us. The native women knelt down by a pool and made it all white with Soap Root suds. The fish did not like that mixture, so they floated on the top as if half asleep. Then, the women caught them in their hands and filled many baskets with them. What they did not wish to eat fresh, they hung on the bushes to dry. Then, they had dried fish when none were to be caught.
           The Spanish Californians used the Soap Root for washing their clothes. Washing Day was not disliked in their time. It was really a sort of picnic. Baskets of soiled clothes were carried down to the creek bank. Camp fires were made under large copper tubs which were filled with the creek water.
           The clothes were soaked in the creek water and well rubbed with Soap Root. Then they were boiled in these copper tubs in Soap Root suds. Next these were rinsed in the clear creek water many times. After washing, the clothes were spread out on the grass to dry in the fresh air and bright sunshine.  How white those clothes were and how sweet they smelled! 
           I said Washing Day was like a picnic. It was. The washers ate their game and tortillas by the stream. In those days, people travelled mostly on horseback. There were few roads between Northern California and Southern California. People rode on trails. Most trails followed along the creeks. So, the washers often saw a horseman coming from a distant part of the State before he got to the ranch or to the town.
           They would hail him. He always stopped to talk with them. Sometimes he lingered to eat with them. He used to tell them all the news of the place from which he came. The washers used to know the news before the other people did. So, when the Americans came to the country and the General wanted to learn the latest news from Los Angeles, he sent his scout to the washing-pool. They used to call this way of getting the news "The Washerwoman's Mail."
          When the Forty-Niners were digging gold in the Mountains, they were very glad to have Soap Rootto wash themselves and their clothes. Soap was not so common in those days as it is with us. And besides, it would be heavy to pack the miles into the mining country. So, they looked on Soap Root as one of their friends who made their lives easier.
           If you want to have fine glossy hair, use the root as the Spanish Californians did. Make a good suds of the root and rub it well into your scalp. Then, rinse the suds out in several waters and dry your hair in the sunshine.

    Monday, March 8, 2021

    Barbie Fashion Dolls by Mattel

           Barbie is a fashion doll manufactured by the American toy company Mattel, Inc. and launched in March 1959. American businesswoman Ruth Handler is credited with the creation of the doll using a German doll called Bild Lilli as her inspiration. Read more . . .
    Barbie and her friends were only four years old when this ad
    was included in the Sears and Roebuck Catalogue. Dolls shown
    above include: Barbie, Ken, Midge from 1963, came with wigs!

    How to Identify Your Barbie

    Year of Make: Doll body parts are copyrighted frequently in different years. The production of face molds may be earlier or later produced than the body they are attached to. This is why dating Barbie dolls may be quite difficult if the doll doesn't have an original box or costume.

    Country were parts are made: Barbies have been produced in many different countries but knowing where these parts come from will help a collector determine era that the doll was designed in.

    Trademark: Barbie is made by Mattel. There are many other companies that produce 11" - 12" fashion dolls. So look for the makers mark or word "Mattel" when identifying Barbie and her counterparts.

    Face Mold: face molds are frequently named, sometimes with an actual name and at other times with a phrase or number. This is a very old, traditional way of identifying all kinds of dolls that have been produced by doll manufacturers throughout history from many different countries. Always check the back of Barbie's head to get the date she was made. Her body parts may have different dates but these are only for the doll's body parts not her actual date of design or face mold.

    Barbie Identification by Melillo, the
    best - 1959 to 1995, for face molds

    1. Barbie face mold from 2005 includes hot pink lipstick and dark eye shadow
    2. Christie face mold - this was the first friend to Barbie that was also African American - Read more about her at Neoshaloves.
    3. Barbie face mold from 1998 with ash blond hair and darker white skin. She also has a beauty mark under her left eye.
    4. Kira Miko face mold is Asian but she is actually a native of Hawaii not Japanese! (Kira is her first name, Miko her last name, some collectors interchange these but calling her face mold "Miko" is like calling a doll's face mold "Smith." "Miko" is a surname or last name.) Read more about her at Kattis Dolls here.
    5. Teresa face mold - is the Spanish Barbie face sculpt. See how Teresa changed over time by ToysND
    6. Barbie face mold from 1998 with lighter skin and blonder hair. Her eye shadow is rosy and her lips bright red!
    7. Nicki face mold - Nicki was first an African American friend for Skipper, but she was also later made into an adult version friend for Barbie. Nicki face mold are still mass produced and sold today and has replaced the Christie face mold altogether. ( I think, maybe not.) Nicki's fame has climaxed to the MAX because of froggy, of course! see Sophie, froggy's famous character with a Nicki face.
    8. Barbie face mold, another from 2005, with lavender lipstick, no bangs, low arched eye-brows

    Hair Color and Style: The hair color and style will help a dealer or collector date and identify a Barbie faster than a copyrighted face mold or body part. This is because sometimes Barbie dolls are not assembled until years after their parts have been manufactured. So a doll with older parts may not be actually sold to the public for several years after it has been stamped with the year. Also hair styles are definitely dictated by decade when it comes to Barbie. 

    Skin Tone: Skin color on a Barbie doll does not determine the doll's face mold label or name. Barbies that have different skin colors are still Barbies if they have a face mold that is identical to those faces labeled "Barbie." Names of Barbie's friends and family are given to different face molds not skin tones. There have been a few exceptions to this rule for Barbie manufacturers because of advertising campaigns and also because of issues that have to do with supply and demand for cancelled doll designs. However, the vast majority of doll producers identify dolls by face molds and therefore, keep to the consistent practices set by doll designers.

    Feet: Holes or not in the bottom of the doll's feet will determine it's age. Earlier dolls where manufactured in such a way as to cause the feet of the doll's to be punctured. Knowing this helps collectors to determine the age of a doll overall. However, many people put Barbies together with old parts so this type of information is not always reliable.

    Hands and Arms: positions of elbows and fingers vary, also palms face outside or to side

    Eye Types: Eyes may be hand-painted or decal on Barbie dolls.

    Body Types: There are many new shapes for Barbie bodies now so this can also help identify your doll as long as the head and body are original. "Made to move Barbie" bodies are move expensive but easier to play freely with. Many doll collectors actually switch out their Barbie bodies with these preferable body types. The Ballerina back and Shani front styled body is the most traditional and also the most controversial figure. Read all about eleven controversies surrounding Barbie!

    Clothing: Barbies that are dressed as they were new-in-the-box, are very easy to identify as long as the clothing is original.

    More Posts About Barbie, Her Friends and Family,  plus The New Fashionistas: 

    Saturday, July 17, 2021

    Crafts for "Playscale" Dolls Like Barbie

    Sample projects shown above from the listing below include: floaties for Barbie, a soap
    dish transformed into a playscale bathroom sink, a heart-shaped tufted doll bed and
    mid-century modern doll chairs.

      
           Our Giant listing of dollhouse crafts below are for Fashionistas, Monster High, Disney Princess Dolls and Descendants, Rainbow High, Spin Master Dolls, Kelly dolls, Fresh Dolls,  Bratz, etc... any dolls that are comparable to Barbie's twelve inch height. This would also include the dolls made to be the smaller children or siblings to the 10" - 12" scale dolls. 

    Doll & Toy Storage:

    1. How to Upcycle a Child's Suitcase Into Doll Storage - for smaller than playscale dolls but the same transformation of a larger suitcase may be used for larger doll versions.
    2. Decoupage A Doll's Storage Trunk - 12'' scale dolls and wooden trunks like the one depicted on this post may be purchased for very little money at resale.

    Collecting & Crafting Dollhouses: 

    1. Apartment Dollhouse Modernized with Elevator - Vintage dollhouse plans for visitors to print and study for the building of their own versions...
    2. My Vintage Tudor Doll House - a Rich Keystone dollhouse from 1938
    3. Every Child Needs a Fabric Dollhouse - A fabric dollhouse is easy to fold up and store or to carry anywhere to play with.
    4. Turn a Bookcase Into A Dollhouse - This is a dollhouse for miniature dolls but a larger bookcase may be treated the same for 10"-12" dolls.
    5. Aunt Marlene's Doll Cupboard - A built in cupboard makes a nice place to display or play with your dolls...

    Furniture and Accessories for Dollhouse/Doll Related Crafts: 12 inch dolls: Barbie Dolls and Fashionistas: These doll sizes are called "playscale"

    1. How to make trash cans for a doll's garage - realistic looking garbage cans for Barbie and Ken's garage rubbish
    2. Craft Lawn Care Tools for A Doll's House/Garage -doll sized rakes and shovels made from plastic forks and spoons
    3. Mini Campfire Bundle - craft one of these using colorful chenille stems and twigs
    4. DIY a Washer and Dryer for Barbie - Ours were made using recycled food containers, foil, buttons and juice tin caps...
    5. Upcycle a Vintage Cafe Set for Barbie - This set was altered to look old with metal-like surfaces and a mosaic tabletop . . . 
    6. DIY a Gas Stove Top and Oven for Barbie's Family - This stove is constructed from cardboard, aluminum tape and tiny details using toothpicks and buttons.
    7. DIY Pet Beds for Your Doll's Dog or Cat - Barbie has pets of course and these cozy little beds are perfect places for them to nap.
    8. Craft a Unique Doll's Table Using Only Four Tiles! - This one would look lovely in a small breakfast nook or on a patio used for informal dining.
    9. DIY Pool Floats for Your Doll - A classic craft using plastic straws and an iron. Ask an adult for help with this DIY.
    10. Use A Vintage Display Box for Barbie's Living Room - We show how to decorate with shells our little ones found on the beach.
    11. Distressing a Sideboard or Buffet for Barbie & Family - Transform an old music box into formal dining room furniture for Barbie and other dolls.
    12. Collecting Rugs for Your Doll's House - How to be frugal and imaginative about decorating the floors of a doll's house and all dollhouse floor tags here.
    13. Tile A Bathtub From An Ordinary Shoebox - This one has real tiny tiles and a faucet made from a recycled soap pump!
    14. Craft a Faux Stainless Steel Doll House Sink - Made using a recycled soap tray, stainless steal measuring cup, foil and cardboard, it looks amazingly realistic!
    15. Assemble a Bathroom Pedestal Sink and DIY a Custom Backsplash - Turn a glass candlestick upside down and add a tiled cardboard back splash...and you've got an instant dollhouse bathroom sink.
    16. DIY a birdbath for a doll's garden - This convincing bird bath looks like it was cast from concrete, but it's just made with ordinary craft materials.
    17. Make Mini Golf Tee Flashlights - Young crafters will also need to collect small gems or yellow beads for this dollhouse accessory.
    18. Craft tiny canteens for a doll's camping trip... - Barbie should be prepared for camping and never leave the campsite without taking water.
    19. Roll and Sew A Tiny Bedroll - This cozy little blanket may be carried over the shoulder of any small doll while hiking and camping in the woods.
    20. Craft a sleeping bag with a doll inside - Make a small baby for your dolls to look after while camping; this one is bundled inside a sleeping bag.
    21. DIY a rope basket - A rope basket makes the perfect container for dirty laundry and also a fun place for pets to hide in.
    22. Craft a miniature ironing board and iron - Every small doll must do chores, especially when it comes to keeping their wardrobes tidy and wrinkle free.
    23. Mini Breakfast Skillet for Dolls 10 - 12 inches - these have bacon, sausage and eggs sunny-side up!
    24. Sew a Stack of Felt Pancakes - A yummy breakfast treat made using felt and paper.
    25. Construct a paper mache or papier-mâché utility cabinet - Barbie and Ken need a place to store all of their cleaning supplies.
    26. Craft a Utility Sink and Hamper for Your Doll's House - These clever utility room accessories are made entirely from recycled plastic containers.
    27. Update a Wooden Doll's Cradle - I repainted a 12" doll sized cradle and made bumper pads and a mattress for it to decorate a nursery for a tiny baby doll.
    28. DIY Feather Dusters for Your Doll's House - craft easy cleaning supplies
    29. Refinish Wicker Doll Furnishings - A little paint and a few sewing supplies can revive tired old wicker furniture.
    30. Sew a Set of Towels for A Doll House Bathroom - easy first sewing project for kids
    31. Glue Together & Paint Two Night Stands - Easy, quick furniture craft for kids to make for a doll's bedroom.
    32. Painting and Upholstering A Doll's Bedroom Bench - Little doll sized furniture from resale can be made to look brand new!
    33. Knot a Felt No-Sew Throw for You Doll - An easy first no sew doll blanket project for young crafters.
    34. Upcycle A Box Into A Doll Bookcase - This classic dollhouse craft can be made to match any dollhouse decor and costs virtually pennies to make.
    35. Convert a Convertible For a Doll - How we changed a former video tape player into a doll's bed.
    36. Shelving for A Car Themed Bedroom - Sometimes packaging can be used to accessorize a dollhouse room.
    37. Assembling A Plant Stand - Turn a former votive candle holder into an interesting dollhouse plant stand.
    38. Sew Groovy Textile Art for A Doll House - Textile art looks just as cute on a dollhouse wall as a framed painting.
    39. Make a Foam Flat Screen T.V. - This doll technology is made with craft foam.
    40. Decoupage A Llama Dresser - Decoupage with paper or fabric and a bit of Mod Podge to transform any furnishings into unusual possibilities.
    41. Refinish A Doll's Rocking Chair - What is intended for one thing, may be better suited for another...
    42. Transform a Curio Cabinet for Barbie - How we updated an adorable doll sized shelf with lavender paint and figurative papers.
    43. Mid-Century Faux Fiberglass Chairs for Barbie - Made with paper mache shoe forms and faux wood shelf paper.
    44. Sew Bean Bag Chairs for Your Doll (free pattern)
    45. Craft a Sunny Little Ball Pit - This unusual craft is made from a recycled tomato container.
    46. Collage a Baby Swimming Pool for Your Dolls - This craft is made cuter with the stickers you choose.
    47. Make Rainbow Hair Extensions for Fashion Dolls - Search for supplies at the dollar store for this craft.
    48. Craft Doll Tennis Rackets (free pattern)
    49. How to DIY A Doll Playpen - Made entirely from recycled materials.
    50. Craft a Car Shaped Ball Pit for Your Dolls - Make something new from discarded, unwanted toys.
    51. The Tissue Box Cover Bed - Turn a tissue dispenser into a bed frame for a dollhouse.
    52. DIY Clamshell Laptop for Your Favorite Doll - This version is made using cardboard.
    53. Turn a bookcase into a changing table - This doll sized bookcase was turned into nursery furniture for our dollhouse.
    54. Craft a rainbow yarn rug for a dollhouse - This craft requires a lot of drying time but the end results can be very interesting.
    55. DIY Big Rig Toy Box - A fun addition to a tiny toddler doll's bedroom.
    56. Cut and Paste Doily Rugs - very easy craft for young dollhouse decorators
    57. Simple Chenille Stem Christmas Wreaths - If you enjoy this Christmas craft, why not visit our doll holiday index on the right hand margin to make more?
    58. Craft Couture Bags for Barbie - An adorable way to recycle old purses.
    59. Make a Soft Sock Sofa for Dolls - This method for making a 10"-12" doll couch is much simpler for young people to accomplish.
    60. How to Assemble A No-Sew Couch for Barbie - Not to difficult to assemble but the materials are sometimes not as easy for children to come by. Be on the look-out for soft foam for this doll craft.
    61. Craft a Heavenly, Heart Shaped Bed for a Little Doll - A cute way to upcycle a old heart shaped chocolate box from Valentine's Day.
    62. Barbie's Bohemian Patchwork Sofa - Dollhouse furniture for beginner quilters.
    63. Easy To Craft Dollhouse Windows - An easy way to make dollhouses look more sophisticated.
    64. Spruce Up a Heart Shaped Rocker For a Doll! - How to decoupage a chair seat in order to restore a rocking chair for your doll's home.
    65. Sculpt a Stone Faced Fireplace for a 12" Doll's House - Every little child needs one of these to make a dollhouse cozy in winter!
    66. Build a Breakfast Banquette for Barbie - plans for two kitchen benches and table for 12-16 inch dolls
    67. How to make handker-shifts from 1966 - make better use of those old-fashioned handkerchiefs!
    68. Sew Sock Slacks for Fashion Dolls - Knit coordinates are always in fashion for dolls.
    69. Spaghetti String, Summer Top for a Curvy Fashionista - Embroidered socks made into quick and easy doll clothes.
    70. Quick and Easy Skeleton Costume for a Doll - Don't like to sew so much? Find out just how quick it is to convert a stuffed softie into a costume for a doll this Halloween or for Mardi Gras if you prefer.
    71. How To Sew a Straight Knit Skirt for A Fashion Doll  - Yet another easy fashion for Barbie made from socks without partners.
    72. Sew a Jersey/Sweater for Ken or Barbie - 10" - 12" dolls need not go cold this winter!
    73. Snow White Redressed...
    74. Belle From Beauty and The Beast Redressed
    75. DIY Conical Hats for Fashionable Princesses - A necessary craft for princess play. (free pattern) 
    76. The Pompon Puddle Pet from the 1960's - Directions for an original vintage pink poodle from 1960s as well as a newer set of directions for a contemporary version are included here.
    77. Craft a Doll Bathtub From a Recycled Soap Bottle - Give your Kelly dolls a real bath with soap bubbles inside this waterproof, dolly bathtub!
    78. Craft a Clothespin Cathedral Rocker - this design fits 10", 11", and 12" dolls perfectly and all you need are spring clothespins and a hot glue gun to make!
    79. Make a traditional wooden rocker for a Barbie... - a design with a slatted back and seat, made using spring clothespins
    80. How to assemble a 'Sunburst' Twin Rocker... plus close-up photos of paint design
    81. Make doll sized patio furniture using clothespins - Great craft for summer fun!
    82. Craft a Shoebox Bed for Barbie - fancy faux carved headboard, kerchief sheets, you'd never guess it was so easy to make!
    83. DIY A Vanity Chair for Barbie - This one is made from a cardboard tube.
    84. Make three boxy bunk beds for your small dolls - holds for climbing into bed instead of ladders
    85. How to make a faux leather club chair for Barbie dolls - this one uses leather-like paper and a wooden block base...
    86. Constructing a Corner Cupboard for Barbie - Shabby Chic faux wooden papers
    87. DIY Barbie's Bohemian Bed - using paper doilies, spray paint and lace
    88. Build a custom fireplace surround for Barbie's dollhouse - this one is for pretend gas heating!
    89. DIY Front Doors for The Dollhouse - measurements, ideas and clip art printables for dollhouse front doors, both for Barbie and American Girl Dolls
    90. Craft a footstool for Barbie or much smaller dolls - using buttons, beads and caps
    91. Create a Barbie hospital room using a recycled binder . . .
    92. Make a sculpture display case for Barbie and Ken - cool for a penthouse, dream house or gallery . . .
    How to Build Or Assemble A 10"-12" Scale Dollhouse From YouTube:
    Furniture made from spring clothespins fit 12" dolls like Barbie perfectly.