Thursday, July 18, 2019

How I Restored An "Our Generation Gourmet Kitchen Set"

The before and after photos of my "Our Generation Gourmet Kitchen." I papered the back
 splash, painted the burners, painted the lighter pink trim and shelving white, replaced the clock,
 covered the old hinges, added a view behind the window panes (free alternative here) and then
 papered hot pink shelves.
 
Restoring The Food and Accessories That Once Came With The Kitchen

Above are the vintage doll foods from Japan that I purchase from a local
estate sale. I paid fifty cents for two small, unopened bags. Each piece
measures approximately 3/4" across. Top Left fruit are: watermelon, pear,
pineapple, lemon, bananas, grapes, two apples, pomegranate and orange.
Top, Right breads are: two toasted cheese, three plain glazed donuts and
and one larger bagel. Bottom Left meats are: two hamburgers, hot dog,
two pork chops, Cornish hen, lobster and two fried eggs that are sunny-
side-up. Bottom Right vegetables are: two small iceberg lettuce heads,
two carrots, one tomato, one yellow onion, head of cauliflower, celery
stalks, one red beet, a cucumber, one green pepper and one lonely potato.
All of the play foods are made of paper mache and hand-painted. I don't
know a date but the packaging looked very old. One of the hamburgers
is marked Japan.  This tiny collection adequately replaces similar food 
 items that once came with the collection belonging to the Our Genera-
tion Gourmet Kitchen. In fact, I'd say it greatly improves it altogether.
       This doll kitchen set came with a large collection of food items. However, I was only able to purchase the single, larger unit from resale for $4.99.  So over a period of several weeks, I managed to collect & craft most of the following items to replace what once accompanied it. Below I've listed the original contents of the sets normally sold at Target, and now also at Amazon, so that visitors may also be encouraged to undertake a similar challenge.
       The bad news is, as you may also have noted, I did not obtain the original refrigerator with the used kitchen! The good news is that I will be making a DIY for a doll refrigerator in the near future and link it up to this post when it has been completed.
       I've included lists of those items accompanying three popular doll kitchen sets so that you can decide which of the three you might prefer to purchase in the future or, you could go the least expensive route like myself, and hunt one of these down at resale or on ebay. Printing the lists out and working off of these makes crafting or purchasing similar items easier. 
  • To see a review of the original Our Generation Kitchen set by IconaDollies. My set is the version with a hot pink kitchen counter. This review is of a red kitchen set with the same design features.
Above are custom grocery items made from my vintage label printables.
Shown here are: a sack of flour, country ham, Five Roses Cake Flour,
two bags of dried peas and two frozen packages of Ozark Strawberries.
The Original Food Items: Note - I have seen alternative, updated food sets for My Generation Kitchen set that come with egg trays + removable brown eggs, plastic milk cartons, butter with a transparent container and removable lid, a raspberry fruit basket, an additional skillet with a clear plastic lid, realistic salt and pepper shakers, a clear plastic cookie jar with a removable lid, a clear bottle of olive oil with a silver spout, peanut butter jar and Nutella jar etc... So depending upon when and where you purchased this set will determine what is included in your version of this play kitchen.
  1. colorful marshmallow flavored cereal box (empty)
  2. fruity crunch flavored cereal box (empty)
  3. a paper container for pretend orange juice (empty)
  4. hot chocolate mix, including 2 sachets inside
  5. a paper container for pretend milk (empty of course)
  6. 100 percent hamburger patties, freezer box (empty)
  7. rainbow pops made with 100 percent fruit juice (empty)
  8. a Sunday ice cream kit (empty)
  9. an egg container for 12 extra large eggs (empty) - farm fresh eggs here!
  10. a small empty bag for All Purpose Flour
  11. two 3 dimensional chocolate chip muffins
  12. two 3 dimensional cup cakes (red and blue icing) - see how we mad blue and red cupcakes with rosettes
  13. three chocolate chip cookies
  14. one small plastic can of tuna fish
  15. one small plastic can of peaches - fresh peaches here, not canned
  16. two small plastic sandwiches sliced in cross length shapes
  17. three plastic eggs stuck together
  18. a soft red plastic tomato - learn to sculpt tomatoes using oven-bake clay
  19. a soft orange plastic orange
  20. a soft, red plastic pepper - peppers and tomatoes sculpted using oven-bake clay
  21. a wedge of Swiss cheese 
  22. a cardboard box of butter - handmade dairy items for play
The vintage labels for doll canned foods above include: yams, asparagus, pineapple, pickles, spinach, tuna
baking powder, pumpkin, and pet foods for both a dog and a cat. The copyrights for my versions of these
labels are free for people to print out and craft with but not sell. Link back to the originals if you wish but
don't republish or redistribute them from alternative other websites please.
Kitchen Dishes, Tools, Accessories & Decorative Items:
  1. a blue, transparent, plastic serving pitcher
  2. a pink plastic drying rack + the draining tray that accompanies such kitchen equipment
  3. a plastic cookie sheet
  4. a plastic muffin baking tin
  5. two blue plastic glasses that match the serving pitcher
  6. three plastic shakers with red, white and blue caps for spices
  7. a set of red plastic measuring spoons
  8. a plastic spatula with a blue handle and grey tip - doll kitchen utensils crafts
  9. a plastic spoon with a grey handle and blue tip
  10. a remote, plastic, red phone and charging unit (phone can be removed)
  11. a red, plastic hand mixer (grey beaters that are permanently attached)
  12. a plastic, soft soap dispenser (red lid, white container)
  13. white and red, plastic spray bottle for pretend cleaning fluid
  14. a grey frying pan with a red plastic handle - how to make doll sized pots, pans and skillets here
  15. two blue polka-dot plates made from plastic (polka-dots are white)
  16. a plastic, blue polka-dot mixing bowl (goes with plates)
  17. a white sponge for cleaning counter tops
  18. a transparent measuring cup
  19. two small decorative plants with attached plastic pots
  20. Three plastic, white canisters for: flour, sugar, and coffee beans (Traditional canister sets usually include four pieces, the fourth being used for tea) - spool craft canister set
  21. two red plastic soup bowls
  22. two tall, white plastic chocolate mugs (not coffee mugs, the shapes are traditional to hot chocolate sets crafted a couple of centuries ago) - how to craft hot cocoa
  23. one grey, plastic loaf pan - Our version of this craft here.
  24. a pale pink sink strainer ( These are made to fit over the top of a sink so that veggies and fruit may be washed thoroughly; directly under the faucet.)
These tiny granola cereal boxes are made from advertising on
the side panel of an actual cereal box. They are just the right
size for a Barbie doll. See how to make the same for 18" dolls.
*Note, the colors of items may vary according to the color combinations of your kitchen set.
*Second, many of items in all sets are doubled up to increase the count of how many accessories and pieces of food come in each play kitchen set. 
* I don't mention the kitchen hardware on the lists.

Here is a listing also of all kitchen items normally included with the Journey Girl Gourmet Kitchen set originally sold by Toys-R-Us. You can view the exact toy kitchen sets here by Just Craft It.

The Original Food Items:
  1. white, plastic milk carton - Doll dairy container crafts pictured here.
  2. one paper juice carton
  3. one box of butter (empty)
  4. three, orange plastic carrots stuck together
  5. three, yellow plastic bananas stuck together
  6. one plastic orange
  7. one red condiment bottle of ketchup
  8. one yellow condiment bottle of mustard 
  9. two plastic pieces of toast
  10. one green plastic head of lettuce - How to make Bibb lettuce for your dolls
  11. one red plastic tomato
  12. one brown, plastic chocolate cake sliced into four pieces - pretty pom-pom chocolate cake craft
  13. four chocolate cup cakes
  14. four sugar cookies iced with pink plastic - Our sugar cookie star versions with jelly filled, heart shaped centers...
  15. one large uncut sandwich
  16. one cardboard cereal box (empty)
  17. one box of processed macaroni and cheese (empty) - how to make pasta boxes for doll pantry...
  18. one plastic green celery or broccoli? - doll size celery handmade
  19. one box of Neapolitan ice cream for the freezer (empty)
  20. two boxes of frozen veggies (empty)
Our set of very realistic looking desert erasers are now
kept in the doll's kitchen. These include: ice cream cones,

ice cream pops, ice cream sandwiches and dishes of
ice cream.
Kitchen Dishes, Tools, Accessories & Decorative Items:
  1. a free standing, green colored mixer with matching beaters
  2. a grey, plastic mixing bowl
  3. one white plastic mixing bowl
  4. a set of pale green measuring spoons
  5. a green, plastic toaster - two versions of cardboard toaster crafts here
  6. a grey, plastic drying rack
  7. a grey, plastic ice cube tray (comes with 6 pieces of removable, heart shaped, plastic ice)
  8. a grey, plastic pot with a detachable lid
  9. two, green canisters with attached lids
  10. a pale pink, plastic cake stand
  11. two transparent containers with grey lids
  12. a grey cookie sheet
  13. two, red, heart shaped serving bowls
  14. a pale pink strainer
  15. two see-through plastic cups
  16. one lemon scented, liquid dish soap bottle
  17. a set of little salt and pepper shakers - button-top salt and pepper shakers here
  18. one plastic spatula
  19. one cookbook (doesn't have actual pages)
  20. two pale pink plates
  21. two pale pink coffee cups - Our paper tube coffee mug craft here.
  22. two see-through glasses
  23. one pink oven mitt
  24. one pink hot pad - braid vintage fruity potholders for dolls
  25. two sets of grey, plastic silverware including:one knife, one fork and one spoon - See how you can make silverware for dolls from cardboard here.
  26. a transparent measuring cup with a spout
  27. a pink hand mixer with attached grey, plastic beaters
  28. a green container for mixing spoons and spatula
  29. a plastic shaped bread box with a bread shaped lid
  30. a grey plastic cutting board
Our dolls now have a selection of sushi erasers to eat.
Last, but certainly not least, is a listing of all the supplies sold along with a Gourmet American Girl Doll kitchen set: Review by American Girl Spirit

The Original Food Items:
  1. one box of baking oats (empty)
  2. one box of apple cinnamon stars cereal (empty) - How to make cereal boxes for your dolls here.
  3. one box of pet food (empty) - Can labels for doll pet food here.
  4. one box of brown sugar (empty)
  5. one tiny box of baking soda (empty)
  6. four plastic chocolate chip cookies
  7. four plastic dark brown chocolate brownies - make rich chocolate brownies in a casserole here
  8. half a loaf of bread
  9. three slices of cut bread to insert into the toaster
  10. one green basket of strawberries (removable)
  11. one green basket of blue berries (removable) - Baskets of fruits with free pattern too!
  12. two canisters: one for flour and the other for sugar (clear plastic, contain glitter, color labels, non-removable lids)
  13. white plastic milk jug - Milk containers both glass and paper here...
  14. clear plastic olive oil bottle
  15. white plastic egg carton with eggs
  16. plastic butter on a blue butter dish (comes with a clear plastic lid) - See our dairy for dolls to learn how to make butter sticks.
  17. rolled out sugar cookie dough
  18. pet food and water (removable) - Dog water and food bowl craft here.
A collection of food shaped erasers are just the right size
 for our 18inch dolls. pizza slices, burger, hot dogs,
 fries and sandwiches all look delicious!
Kitchen Dishes, Tools, Accessories & Decorative Items:
  1. one grey square brownie tray - Our replacement versions here.
  2. one grey bread pan
  3. a green toaster that pops your doll's toast up and lowers it down with a built in spring - our craft version of toasters here
  4. one grey plastic skillet with a pink handle
  5. one grey plastic pasta pot with blue handles
  6. two dark pink soup/cereal bowls - green cereal bowls for doll yogurt and fruit in the morning
  7. two white plastic plates with colorful designs
  8. two metal spoons
  9. two metal forks
  10. a salt shaker made of clear plastic and grains of salt
  11. a pepper shaker that looks like metal - button top salt and pepper shaker craft
  12. one plastic whisk (metal looking handle, rusty orange whisk)
  13. one plastic mixing spoon (rusty orange)
  14. one plastic rubber spatula (pink and grey)
  15. multi-colored measuring spoons
  16. grey plastic measuring cups
  17. one butter knife with metal looking blade and green handle
  18. a blue plastic recipe box
  19. a plastic pen for writing with
  20. note cards made of paper for recipe box
  21. eight spice jars with a sheet of sticker labels - Our replacements for doll sized spices...
  22. 2 clear plastic glasses
  23. one plastic rolling pin - Make your own rolling pin and sugar cookie dough here.
  24. one yellow mixing bowl
  25. one grey cookie sheet - My versions of a cookie sheet craft here.
  26. a polka-dot pink hot pad
  27. a polka-dot pink apron - Directions for sewing a simple doll apron here.
  28. a peach mixer that spins two alternative attachments: a whisk and a bread dough kneader
  29. a large mixing bowl with measurement markings on the side (clear plastic + handle)
  30. pink square trash can
See More Toy Kitchen Reviews for 18" Dolls:

Monday, July 15, 2019

Learn to Become a Poet and a Dancer With Gabriela McBride

"Gabriela Speaks Out" cover.
       Gabriela McBride is the fifteenth Girl of the Year, released in 2017. She made her debut on Good Morning America, Gabriela is an aspiring poet from Philadelphia, Pennsylvania to express her feelings to help her overcome stuttering. Gabriela loves to dance at the community center after school. She is the first African American Girl of the Year.

Themes to Research Online from Gabriela McBride's Book:
Overcoming Speech Impediments:
Young Poets:
Community Dance Programs and Private Dance Training for Kids:
American Girl, Gabriela McBride's Books:
  • 'Gabriela' by Teresa E. Harris
  • 'Gabriela Speaks Out' by Teresa E. Harris
  • 'Gabriela: Time for Change' by Varian Johnson
American Girl Doll, Gabriela McBride's Fan Videos:

Friday, July 12, 2019

Learn About The Family Business and Food Allergies With Blaire Wilson

5 Fun Facts about Girl of the Year 2019 - Blaire Wilson

       Blaire Wilson is the seventeenth Girl of the Year, released on January 1, 2019. Hailing from the fictional town of Bluefield, New York, Blaire lives on her family's sustainable farm, which also includes a farm-to-table restaurant, B&B, and special event barn venue. She loves to cook and craft, but struggles with newly-diagnosed lactose intolerance and her smart device addiction. She has a paler skin tone compared to other fair-skinned dolls, and uses the Josefina face mold. 

Learning With Blair Wilson: American Girl Doll of the Year for 2019
Our Artifacts for Lapbooks and Journals About The Blaire Wilson Doll:
Online Research for American Girl Blaire Wilson:
Family Farms:
Bed and Breakfast Retreats:
Lactose Intollerant:
State or County Fairs:
Barn Wedding Venues:
Blair Wilson books:
  • "Blair"
  • "Blair Cooks Up a Plan"
Fan Video Pics for American Girl Doll Blaire Wilson:

Learn to Follow Your Dreams in Gymnastics With McKenna Brooks

The American Girl "McKenna" book.
       McKenna and her collection debuted in January 2012, revolving around a gymnastics theme. She is a ten-year-old girl from Seattle, Washington who is a budding gymnast but suffers from problems with school work. McKenna is the oldest of three children, with younger twin sisters named Maisey and Mara Brooks. She is described as strong-willed and determined, and is determined to be an Olympic gold medalist for gymnastics.
       A television film entitled An American Girl: McKenna Shoots for the Stars was released on July 3, 2012. The film is also the second in the series to feature a Girl of the Year character. McKenna is portrayed by actress Jade Pettyjohn.
Our Artifacts for The McKenna Doll:
Online Research for Themes Covered in McKenna's World:
Children and Gymnastics:
McKenna has trouble in school: This listing is for parents, tutors and older kids to use in research.
McKenna learns to look past disabilities:
How to live with a broken limb:
Training a Special Needs Dog:

Tuesday, July 9, 2019

How To Build a Fireplace For An American Girl Doll House

Left, there is just enough space inside my faux fireplace to hold a "iron grate and some small wood logs.
I used a wooden picture frame to finish off the fireplace opening. Right, the height of my handcrafted
fireplace is perfect for all of our 18inch dolls; it measures 22" tall and 10" wide.
       In my humble opinion, a fireplace is one of the most romantic features of any home. That home could be for a doll but it could also be for a person. 
       Fireplaces for dolls are constructed with very strong cardboard or wood. I chose to build mine using old paper mache techniques that most older kids can certainly manipulate with only a bit of practice. 
       A fireplace may be any size or shape you desire; these come in as many materials as you can imagine! 
       If you look closely at my example, you can see that my stone-faced, 18inch doll fireplace is actually detached from any wall. I build my doll furnishings so that they may be conveniently packed away in storage. Free standing doll furniture is not only easy to store, but also easier to sell, move and manipulate into any photoshoot.

Click to see stonework details.
Supply List:
  • plastic knife
  • cardboard
  • small sample tiles
  • white, yellow and black acrylic paints
  • Gorilla glue
  • stain for the wooden mantle
  • brick
  • wooden picture frame
  • wood for mantel
  • Claycrete paper mache
  • Mod Podge 
  • clear acrylic sealer (spray or liquid)
  • wood glue or Gorilla Glue
  • sponges (optional)
Step by Step Instructions:
  1. First I had to decide on a standard height for an 18inch doll house room that I would be constructing for photography purposes in the near future. 
  2. Then I measured and cut a wall suited to those measurements. 
  3. Using wood glue, I attached a shallow heavy cardboard box to the cut wall and covered the form entirely with masking tape.
  4. Then I cut a mantle made from wood and adhered it to the top of my shallow box with wood glue. 
  5. I weighted this mantle board down with a brick and let the glue dry for several days before staining it.
  6. I then cut a floor board to attach at the bottom of my fireplace so that I could tile the floor a few inches in the front of the facade.
  7. I glued the tiles down all a once because I purchased these on a small mat. Then I applied my grout and wiped away the mess with a sponge and water. 
  8. I let the grout dry over night.
  9. Then I cut away the lower half of a simple, wooden picture frame. And glued this to the opening of my firebox. I weighted this down and gave it time to dry.
  10. Finally, I was ready to mix the Claycrete and mold it into a stone pattern around the front and side surfaces of my doll fireplace.
  11. After letting this stone surface dry for a couple of weeks, I then painted it a dark grey entirely.
  12. Then I mixed several lighter grey colors and dry brushed these alternately across the surface of my stones to give them dimension. If you are not familiar with this technique, I would suggest you use a dry sponge to work the paint in and out of the surfaces. instead.
  13. When you are satisfied with your paint work, seal all the surfaces with a acrylic spray fixative.
Left and Center, I attached a shallow heavy cardboard box to the cut wall. Right, I weighted this mantle
board down with a brick and let the glue dry for several days before staining it.
Left, you can see the brick at the top weighting down the mantle till it dries. Center is a close-up of
the wooden picture frame used to trim out the facade of my fireplace. Right, I've used a bit of wood
 putty to fill in cracks around the frame.

Here are some shots of the stonework as I molded it with my hands and a plastic knife. It is a very simple
 process; just mush it on and flatten it out a bit as you go. These are only rocks after all!

Above is the decorative wire soap dish used
here for faux fireplace grate.
        I found a small soap dish that reminded me of a cast iron fireplace grate at my local thrift shop. As you can see on the right, it also has a daisy motif on the front of it. Then I stacked small wood stems on top of it. These stems are frequently sold at our dollar store down the street. If you can't find these, just cut up twigs from your lawn after a storm to make convincing logs for your doll's fireplace instead.

More Fireplace Crafts for 18inch dolls:

Sunday, July 7, 2019

Transforming a Bistro Chair for A Desk Set

       This particular chair comes from the Journey Girls bistro table and chair set originally. See the whole set at the My Journey Girls Adventures here. I decided to transform it with a bit of orange spray paint and a new seat cushion cover. I will use it in a doll bedroom for a desk chair in a future post.
I picked up this stray plastic chair at resale for a dollar. I needed it for a doll's desk 
attached to the front end of a large bunk bed suite. These bunk beds with a 
built-in-desk are sold at Emily Rose here.
          The new fabric for the seat cushion has the colors that I am using for the doll bunk beds: brown, white, orange and pink.
Although I like the teal color of this former bistro chair, it will not blend in with my doll's bedroom suite.
        Above I show how easy it is to take the plastic chair apart before painting the chair and recovering the seat cushion.
The plastic chair looks rustic once painted. The seat cushion's colors blend in 
with the blankets and sheets that I am sewing for the bunk beds.
       I used an orange spray paint designed to cover plastic to change the faux iron rod look of the chair legs, back and seat. 
       Then I cut a circular piece of fabric and sewed a straight seam around it's parameter in order to pull it taunt over the chair pad and around to the backside of the seat. The gathering was concealed underneath the chair cushion after I reattached it to the chair base. I used a generous portion of hot glue to put the cushion back onto the seat as well.

How to fix floppy necks on dolls...

       Here is a common problem with some dolls. You found the perfect doll at resale but . . . it's torso doesn't support the head. Your doll has floppy neck or floppy head syndrome! No kidding, that is what the condition is called.
       This is a result of either poor construction or the use of the wrong material. I recently purchased a doll with this condition for a few dollars. It was very easy to fix simply by replacing the materials that were used to stuff her body.

I didn't hesitate to buy a new doll with floppy head. Her condition was easily corrected by
replacing her new stuffing with cotton. Polyester fiber is too soft for a 18inch child doll.
       The manufacture had stuffed her torso with polyester fiber, a material often used in the filling of baby doll bodies, to give them extra softness. This is preferred when the doll is representing a new born infant, because that type of doll is usually carried non-stop and suited to a small cradle.
       However, for a free standing, 18 inch, child doll, this material is not a good choice. The doll will always be too limp to stand on her own. Thereby, making her an unattractive, inexpensive alternative to the pricier American Girl doll standard. 
       So, I opening up her fabric torso with a seam ripper and removed all of the polyester fill before replacing it with 100 percent cotton batting; this is the fill that resolved this new doll's floppy neck. Then I stitched up the opening in her back using a invisible hand stitch. She is now better than new.
       Now you'd think that a manufacture of dolls would know better, right? They do, however, if they are purchasing materials in bulk from one source, they can do so at a lower price point and this is what most likely took place.
       In case you are wondering if you could do the same by using half polyester and half cotton, don't bother. The doll's body will eventually collapse again. The polyester does not compact enough inside the torso to make it stiff. Fill the doll with tightly compressed cotton balls or cotton batting and you will never have the problem again.

Fixing Floppy Necks:

       I added the softer polyester fill beneath the neck of both the porcelain and vinyl versions of my 
Bello baby dolls. Although my investment was only a few dollars, my fondness for these 
twin molds was too great to allow them opportunity for damage I could not repair.

        What child or adult could resist these little faces? Baby dolls by Venezuelan designer, Yolanda Bello, in the 1990s, are notorious for their fragility. Their bodies were stuffed with pellets and polyester fill so that they would feel limp like newborn babies. However, this also meant that the porcelain versions were not likely to survive outside of a curio cabinet, even in the arms of an adult.
       Ashton Drake also sold identical designs in vinyl materials, so that parents had the option of giving a durable doll to a child. But their bodies had little stuffing about the neck and shoulders as well and even if the doll's heads were no longer breakable, the bodies of these dolls could be easily torn and tattered within a short duration of play.

Saturday, July 6, 2019

Vinyl Clip Art Records for Doll Crafts

       A phonograph record (also known as a gramophone record, especially in British English, or record) is an analog sound storage medium in the form of a flat disc with an inscribed, modulated spiral groove. The groove usually starts near the periphery and ends near the center of the disc. At first, the discs were commonly made from shellac; starting in the 1940s polyvinyl chloride became common. In recent decades, records have sometimes been called vinyl records, or simply vinyl or even vinyls. Read more...
       Cut and paste these albums/records back to back or sandwich a piece of light weight cardboard between two sides, if you would like your doll's records to be sturdier for play. The following clip art is intended for child crafts and play. It is not to be redistributed from any other website or sold for profit.
Printable 12-inch LP Vinyl Records with colorful labels.

Printable 45 RPM vinyl records with colorful labels.

Thursday, July 4, 2019

DIY Patriotic Pinwheel Cookies for American Girl Dolls

You can cover a small box with white typing paper, and tie the lid shut with white twine,
 to make your cookies look like they were purchased fresh from Grace's French bakery.
Because red, white and blue are also the colors of Great Britian's and France's flags,
our pinwheel cookie crafts would also be fun to include in a doll bakery overseas! 

        Above is a fresh baked box of patriotic pinwheel cookies for our American Girl dolls to share at their 4th of July picnic. These are easy to craft with just a small amount of oven bake clay. To make the process even faster, purchase colored clays in advance. If you are frugal like me, suffer through the process of mixing the red and blue to avoid holiday traffic!

Don't forget to throw away the sticky, clay mess left on the wax paper as soon as you have 
rolled it out with a glass! I doubt that this stained clay can be washed from any kind of fabric.

        You can color white Sculpey by kneeding in acrylic paints. It's a very messy business so I don't exactly recommend the process if you can purchase factory colors. Above you can see that I was able to combine the acrylics with the oven bake clay to create some relatively bold colors. Make sure that if you choose to do this, work on top of wax paper and when you roll it out with a glass, sandwich the clay between wax papers.
       Roll out the colored clays: red, white and blue and stack these on top of each other. You can stretch out the clay a bit to ensure that there is equal coverage for all three before rolling these up together.

It isn't necessary to compress the clay much as you roll it out. Just tap it down slightly 
to remove air bubbles.

        On the left you can see that I am rolling all three colors into a log. On the right my log is ready for cutting.
I gently pressed out the edges of each doll cookie to make them look more life-like,
 before baking them.

       Above and left, I cut consistent sized cookies with a knife and layed these out on top of a cookie sheet and baked them at 275 Fahrenheit or 135 Celsius for 5 - 8 minutes. Sculpey is best baked when it is allowed to heat up with your oven and cool down slowly without the oven door ajar.
       After my pretend doll cookies cooled, I brushed them with white glue and rolled them in transparent glitter to mimic sugar.
       These pretend sweet treats will be much appreciated by little mothers in their play doll bakery.

18" Doll Size Patriotic Pinwheel Craft

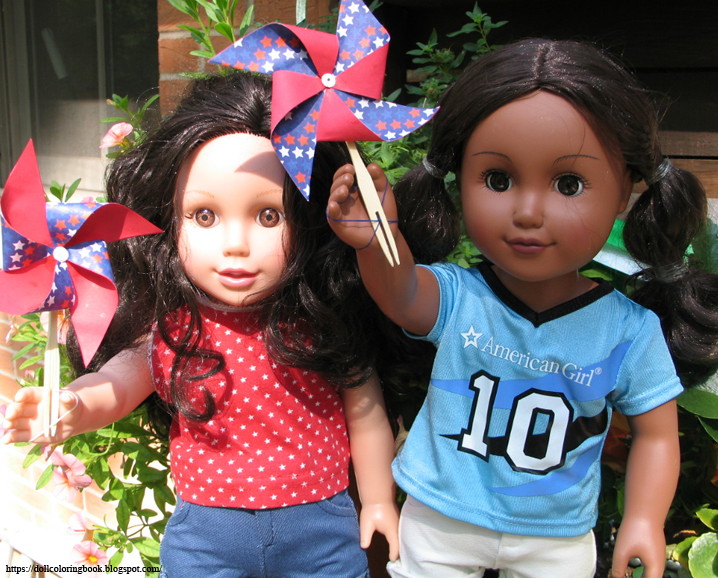
Our dolls are going to carry their very own red, white and blue, windmills in a 4th of July parade!

        Here is a simple and fun craft that you can make in only a matter of minutes for your favorite American Girl Doll. Using supplies you already have tucked away in a general craft supply at home follow the instructions below. Now your doll can have something to carry in a parade while you carry her!

One side of the pinwheel is solid red
paper, the other side is a red, white
 and blue star pattern.
 Craft Supplies:
  • scissors 
  • decorative patriotic scrapbook papers
  • hole punch 
  • double prong tooth picks
  • hot glue and hot glue gun
  • ruler
  • tiny rubber bands (for display)
  • white tacky glue
  • pin or thumb tack (for pinwheels that move)
  • left or right handed scissors (Match the correct scissors to the dominant hand of your child please.)
Step-by-Step Instructions:
  • First you will need to measure and cut four squares from scrapbook paper measuring three inches on all four sides.
  • Two of the those squares may be a solid color and two should be patterned. We used red, white and blue to emphasize the fact that these paper windmills are for a 4th of July celebration.
  • Glue two squares together with the alternate pattern and solid coupled as a pair.
  • Now fold the paper squares from corner to corner in half.
  • Then fold those triangle shapes from corner to corner in fourths
  • Open up the squares and measure 1 1/2 inch from the centers out along the folded lines with a light pencil mark.
  • Use your scissors to cut from each corner in up to the marking.
  • Fold in every other corner, tip to center point and glue.
  • Repeat this step four times.
  • You should have a pinwheel shape.
  • Punch out two centers using your hold punch and paste these to the center of each pinwheel.
  • Now hot glue each of your pinwheels to a double prong tooth pick for your dolls to carry in a 4th of July parade. (This version doesn't spin)
  • If you want your pinwheel to actually spin in a breeze, you can poke a pin through the center and then attach the pinwheel to a straw or pencil using a pin or thumb tack.
You can use a tiny rubber band to help hold the windmills in the palm of your doll's hand.

DIY Doll Sized Rockets for 4th of July!

Our dolls are seated on the lawn along with our homemade rockets, waiting for their American 4th
of July picnic to begin. However, many other countries celebrate important holidays and special
 occasions with fireworks just like Americans. If you have a doll collection from a different country,
 you might also like to make pretend fireworks for doll play

       Our dolls have decided to have a 4th of July picnic on the lawn today. They can't wait to play with their pretend rockets! 
       You can make doll fireworks just like ours using recycled paper tubes and skewers that are commonly found in supermarkets among the barbecue supplies.
       Be careful, though, not to let young toddlers or baby brothers and sisters play with these sharp ends. I clipped mine off a bit but these are certainly not the kinds of toys for little ones to run around with! They do make cute photo opportunities for the dolls however.

Paper mache rockets in the lawn
 for festive decoration only.
 Craft Supply List:
  • cardboard tubes (variety of sizes)
  • decorative, patriotic scrapbook papers
  • white school glue
  • hot glue and hot glue gun
  • newsprint
  • wooden skewers
  • twine
  • sheets of foam and card stock for rocket tops
  • masking tape
  • left or right handed scissors (Match the correct scissors to the dominant hand of your child please.)
Step-by-Step Instructions:
  1. Cut the cardboard tubes into a variety of lengths.
  2. Crush the newsprint and use masking tape to attach the ends of the newsprint to each skewer. 
  3. Wrap the ends of each skewer with the newsprint, approximately 1 - 2 inches from the end so that the skewers fit snuggly inside each cardboard tube.
  4. Drizzle some hot glue inside each tube and stuff more newsprint around each skewer to fill up the hollow insides of each 'rocket' firmly with paper stuffing.
  5. Use masking tape to close both the top and bottom of each tube.
  6. You can poke a hole using a toothpick or pin to insert a piece of twine to act as a pretend fuse.
  7. Wrap each tube with decorative paper and white glue to make the rockets festive looking.
  8. Cut circles measuring approximately 1/3 to 1/2 inches larger in diameter than the openings of your tubes.
  9. Now  cut a pie shape from each circle. (see photo below)
  10. Using a bit of hot glue on the cut opening carefully pull and attach each end to overlap slightly. This will create a pointed-end-caps for your rockets. You can use either foam sheets or card stock to shape these caps.
  11. Attach the end-caps to each of your rockets with hot glue.
  12. Twist more decorative paper around the skewer end using white glue to add more detail if you'd like.
  13. After your pretend rockets have dried, stick them into the lawn and photograph your dolls enjoying their 4th of July picnic.
Far left, Cut the cardboard tubes into a variety of lengths. Center, stuff more newsprint around
each skewer to fill up the hollow insides of each 'rocket' firmly with paper stuffing. Right,
Wrap each tube with decorative paper and white glue to make the rockets festive looking.
Left, Now  cut a pie shape from each circle. Right, Using a bit of hot glue on the cut opening
carefully pull and attach each end to overlap slightly.
Our dolls prepare for their very own 4th of July Celebration.

Wednesday, July 3, 2019

Learn About St Louis, Mo and Rainforests with Lea Clark

"Lea to the Rescue" movie for
American Girl fans
       Lea Clark is the fourteenth Girl Of The Year, released in 2016. Debuting in an episode of Good Morning America, Lea is a budding photographer from St. Louis, Missouri, and is described by American Girl as an animal lover who "discovers a world of possibilities" upon visiting Brazil, culminating in a visit to her brother in the Amazon rainforest.
       Coinciding with her release is a film entitled Lea to the Rescue starring Maggie Elizabeth Jones as the title character, along with coordinating items such as books penned by Lisa Yee entitled Lea Dives In, Lea Leads the Way and Lea and Camila, and a mobile game for iOS. American Girl has also launched an advocacy campaign with the World Wildlife Fund called "Wild at Art", urging young girls to contribute to the fund through their artistic abilities.
Our Artifacts for the Lea Clark Doll:
  1. The Jungle
  2. Jungle Animals
  3. People Who Live in The Jungle
  4. The Jungle "Maloca"
  5. The Jungle Hunt
  6. Jungle Farming and Foods 
  7. Jungle Medicine Past and Future 
  8. The Jungle Dance 
  9. Jungle Crafts
  10. Lea Clarks Behia Berry Fruit Stand - replacement accessories are coming soon!
Online Research for Themes Found in Lea Clark books: Kids Can Learn Photography:
Rain Forests of Brazil:
Endangered Animals in The Rain Forest:
Tour The City of St. Louis: Most of the attractions in St. Louis are free of entrance fees, curtesy of the St. Louis taxpayers.
American Girl Lea Clark's Books:
  • Lea Dives In
  • Lea Leads the Way
  • Lea and Camila