Showing posts sorted by relevance for query Valentine candy. Sort by date Show all posts

Thursday, February 7, 2019

DIY Candy Filled Heart Box for 18 Inch Dolls

Valentine messages for candy boxes and cards in lavender.

"True as strong and strong as true
Is my earnest love for you."

Our 18 inch doll's "parents" have been working over-time making doll sized, candy filled
Valentine containers.  Our Chavonne doll holds the pink candy box and our Zoe doll
holds a purple version.


Valentine hearts made from fabric and notions. If you would like to print
 my images of these to make paper versions instead of fabric,
you may download them here for personal crafts only.

"Tis the day the love birds mate;
Smile on me, and bless my fate."

"Here's my heart as good as gold
Bringing to you love untold."

       Although this craft is not difficult, it is time consuming to create. You can either make your Valentine shaped candy box using decorative fabrics or paper. What makes this Valentine craft truly unique are the tiny hand-made clay candies glued inside!

Supply List:
  • cardboard
  • masking tape
  • tacky white glue
  • hot glue and hot glue gun
  • notions, trims, beads, lace (if you intend to make the fabric versions)
  • fabrics
  • Sculpey or paper clay
  • acrylic paints: chocolate browns
  • puff paints: white, pink, red 
  • recycle an old heart shaped container (optional) 
  • a variety of Valentine cupcake liners 
  • matching tissue paper
Step-by-Step Directions:
  1. If you do not have a recycled heart shaped box, you can make one similar to my own by hand. You will need to cut two hearts from cardboard. One of those hearts will need to be slightly smaller than the other, approximately 1/8 to 1/4 inch smaller. The larger heart will become the lid and the smaller one the bottom.
  2. Both hearts will need to have 1/2" to 3/4" side walls in order to comfortably hold your doll's miniature clay candy creations. Cut these strips from cardboard and attach them along the edges of your cardboard hearts using hot glue. Ask a parent for help when using hot glue.
  3. Decorate both the top and bottom of your box. You may even wish to cover the sides of your box with ribbon or lace. Make sure the box lid fits neatly over the bottom before proceeding with the craft.
  4. I also lined the interior of my two boxes with tissue paper.
  5. Shape, or cut with a miniature cookie cutter or use tiny candy molds to make the doll candy from the clay of your choice. I used oven bake Sculpey for our doll's Valentine candy creations.
  6. After baking the clay candy in the oven at 275 degrees, I let them cool completely before painting with brown acrylic paints.
  7. I also covered a few candies with tacky white glue and aluminum foil paper.
  8. Next, you may squeeze a bit of puff paint onto the top of your faux chocolates to identify what is supposedly inside each sweet treat; just as you would find on actual chocolate candies!
  9. Let the candies dry and then cut long, narrow strips from a few cupcake liners to glue around the candy edges. Now you can choose to glue the faux candies inside your Valentine boxes or keep them loose. I chose to glue ours inside the bottom half of each box so that these would not be lost over time.
Left, Valentine clay candy cut with a miniature cookie cutter. Center, miniature Valentine clay
candy shaped by hand. Right, miniature clay Valentine candy shaped inside a tiny mold.


"When Cupid's dart
Shall strike your heart,
Oh, may his arrow be
This Valentine from me!"


Any doll would be pleased as punch to receive a box of chocolates like the two shown above and
below. Above is our purple version. The box top is decorated with satin, rick rack and a tiny
wire butterfly.


Here's a message, just a line,
Will you be my valentine?


Above you can see our buff pink version of this Valentine candy box craft. This candy box is
trimmed with pink silk embroidered flowers and green petals made from shaped ribbon.


"I send to you this heart of mine, 
For I'm your own true Valentine.


More candy filled container crafts:

Monday, September 23, 2019

Valentine's Day Doll Crafts

Far left, felt roses for Valentine bouquets. Center left, doll sized Valentine cupcakes and sheet cakes.
 Center right, Valentine cookies on a tray. Far right, St. Valentines wall decorations.

       Did it ever occur to any of you to wonder who Saint Valentine was, and why we should commemorate his day by sending cards or letters containing all sorts of playfulness, like true-lovers' knots, hearts pierced with arrows, etc.?
       It is easy enough to tell you about the saint, but what he had to do with the popular observances of the day dedicated to him is a matter for conjecture.
       Saint Valentine, they say, was a grave and earnest Christian bishop, who was put to death in Rome on the fourteenth day of February, about the year 270 A.D., for his too zealous efforts in converting the heathen. When he was canonized, the day of the month on which he died was dedicated to him.
       The customs of Saint Valentine's Day are, no doubt, derived from those practiced at some of the Pagan festivals, for they are of very ancient origin. The principal feature of the ceremonies was always the choice of a valentine for the ensuing year. 'The cavalier was expected to wait upon his lady, execute all of her commands, and act as her escort at all social gatherings.
       Of course you have all had some experience in sending and receiving valentines, and perhaps consider that the only way of celebrating the day; but don't you think it would be a good idea to invite some friends and their dolls to your house and have a Valentine-Party?

St. Valentine Parties for Dolls:
Our Valentine Themed Doll Crafts: You can help grow our listing by making requests for particular Valentine crafts in the comment box below:
  1. Craft a Cupcake Stand Using Wooden Spools - a faux food display item made from recycled parts...
  2. Craft Doll Sized Cookie Sheets and Sugar Cookies - This cookie tray is made from kitchen tin foil and the cookies are made from oven bake clay.
  3. DIY Candy Filled Heart Box for 18inch Dolls - very intricately detailed faux chocolates and a lovely paper heart box!
  4. Spruce Up a Heart Shaped Rocker For a Doll! - Transform this resale rocker into something much more attractive.
  5. Decoupage A Frame For Your Doll's Picture (heart theme)  - a frame that any little girl would love to display in her bedroom.
  6. DIY Doll Cupcakes for Valentine's Day - the cutest dolly cupcakes ever!
  7. How to make felt roses for a doll - Felt roses are always appropriate for any or every holiday occasion.
  8. Molding and Painting Doll Sheet Cakes for Valentine's Day - More dolly sheet cakes for our doll bakery of course.
  9. Printable Valentines for Playtime With Dolls - authentic, antique missives for your doll's post office/mail service...
  10. Make a Paper, Heart Shaped Wreath for Your Dolls - This sweetheart wreath is perfect for decorating your doll's home or hanging inside of a doll banquet hall.
  11. Craft a Heavenly, Heart Shaped Bed for a Little Doll - A tufted sweetheart treat of a bed for any mini doll on Valentines Day. 
  12. Fancy Chocolates Clip Art Pages (4) - would be cute for Valentines or Mother's Day cards ect...
  13. The Valentine Board Game - printable, one for big girls and one for dolls.
  14. Make a strawberry heart shaped doll cake... - This one is trimmed with edible lace decorations!
  15. The Annual Valentine Mailbox Competition - Every year participating students at our Dollville school enter a mailbox contest with award ribbons, party games, and Valentines of course!
  16. Old-Fashioned Valentines, cupids with arrows and treat box lids... - printable for doll sized Valentines, candy box lids, child sized Valentines plus cupid cartoons
  17. Tiny Cherubim Printable Papers - for student Valentine crafts
  18. How Flossie and Tom Cat Made Valentines - writing exercise for Valentine's Day Fun
He passed her an old-fashioned love note.
Valentine History and Stories:

Valentine/Love Poetry for Kids:
Valentine Coloring Pages:
Saint Valentine's Day Video from American Girl Doll Fans:
More Doll Valentine Crafts Online:
  1. Toothsome Chocolate Emporium For Dolls...The Candy Floss Machine Craft! - take a look at this wild chocolate emporium, candy floss treats everywhere!
  2. What We Made for the Valentine's Day Party - from AGDollPlay - pretend candy, Valentine mail box, cake and place settings, candy boxes, and a Valentine dress review
  3. Valentine's Day Bitsy Baby Doll  - knitting pattern by Claire Fairall, soo cute!
  4. Hearts Galore Doll Scarf - Crochet Pattern For American Girl Dolls
  5. Valentines for Classmates - make wooden fairy dolls for all your besties!
  6. Matchbox Valentines from TheRoomMom - sweet treat boxes made easy
  7. Sweet Hearts for Sweethearts! DIY Valentine's Candy Jar and 3 Easy Steps to Make DIY Pom Pom Teddy Bears
Young Children's Valentine Specials: Your dolls and teddy bears may enjoy these...

Sunday, February 13, 2022

The Valentine Board Game

        This Valentine board game is played using a button. Toss a big button so that it falls into a small box or box-cover. If it falls right side up, you may move forward around the board game with a token; if the button lands wrong side up, you stay where you are. The board game has two sides with "Valentines" numbered 1-6, however, the players will only need to move tokens on the side of the board where they are seated. Everyone starts at the Valentine who wears the crown and every player enters the Valentine that wears the laurel wreath to the center card of a maiden dressed in red hearts. You must have at least two people to play the game.
       Each player has a small piece of Valentine candy to use as a game token like: candy hearts or M&Ms, red tarts, whatever bite-size candy that the players enjoy. The aim of the game is to move about half of the board, tossing the button to land right side up, in order to eat as much candy as possible after landing on the Valentine at the center wearing a heart gown/dress.
  1. To begin the game, toss a dice and the highest number will go first. 
  2. The first player will continue as her play permits, tossing the button into the small box. 
  3. Each time the button lands right side up, she may move forward one space. 
  4. If the button lands wrong side up she must stay within the square she last landed and the button will be passed to the next player seated on the opposite side of the board game to toss.
  5. Each player must move around their half of the board from 1 to 6, before landing on the center Valentine.
  6. The reward for landing on the center Valentine is that the player may then eat her token and begin again, by adding a new piece of candy as her token to the Valentine crowned (1.)
  7. The player that has the most luck with the toss of the button gets the most tokens to eat!
* Note to parents and teachers - I recommend that this printable board game be laminated at a local discount school supply or in the school office prior to using. This will allow you to wipe it down with soap and water or a cleaning wipe after use.

This printable Valentine board game is for grown girls to use in order to eat
all the small sweets they desire.

 
This smaller Valentine board game is for your dolls
to play with! Girls may substitute beads for the
candy tokens.


Thursday, February 13, 2020

Craft a Heavenly Heart Shaped Bed for A Little Doll...

Our little doll is thinking to herself, "I must be dreaming,
because this bed feels just heavenly."

The Dove chocolate box received on
 Valentine's Day last year.
       I recycled a nice tin candy box from last Valentine's Day for this year's special gift. 
       It made a perfect heart shaped bed for a tiny doll and best of all... it was decked out in someone's favorite shades of pink! 
       This project is perfect for an older sibling, mother or grandmother to craft as a gift for a young child. 
       Because your Valentine box may not be the same size as my own, I have neglected to include measurements here. However, the process is not difficult for someone if they have a bit of sewing experience!

Supply List:
  • a heart shaped candy box
  • felt for a fluffy, heart shaped mattress
  • embroidery floss and thread
  • cotton batting
  • ribbon bows
  • hot glue gun and hot glue
  • decorative trim: lace or ribbon 
  • matching fabrics and trims for tiny blankets and pillows
  • masking tape
  • embroidery needle
  • cardboard
Step-by-Step Instructions:
  • Make sure your candy box is clean and dry before beginning. 
  • Trace around the outside of the heart shaped box using a pencil on top of a light weight piece of cardboard. Now you have a pattern to make the mattress with.
  • Cut two pieces of hot pink felt in the size of the pattern exactly. 
  • Then cut a very long, narrow piece of that same felt for the edge of the mattress, approximately one inch wide.
  • I used a blanket stitch to attach the sides of the doll mattress. But you may use any stitch that pleases you or you may even attach this piece of felt using hot glue if you do not feel like sewing.
  • Leave a two inch opening on one side of the mattress so that you can fill it with cotton batting. Then sew up that opening with an invisible stitch or a showy blanket stitch if you prefer.
  • Now you will need to use a long large embroidery needle to 'tuft' the mattress with. Poke this all the way through the back to the front side. Your knotted end of the embroidery floss should catch as you pull the floss hard enough to 'tuft the back to the front side. 
  • Double back with the needle through the front to the back of the mattress and repeat this step three times before tying off the embroidery threads on the backside of the mattress. 
  • Tuft several areas equally distant from one another till the mattress is completely tufted.
  • I then sewed on the tiny bows to the front side for decorative reasons.
  • Set the finished mattress aside.
  • Now mask off the upper edge of the candy box in order to help the hot glue grip the eyelet lace and ribbon. I used a 'Hello Kitty' ribbon because it is a favorite of the child receiving the Valentine bed.
  • I also cut a small piece of felt and trimmed it in the same ribbon and lace to coordinate with the mattress. Except I used a a pale pink felt for the bedding and pillow.

Left, I shaped the mattress by tracing around the heart candy box with a pencil on top of cardboard.
Center, after stuffing the mattress with cotton batting, I used an embroidery needle to 'tuft' the mattress.
Right, the backside of the mattress.

Left, the top half of the candy heart shaped box has been masked with tape so that the hot glue will adhere
 better to the lacy dust ruffle. Center, the felt mattress fits perfectly inside the candy box. Right, the dust
 ruffle completes the look of our heart shaped bed.

Left, I made a tiny pink felt pillow for the doll's heart shaped bed. Center, I also trimmed a blanket in the
same 'Hello Kitty' ribbon and eyelet lace. Right, everything plus the new doll is tied together with a pink bow.
 Somebody will be pleased as pink punch this Valentine's Day!

Sunday, March 5, 2023

Make a traditional Valentine mailbox using stickers...

This mailbox is decorated with butterfly stickers and white rick-rack trim.

       This traditional Valentine mailbox is wrapped with a heart tissue paper and then further decorated with butterfly stickers. The colors are all traditional to Valentines Day: red, hot pink, pale pink, white and lavender.

Supply List:

  • a sturdy, recycled rectangular box with a lid
  • wooden coffee stirring sticks (2)
  • fancy wrapping paper, decorative scrap paper or tissue in Valentine colors
  • paper for lining of the box
  • extra cardboard for the box tray
  • stickers, your choice
  • rick-rack trimming
  • white school glue and hot glue
  • Mod Podge
  • masking tape.

Step-by-Step Instructions:

  1. Cut an envelope sized narrow opening in the top lid of your box, before covering the entire outside with a layer of masking tape. This will give it an ideal surface for decoupage.
  2. In order to make a "secret compartment" inside the box to hide candy and treats, you will need to craft also a fitted tray for the inside of the box. You do this by cutting a rectangle slightly smaller than the dimensions of the outside box. also add walls to the tray on all sides using scrap cardboard and masking tape. 
  3. To make sure that the tray sits above a secret compartment, cut and paste in a small shelf using coffee stirring sticks and hot glue. 
  4. You may also wish to finish the tray with decorative paper on the inside of the compartment.
  5. Now decoupage the outside of the box on all sides using decorative Valentine paper and stickers. We used butterfly Valentine stickers on our doll's version of this mailbox craft.
  6. We also trimmed the lid edge with a white rick-rack trim.
  7. The last step for this traditional Valentine mailbox should be to brush Mod Podge on top of all decorations in order to keep them in place and clean with handling and play.

Stages of wrapping the small box with an inserted tray with masking tape.

You can cast a vote for this Valentine mailbox entry in the Comments Box Below, if you'd like. It would be interesting to see if people/kids on the internet judge our doll's Valentine mailbox competition in the same way as the children judging them in our home.

Monday, February 13, 2023

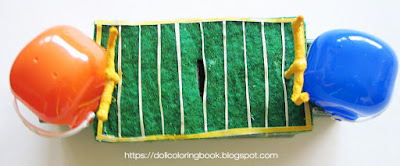
How to craft a football lover's Valentine mailbox...

This mailbox has a football field, goal posts, and even helmets!

        Some dolls like sports and this Valentine mailbox craft is for those dolls who love football. I left the helmets generic so that readers here could imagine their own favorite teams... These little helmets may be found in toy vending machines at grocery stores or pharmacies.

 Supply List:

  • a small rectangular box recycled
  • a second small box cut into equal halves
  • decorative paper for the field, side panels
  • green felt for the playing field on the top of the mailbox
  • two, small, plastic football helmets (the kind you can get in a candy dispenser machine)
  • hot glue gun and hot glue
  • white school glue 
  • bit of green paint
  • chenille stems or wire (for goal posts)
  • one cotton ball
  • yellow and white acrylic paints for painting field and goal posts
  • recycled, clean paper egg carton (parts) 
  • masking tape

Step-by-Step Instructions

The boxes as they look prior to decoupage.
 
       Start this mailbox by taping together the shape seen above. You will need to find a small box the shape of a football field and an even smaller box to cut in half for the display of two plastic helmets. See also the small rounds cut from a paper egg carton and glued into position. The football helmets will eventually be mounted on top of these with hot glue.

Alternatively, you could paint the ground markings
using yellow puff paints if you prefer.


       Next, using white glue, paste on the green scrap paper all around the sides of the mailbox. I chose a "lawn" looking paper. Paint the egg carton mounds green as well. Then cut a piece of green felt for the field. Glue this directly onto the top of the Valentine mailbox. I cut narrow strips of masking tape to make markings on our faux field.

The American football Valentine mailbox from above.
 
       Bend yellow chenille stems or wire into tiny goal posts. Take a small pair of nail scissors and poke holes through the felt and cardboard beneath. Smear a bit of glue onto the goal post tips and insert these into your green felt football field.
You can cast a vote for this Valentine mailbox entry in the Comments Box Below, if you'd like. It would be interesting to see if people/kids on the internet judge our doll's Valentine mailbox competition in the same way as the children judging them in our home.

Saturday, February 9, 2019

DIY Doll Cupcakes for Valentine's Day

Above you can see the finished cupcakes and the liners that I cut apart to trim and finish the 18 inch doll deserts.
       Each one of these doll cupcakes will serve two 18 inch appetites if your dolls are not too hungry! Shape their tops to look like your favorite treats. I decorated some of these cake sweets with cherubim, hearts, strawberries, cherries, doves and even a little rose! I also added a little red or white glitter glue to make them extra tempting!
Top, paper tubes. Bottom, sculpted clay cupcakes
before they have been painted.

Supply List:
  • narrow cardboard tube
  • cardboard
  • tacky white glue
  • Sculpey
  • acrylic paints: red, pink, brown, white etc...
  • Valentine cupcake liners
  • mini cookie cutters
  • mini candy molds
  • glitter glue
  • Mod Podge
  • hot glue gun and hot glue
  • Xacto knife
 Step-by-Step Directions:
  1.  Cut the narrow cardboard tube into 1inch sections.
  2. Glue these down to a piece of scrap cardboard with white tacky glue. Let them dry.
  3. Cut the tubes apart from the cardboard and trim them so that each segment has a closed end.
  4. I hand-shaped my cupcake tops on top of the closed end of the tub in order to give the clay support. 
  5. Use long snake shapes from the clay to wrap around the top of the cupcake making the icing.
  6. Roll out tiny spheres for the cherries and poke a hole into the top of each to insert their stems.
  7. I molded the tiny doves and cherubim from candy molds and baked these ahead of time to stick into the cupcake icing. (see pictures of the clay shapes here.)
  8. Again, I did the same with the hearts only I used tiny mini cookie cutters to cut out the tiny Valentines. These may be baked ahead of time. They will adhere to the icing once baked together in the oven at 275 degrees. You should not need to remove the sculpted clay tops from the cardboard tubes once these have been baked together in the oven. The oven temperature is too low for the paper tubes to burn.
  9. Paint your cupcakes however you would like! I used traditional Valentine colors: red, pink, white. 
  10. I also painted on the glitter glue to add some sparkle.
  11. After the painting dries, cut the ribbed edges of the cupcake liners apart from the bottoms of the cupcake liner.
  12. Carefully reattach the ribbed liners around the lower half of the paper tubes.
  13. Now you can re-cut the bottoms of the liners to the size of the miniature cupcake bottoms and glue them in place.
  14. Coat the clay parts of the cupcakes with Mod Podge when you have finished to help keep the Valentine party treats looking new.

Friday, March 12, 2021

Doll Groceries for Craft and Play

Just a few of the crafts included in our grocery index for doll play.

       A grocery store in North America, or a grocer or grocery shop in the United Kingdom, is a store primarily engaged in retailing a general range of food products, which may be fresh or packaged. In everyday U.S. usage, however, "grocery store" is a synonym for supermarket, and is not used to refer to other types of stores that sell groceries. In the UK, shops that sell food are distinguished as grocers or grocery shops, though in everyday use, people usually use either the term "supermarket" or, for a smaller type of store that sells groceries, a "corner shop" or "convenience shop". 

       Under this index we will list both grocery items and playsets for your dolls. Some of these posts are of things we have collected and some are of things we have made. Grocery storage such as kitchen refrigerators and pantries, plus fruit/veggie stands are also included among our artifacts.

Groceries for You To Craft or Collect For Your Dolls:

  1. Sculpt Luncheon Meats and Cheese - These 18" doll trays are 3 dimensional and so fun to make they remind me of of the Lunchables our kids used to take to school...
  2. Newsprint Cinnamon Buns - These delicious looking sweet buns made to fit our doll's oven; these also come with a recycled tin container.
  3. Chenille Stem Lollipops - Kids love to bend these furry craft wires into all kinds of shapes. Here is an easy lollipop craft they can give to their American Girl dolls.
  4. Make faux rock candy for your dolls...  - These doll treats are made using tribeads.
  5. Soft Braided Pretzels - This salty treat looks to real! 
  6. DIY Doll Sized Jiffy Pop! - A fun craft made with Dollar Store art supplies and tinfoil. 
  7. DIY Durable Boxed Foods for Play - Learn to layer and paste cardboard to make doll food crafts that won't breakdown with rough play.
  8. Sculpt Paper Mache Pumpkins - are easy to sculpt and paint for Fall
  9. Coconut Drinks for 18" Dolls - made from walnut husks look just like real coconuts in miniature!
  10. DIY Cotton Batting Carrots With Feather Tops - A very old-fashioned craft; your great grandmother probably made these for her Easter Egg Tree!
  11. Craft Candy Bars for Your Dolls - More printable crafts for a doll's sweet tooth...
  12. DIY Doll Sized Candy Apples - We made ours using turned wooden parts.
  13. Craft Cotton Candy for A Doll - Be on the lookout for pastel shaded cotton for this craft. It is frequently sold at Dollar General during the Easter Holiday Season.
  14. Craft contemporary doll groceries using ads and coupons - Hostess cakes, Snowballs, Twinkies, Bird's Eye frozen veggies, Chips Ahoy, Famous Amos Cookies etc...
  15. DIY Basmati Rice for American Girl Dolls - recycle, cut and sew smaller versions of burlap rice bags for your doll's kitchen or restaurant.
  16. Bread Loaves Sewn from Socks - learn to reverse applique for this project...
  17. How to make pasta boxes for a doll pantry - These have tiny windows and sculpted, oven-bake pasta inside each one!
  18. DIY Doll's Farmer's Market Stand - Fresh Summer fruits and vegetable for doll play and display. (These varieties are typically found in the Mid-Western U.S.)
  19. How to craft white sugar bags for a doll's pantry or store shelves
  20. DIY Doll Dairy for Play - See how I made milk containers, butter sticks and cheeses.

Doll Sized Grocery Related Playsets: Crafts and Reviews:

Food Related Crafts for Child Sized Play Kitchens:

  1. Craft Jams & Jellies For A Pretend Kitchen - You will need to collect baby food jars for this craft.
  2. Papier-mâché Two Delicious Pretend Pies! - yum, these are so adorable.
  3. Crafting burlap coffee bean bags and purchasing a burr mill... - an easy beginner sewing project
  4. Crush and Craft Pretend Potatoes - a student's first introduction to paper mache craft...
  5. How to sew a gathered canopy for a child's market stall - dressing the nursery furniture to match your child's decor
  6. Chalkpaint a Wooden Slat Basket - very nostalgic and sweet chalkpaint project, you will need to acquire a wooden basket from resale or garage sales
  7. Refinishing a Table and Chairs for a Child's Kitchen - how I refurbished unwanted childhood table and chairs for our playroom
  8. How to Clean a Vintage Copper Coal Scuttle (for dramatic play) Learn something new about something really old...
Printables for DIY Doll Grocery Store Products:
  1. Printable Candy Bar Wrappers by kathy grimm - candy wrapper covers duty free, in color for doll play
  2. 30 Vintage Labels for Crafting Doll Foods - for making your own vintage doll play groceries in color
  3. Soda Fountain Clip Art Pages (3) - DIY a 1950's Americana Retro Diner (or kitchen) for doll play, journal, or scrapbook pages
  4. Bakery & Deli Food Clip Art - paste these on a shelf inside your doll's bakery!
  5. Fancy Chocolates Clip Art Pages (4) - would be cute for Valentines or Mother's Day cards ect...
  6. Strawberry, raspberries and bread graphics for games and number books - these are in greyscale and black/white
  7. Pumpkin, pumpkin pie, and turkey graphics - for games and number books, all in black and white
  8. Antique honey jar labels for your doll grocery collections...
  9. Templates for Bakery Boxes - Both Barbie and American Girl sizes
Because the crafts here are multiplying, I have decided to move our new holiday/festival related food crafts to their own indices. I will also include literary selections and additional interesting materials from other websites under the following similar topics as well: HalloweenThanksgiving ChristmasNew Year's DaySaint Valentine's DaySaint Patrick's DayEaster and The U.S. American Federal Holidays (Visitors will need to check for current updates to these categories at each unique Index in the future.)

      I've included the cutest vintage grocers windows here for those of you who would like to design a food mart or grocery store for your dolls. Paste these on to the outside of a shoe box after wrapping it with white butcher paper. Then decorate the interior of the box with shelves of food. We have plenty of printables above for this. Don't forget to cut an opening for the entrance/exit inside of your doll shoebox.

Print these restored, vintage grocery store windows from 1930 for crafts.
 
Dramatic Play in The Grocery Store:
Fun Doll Grocery Store Video at YouTube:

Sunday, February 13, 2022

A 'Heartistic' Tale

Printable Valentine candy heart story.

A Heartistic Tale
by Myrtle Koon Cherryman

       It was a Valentine Party and the little heart-shaped candies in the bon-bon dish began to rattle around fretfully. Presently one of them said, with a very determined expression: "I propose we have a Union, and strike for something or other."
       "What, for instance?" asked a merry looking heart.
       "For less eating on the part of people going to parties," said another one who looked very discontented."If there were a law against eating we should last longer."
       "But how could we have a Union?" said another heart, looking very much surprised.
       "And what would we call ourselves?" asked another; looking mischievous and winking one eye.
       "We would be called The Heart Association. I've heard of some such thing," put in another smartly, cocking its eye toward the ceiling.
       "Oh how lovely" exclaimed the enthusiastic one, rolling both eyes heavenward, with a soulful look.
       "Yes," said the highbrow one, whose eyes were almost shut from reading too many candy mottoes. "And we could have a slogan - I know a splendid one: 'Heart for Heart's Sake."
       "But look!" exclaimed a scared-looking heart. "We can't do anything now. The party is coming, eaters and all."
       Then they all turned toward the one who had proposed the strike, and someone said: "Well, you're looking pretty down-in-the-mouth!"
       "That's where we'll all be, in a few minutes,'' said the heart, looking down-in-the-mouthier than ever.

Monday, February 11, 2019

How to Make Felt Roses for A Doll

Our "Cheyenne Rose" Magic Attic Doll
models with the roses.

"A rose by any other name would smell as sweet"
William Shakespeare's Romeo and Juliet

       Every little doll loves to receive roses for Valentine's Day, especially if these flowers are made from felt! Felt roses are not only soft, but they also have a very long shelf life! 
       Here you can see that I chose to craft roses from white, red and hot pink felt for our Doll's Valentine Party. But you could choose to make your own pretend roses from any color of felt you like such as: peach, coral, buff pink, ivory, yellow or maybe even lavender.
       You will also need a selection of green felts for the petals of your roses. I chose to use three variations of green.
       Clip chenille stems in advance to three or four inches in length. I used both fuzzy chenille stems and sparkly metallic green stems because this is what I already had on hand. 
       You may need to purchase a new, sharper pair of scissors in order to the complete the craft. Felt has a tendency to quickly dull scissor blades. Duller scissors could make this craft seem somewhat tedious.

Step-by-Step Instructions:
  1. Cut petal shapes from your felt. You can see that my petals are arched at one end and flat on the opposite end. Cut many of these shapes in advance prior to the gluing process for whatever color of flower you prefer. For an 18inch doll you will need to make the petals approximately 3/4 to 1inch in diameter. Center the tip of your chenille stem on the felt petal with a small amount of hot glue beneath it.
  2. Press together the sides of the petal around the chenille tip and hold it in place until the glue dries. This is a quicker process with hot glue but not a safe one for very young children. If you are too young to use a hot glue gun, you may use tacky white glue and hold the petals a little longer as you go. 
  3. Next you will need to squeeze a bit of glue on either side of the first petal in order to stick the next petal around the edges of the first. Hold the two in place until the glue dries.
  4. Now proceed to add more petals around the circumference of the growing blossom. 
  5. You can add as many petals as you like, depending on the size you would like your rose to become. Rosebuds are obviously smaller with fewer petals.
  6. When you have finished making your felt rose, you can then decide if you would like to glue on a few green felt leaves as seen in the photos below. If you are using tacky white glue to make the rose, wrap a tiny rubber band around the thickest part of the flower to hold all of the drying petals in place until they are dry.
More About Crafting Candy Roses:
More About Crafting Flowers for Dolls:
More About Fabric Rose Crafts:
Left, cut rose petals from hot pink and red felt. Center, Clipping the fuzzy edges of the felt rose stem and adding the
 leaves of the rose. Right, the white felt roses as seen from the top.
Above are the felt roses from a variety of angles. 
Left, a green vase of felt roses. Center and Right, Our lovely Magic Attic, Rosa doll holds a bouquet of felt roses.